4. Commands Use Paths
When you execute commands from
the command prompt, the system needs to know where to find the command.
It first tries to execute it in the current path and then looks for it
in predefined paths. A path identifies a location on the hard drive.
As an example, when you first launch the command prompt, it will start in the C:\Users\%username% path by default, where %username% will be replaced with the username you're logged on with. (If you launch it with Run As Administrator, it will start in the c:\%windir%\System32 folder.) If you execute a command (such as IPConfig),
it will look for it in the current folder first. If it isn't located in
the current folder, it will search the folders identified in the
predefined paths. If the command isn't located in any of the known
paths, you'll see an error. For example, if you type x and press Enter, you'll see this error:
'x' is not recognized as an internal or external command, operable program or batch file.
NOTE
Documentation
commonly uses the terms folders and directories interchangeably. In the
early DOS days, they were almost always called directories. When the
Windows GUI came out, they were referred to as folders because the icon
looks like a folder. It matched a metaphor users could easily
understand; that is, files were placed in folders in the real world and
they are placed in folders in Windows. However, there is no difference
between a folder and a directory; both terms mean the same thing.
If the system didn't have
predefined paths, it would search only the current folder, and commands
would be a lot harder to enter and execute. However, the system starts
with several predefined paths. On my system, this path includes all of
these directories:
You can execute the PATH or the SET PATH
command to view the predefined path for your system. Some applications
will modify the path, and you can also modify the path yourself.
4.1. Identifying Executables
When you execute the SET PATH
statement, you also see something else valuable: a list of file types
that are known to be executables. Some files can be executed or run,
while others are simply data files used by executables.
So what is an executable? It is any file that can be run. For example, you can run the ipconfig.exe file because it's an executable. If a file named IPConfig.txt existed, it could not be executed. The extension .exe identifies the first file as an executable, whereas the extension .txt identifies the second file as a text file.
Known executables are defined by the system variable PATHEXT (path extension). The path extensions, or file extensions, known to be executables are listed as on my system: .COM, .EXE, .BAT, .CMD, .VBS, .VBE, .JS, .JSE, .WSF, .WSH, and .MSC.
So when you execute the IPConfig command, it searches for a file that starts with IPConfig and ends with one of the identified known executable extensions. Since IPConfig ends with .EXE, the IPconfig.EXE command is located and executed.
4.2. Modifying the Path to Executables
If you need to modify the known paths of the system, you can do so with either the SET PATH statement or via the GUI. As an example, you may have an executable in the C:\App path, and you may want this path included in the Path variable. You can use one of these methods.
4.2.1. SET PATH Command
Before modifying the path, take a look at what it currently is with the following command:
SET PATH
You can use the SET PATH statement to modify the path to include the C:\App folder with the following command.
SET PATH = C:\App
After you modify the path, view the current path by executing SET PATH again. You'll notice that there are two paths currently set—the original default path and another PATH = C:\App path that you just created, as shown in code Listing 1 and Listing 2. Listing 1 is what appears before executing the Set Path = C:\AppListing 3.2 shows what appears after executing the statement. statement.
Example 1. Output of the Set Path statement
Path=C:\Windows\system32;C:\Windows;
C:\Windows\System32\Wbem;
c:\Program Files (x86)\Microsoft SQL Server\90\Tools\binn\;
C:\Windows\System32\WindowsPowerShell\v1.0\;
C:\Windows\System32\Windows System Resource Manager\bin;
C:\Windows\idmu\common;C:\Program Files\Windows Imaging\
PATHEXT=.COM;.EXE;.BAT;.CMD;.VBS;.VBE;.JS;.JSE;.WSF;.WSH;.MSC
|
Example 2. Output of the Set Path statement after appending the path
Path=C:\Windows\system32;C:\Windows;
C:\Windows\System32\Wbem;
c:\Program Files (x86)\Microsoft SQL Server\90\Tools\binn\;
C:\Windows\System32\WindowsPowerShell\v1.0\;
C:\Windows\System32\Windows System Resource Manager\bin;
C:\Windows\idmu\common;C:\Program Files\Windows Imaging\
PATH = C:\App
PATHEXT=.COM;.EXE;.BAT;.CMD;.VBS;.VBE;.JS;.JSE;.WSF;.WSH;.MSC
|
NOTE
This behavior of the set path statement is different in Windows 7 than it was in previous versions of Windows. In previous versions, if you used the Set Path = C:\App statement, it would overwrite the previous path and only C:\App would be included in the path. However, when you execute the Set Path statement in Windows 7, it appends, not replaces, the current path.
This modified path will be
modified for only the current session. In other words, if you exit the
command-prompt window, launch it again, and enter SET PATH, you'll see only the original system default path.
4.2.2. Modifying the Path with the GUI
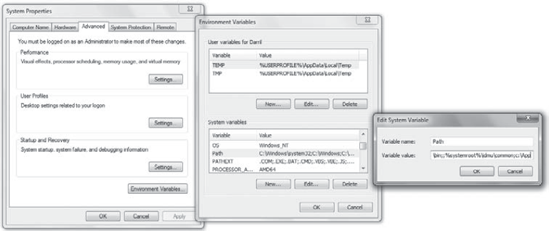
Click Start, right-click Computer, and select Properties. Select Advanced System Settings. Click the Environment Variables button. Scroll to the Path in the System Variables pane. Select Path and click Edit. Scroll to the end of the text in the Variable Value text box. Warning:
Make sure you separate each path with a semicolon. If the semicolon is
omitted, the path will be interpreted as a part of the previous path and
the previous path will no longer be accessible. Enter
a semicolon (;) and then the path you want added, as shown in the
following graphic. Click OK to dismiss all of the windows.
If you launch the command prompt, you'll see that the new path has been appended to the system path.
|
4.2.3. Changing the Current Path with CD
As I mentioned earlier, when you open the command prompt, the default path is C:\Users\%username%, with %username% being replaced with your actual user name. For example, if I logged on with a user name of Darril, the default path would be c:\Users\Darril.
You can change the path with the CD command (short for change directory).
CD \ will take you to the root of the current drive.
CD .. will take you up one folder.
CD folderName will take you into the folder specified as long as the folder is in the current folder.
CD \1st folder\2nd folder\3rd folder will take you to the third folder, as long as the path is valid.
Launch
a command prompt and note the current path. Unless you launched it
using Run As Administrator, it will point to a directory with your name
in the C:\Users directory. Type CD .. (CD, space, and two dots), and press Enter. This will take you up one folder to the C:\Users folder. Type CD \ and press Enter. This will take to you the root of C:\. Type in Dir and press Enter to view the contents of the root. Type the following command to change the directory to the windows\sytem32 folder: CD \windows\system32
Note that the backslash (\) before windows causes the path to start from the root of the C:\ drive. Type in DIR and press Enter to view the contents of this folder. Press the up arrow twice to recall the CD \ command, and press Enter. You'll be returned to the root. Enter the following command to change to the system32 folder using the windows variable. CD %windir%\system32
|
4.2.4. Changing the Current Path with Windows Explorer
A neat feature that's available
with the command prompt is the ability to use drag and drop from Windows
Explorer to copy the path. It doesn't change the directory, but you can
use it to make things a lot easier.
This feature is not available when you run the command prompt using Run As Administrator.
If a command prompt is not already open, launch a command prompt. Launch Windows Explorer and browse to the Libraries\Documents\My Documents folder. Position Windows Explorer and the Command Prompt window side by side. Click
My Documents in Windows Explorer, drag it to the Command Prompt window,
and release it. You'll notice that the path is now displayed in the
window. Your display will be similar to the following graphic.
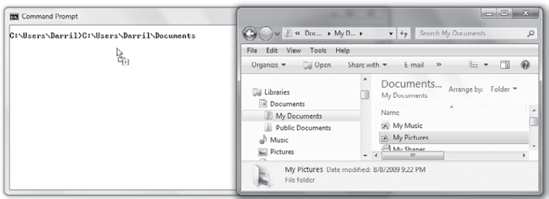
In the figure, the user name is Darril, so the default path of Darril's Libraries starts as C:\Users\Darril and the actual path to the Libraries\Documents\My Documents folder is C:\Users\Darril\Documents. When the My Documents folder is dragged and dropped into the Command Prompt window, the path is typed out. However, you're not finished yet. Use the left arrow (or the Home key) to position your cursor to the left of all the text. Type CD and a space to modify the command, and press Enter. Your path will be changed to the equivalent of the My Documents folder.
|
|
The previous exercise showed
how you can easily change the path using Windows Explorer, but you can
also launch the command prompt to any folder's location from Windows
Explorer. Press the Shift key, right-click the folder, and select Open
Command Window Here. The command prompt will be launched with the
directory set at the same folder as Windows Explorer.
|
|
5. Copy and Paste with the Command Prompt
At first glance it looks like
you can't copy and paste to or from the command prompt. It doesn't work
exactly as it does in Windows, causing a lot of people to assume you
can't, but it is possible.
You can actually copy and paste
by default, but enabling the QuickEdit mode makes it a little easier.
This can be valuable when you are testing commands that you want to
paste into a script file.
Open a Command Prompt window, type in Notepad,
and press Enter. This will launch an instance of Notepad that you'll
use to copy and paste text to and from the Command Prompt window. Type in ping localhost in the Notepad window. Press Ctrl+A to select the text and Ctrl+C to copy it. Click
in the Command Prompt window. Right-click and select Paste. You'll see
the command pasted into the Command Prompt window. Press Enter and the
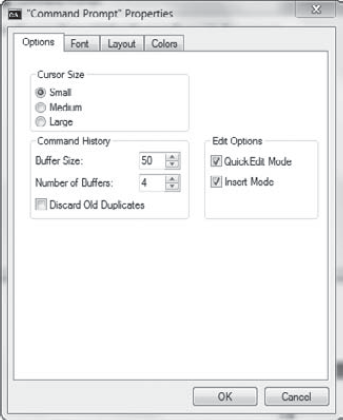
command will execute. Right-click the command prompt title bar and select Edit => Mark. Use your mouse to highlight the output from the ping command. When the text has been highlighted, press Enter to copy it to the clipboard. Click in Notepad and press Ctrl+V to paste the output into the text file. Enable QuickEdit Mode with these steps: Right-click the title bar and select Properties. The Options tab is selected by default. Select the check box next to QuickEdit Mode, as shown in the following graphic. Click OK.
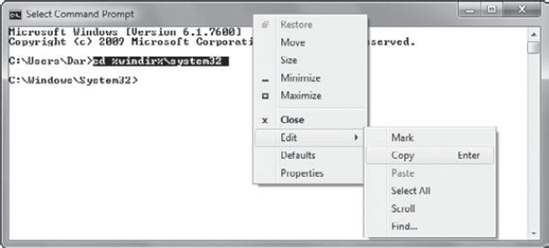
Now
you can select text within the Command Prompt window without selecting
Mark. Simply use the mouse to select the text and press Enter. The
following graphic shows how text can be selected by highlighting it and
using the menu to select Edit => Copy. It also shows the shortcut Enter, or you can simply press the Enter key.
|
6. Capturing the Output
It's common to need to
capture the output of commands executed at the command prompt. This can
easily be done by redirecting the output to a text file using the > symbol.
As an example, you may want to
document the current status of all of the services in a text file so
that you can review them later. The command to view a list of all the
currently running services is
sc query
If you execute this at the
command prompt, you'll see that it quickly scrolls off the screen.
However, you can redirect the output to a text file by modifying the
command to this:
sc query > SvsStat.txt
You can then view the file in Notepad with the following command:
notepad SvsStat.txt
Of course, you can also
redirect the file to any location by including the path in the filename.
The following command creates and stores the file in the C:\Data folder:
sc query > C:\Data\SvsStat.txt
