3. Managing BIOS
Every PC today has a basic
input/output system (BIOS). It's built into the motherboard and usually
as some type of erasable programmable read-only memory (EPROM).
BIOS is needed to help
the processor locate the basic components of a system and find the hard
drive. Once the hard drive is located, a Windows 7 system will use the
BCD store to start the boot process and ultimately load Windows 7.
The BIOS program includes
many different settings that can be manipulated to modify how some of
the hardware is used. A common reason to go into the BIOS is to change
the boot order or enable the system to boot from different components.
For example, a system may not be configured to boot from the DVD drive, a
USB drive, or the NIC. The BIOS would include settings that can enable
these selections and to change the boot order.
Just as any other program
can be upgraded, the BIOS can be upgraded too. If an update is available
for your BIOS, you can download the update from the manufacturer and
apply it to your system. This is commonly referred to as flashing the
BIOS.
The common reason to flash your
BIOS is that a capability is not available in the current program. For
example, a processor may have the virtualization capability available,
but the BIOS may not have the ability to enable virtualization. If a
newer version of the BIOS is available, you can download it, flash your
BIOS, and you'll have the capability.
4. Managing Devices
Beyond memory and the
disks, you may need to manage and troubleshoot issues with other devices
installed on a system. The process of installing devices is often
automated using the driver store, but if you need to do any manual
intervention, the primary tool you'll use is Device Manager.
Devices are installed in two steps: staging and installation.
Staging During the staging step, all of the driver files are staged in the driver store. Drivers can be staged at any time (even if the device is not present in the system). The driver store is located at %systemroot%\ system32\DriverStore.
Installation
The Plug and Play (PnP) process detects the new device and installs the
driver from the driver store. If the driver is not in the store,
Windows Update is checked and the driver is downloaded, staged, and then
installed. If PnP detects the device but can't find a driver, the Add
New Hardware Wizard will launch.
When installing drivers
from third-party sources (such as the installation CD provided with the
hardware), the drivers will be added to the driver store and then
installed.
Although Windows 7 will check Windows Update for drivers not in the driver store by default, this can be modified. Figure 5
shows the default Device Installation Settings page. You can get to
this page by right-clicking Computer, selecting Properties, selecting
the Hardware tab, and clicking the Device Installation Settings button.
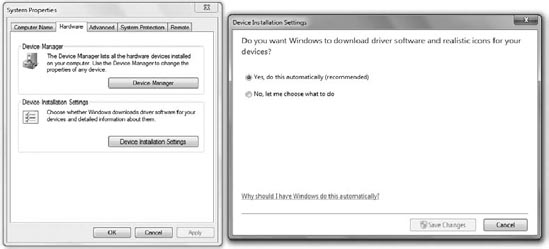
This feature also downloads
icons of your hardware devices that you see in the Devices And Printers
page. Although this setting will allow drivers to be downloaded
automatically when a new device is initially added to your system, it
will not update the drivers for installed devices if drivers later
become available.
The primary tool you'll use
to manage devices and device drivers, including updating drivers for
existing devices, is the Device Manager tool.
4.1. Using Device Manager
You can easily use Device Manager
to check on the status of devices installed on the system and for
updating device drivers. In this section, you'll learn about Device
Manager, rolling back drivers, and signed or trusted drivers.
You can access Device Manager using several different methods. For example, you can click Start =>
Control Panel and enter Devices in the Control Panel search text box.
Several links will appear. Click any of them labeled Device Manager.
Figure 6
shows Device Manager with the Realtek PCIe network interface card in
the Network Adapters section disabled. This shows how easy it is to
identify problems with Device Manager. If there are issues with any
devices in Device Manager, the related sections will be expanded and the
devices will have an extra icon.
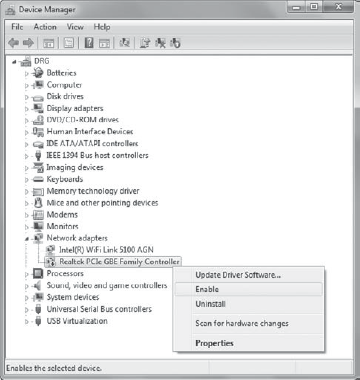
In the figure, the Realtek NIC
has a small down-arrow icon to indicate it is disabled. When the device
is disabled, the Disable choice changes to Enable, and it can be enabled
again by right-clicking it and selecting Enable.
If you suspect a
device is causing problems in your system, you can use Device Manager to
disable it. This ensures it isn't using any resources.
Device Manager will display a
warning icon if there are any issues with the device. A common problem
with devices is related to the driver, and a warning icon usually
indicates the driver should be reinstalled.
4.1.1. Understanding Signed Drivers
Microsoft has a process in place that verifies device drivers. Drivers are submitted by manufacturers to the Windows Hardware Quality Labs (WHQL).
WHQL performs a series of compatibility tests on the driver, and if the
driver passes the tests, the driver is signed and is referred to as a signed driver or a trusted driver.
WHQL issues a
certificate and associates the certificate with the driver. The
certificate provides the signature for the driver and assures you that
it has been tested and verified by Microsoft. Signed drivers are then
made available via the Windows Update site.
Hardware developers can sign
their drivers without submitting them to WHQL. A certificate is
purchased from a Certificate Authority (CA) and associated with the
driver. If the CA is trusted by the end user, the driver is considered
trusted. This provides proof that the driver being installed has not
been corrupted with malware.
Although signed drivers
will help ensure a more stable system, unsigned drivers can also be used
in a system. An unsigned driver could have been created by a reputable
company, but it could also have been created or modified by an attacker
who wants to infect a system. Only members of the Local Administrators
group can install an unsigned or untrusted driver.
NOTE
If the driver lacks a valid
signature or the driver has been altered, Windows 7 displays a warning
prompt indicating that the file does not have a valid digital signature,
and an administrator must approve the installation. Only administrators
can approve the installation of an untrusted driver.
In versions of Windows
before Windows Vista, you could configure a driver-signing policy to
block the installation of unsigned drivers, warn that the driver is
unsigned, or ignore the warning. Windows 7 supports only the Warn
option, so each time an unsigned driver is being installed, Windows will
always warn that it is untrusted.
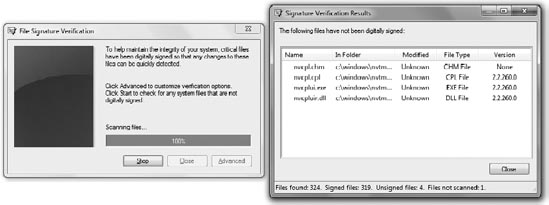
The File Signature Verification tool (sigverif.exe)
can be used to scan your system and identify any unsigned drivers in
it. You can start it by clicking Start, typing sigverif in the Search
box, and pressing Enter. Click Start, and it will scan the drivers in
your system.
Figure 7
shows the results of running the File Signature Verification tool. It
identified four unsigned files on this system. These are nVidia graphics
files. Again, just because a file is not signed doesn't mean it isn't
valid, but only that it doesn't include a digital signature from a
trusted certificate authority.
NOTE
Signed driver files
are also prevented from being infected. If the driver becomes infected
with malware, it will no longer match the data in the certificate, and
the signature will be recognized as invalid.
If there aren't any unsigned
drivers, sigverif will return a dialog box that indicates that all your
files have been scanned and verified as digitally signed. Sigverif will
also create a log located in your Documents folder named sigverif.txt that you can review at any time. It lists all the files that have been scanned.
4.1.2. Updating a Driver
Drivers are often updated by
the manufacturer because of bugs or to add capabilities. Manufacturers
then submit them to WHQL for verification, and ultimately they are
released on the Windows Update site.
You can update the drivers from Windows Update using the following steps:
Right-click the device in Device Manager, and select Update Driver Software.
Select Search Automatically For Updated Driver Software.
The
Windows Update site will be contacted. If an updated driver is
available, it will be downloaded, and you'll be led through the process
to update it.
If the driver has not
completed the WHQL process, you can download it from the manufacturer.
Often, a manufacturer will include a self-extracting executable that you
can launch to complete the installation.
Other times, you'll download
the driver and extract it to location on your system. You can then
update drivers using Device Manager with the following steps:
Right-click the device in Device Manager, and select Update Driver Software.
Select Browse My Computer For Driver Software.
Click Browse to browse to where you extracted the driver files, and click Next.
The wizard will locate the driver and lead you through the process of installing it.
If the driver is not signed, you'll see a warning dialog box indicating it isn't signed and asking if you want to continue.
4.1.3. Rolling Back a Driver in Device Manager
If you've updated a driver
and found that it's an incorrect driver or that it's causing problems on
the system, you can roll back the driver. This will uninstall the
current driver and reinstall the previous driver.
|
You can roll back only to the
previous driver. If you update driver 1 to driver 2 and then update
driver 2 to driver 3, the best you can do is roll back to driver 2. You
cannot roll back two versions of a driver. As a best practice, if you
install a driver that isn't what you want, you should roll it back
before installing another one. This allows you always to get back to the
original driver.
|
|
Figure 8
shows the properties of a driver that has been updated. You can access
this page by right-clicking the device in Device Manager and selecting
Properties. If a driver hasn't been updated, the Roll Back Driver button
is dimmed and cannot be selected.
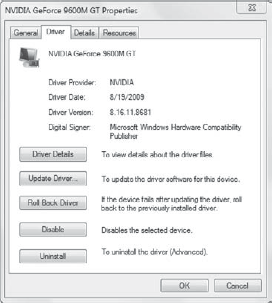
To roll back the driver,
click the Roll Back Driver button. You'll be prompted with an Are You
Sure dialog box, and when you click Yes, the current driver will be
removed and the previous driver will be installed.
