There are
thousands of Group Policy settings that can be configured for users and
computers. There's no way that we'll cover them all, and that's not the
goal in this section.
One of the goals of this book
is to cover the objectives in the 70-685 and 70-686 exams. Thus, in this
section I've used these objectives as a guide to help determine what
Group Policy settings to include. The settings included in this section
are
1. Managing User Profiles with Group Policy
As a reminder, a local profile
is created on a system when a user logs on. Normally the profile is
created from the Default Users profile, and then, as the user makes
changes to the environment, the user's profile is modified to retain
these changes.
If a roaming profile is
used, the profile is retrieved from a server and copied down to the
client's computer. Changes are copied back to the server when the user
logs off unless the profile is configured as a mandatory profile. When a
mandatory profile is used, changes can be made locally, but the changes
are not copied back to the server, and the next time the user logs on,
the local profile is again overwritten by the mandatory profile.
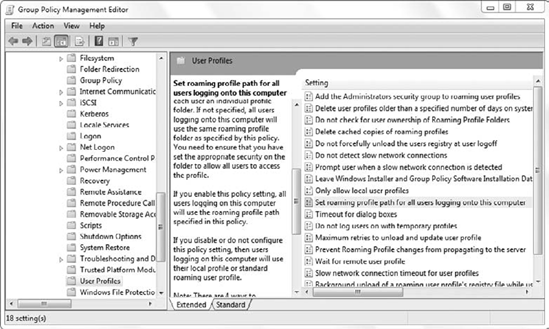
Figure 1
shows the User Profiles node, which includes several settings that can
modify the default behavior of user profiles. You can access these
settings from Computer Configuration => Policies => Administrative Templates => System => User Profiles.

These are some of the key User Profile settings in this node:
Delete User Profiles Older Than A Specified Number Of Days On System
This can be useful to
reclaim space consumed by older profiles. If this setting isn't enabled,
older profiles will remain on the system until they're manually deleted
by an administrator.
Delete Cached Copies Of Roaming Profiles
Roaming profiles are
downloaded to the local system each time a user logs on. When a user
logs off, the changes are uploaded. This setting will cause the local
version of the profile to be deleted each time the user logs off.
Only Allow Local User Profiles
This can be used to prevent the use of roaming profiles on specific computers.
Set Roaming Profile Path For All Users Logging Onto This Computer
This allows you to
set the roaming profile path for all users logging onto the computer.
This is much more efficient than setting the roaming profile on a
per-user basis using Active Directory Users and Computers.
Prevent Roaming Profile Changes From Propagating To The Server
This setting is similar
to creating a mandatory profile because the profile cannot be changed.
When a user logs off, changes to the profile are not merged to the
server, so when the user logs on again, they have the same profile each
time.
Some of the User Profiles settings in the User Configuration node can
also be used to modify the default behavior. These are located in the
User Configuration => Policies => Administrative Templates => System => User Profiles node.
Exclude Directories In Roaming Profile
When this setting is
enabled, you can list the directories that should not be included in the
roaming profile. This can be used to limit the size of the profile and
the amount of bandwidth needed to download it.
Limit Profile Size
Because the profile includes the Documents
folders, it can become large. This setting allows you to set a maximum
size of either local profiles or roaming profiles. You can include a
custom message to the user when the maximum size has been exceeded.
2. Logon and Startup Scripts
You can use Group
Policy to run scripts automatically on computers. You have the option of
configuring the scripts to run during one of the following four events:
User logon
User logoff
Computer startup
Computer shutdown
One of the common ways a
script is used is to show a logon banner. Logon banners are often used
to remind users of acceptable usage policies or other security-related
policies. As an example, the following script could be used to show a
message box when a user logs on:
msgbox "Usage of this computer is subject to monitoring at all times."
 & vbcrlf & vbcrlf &
"If you aren't an employee of Acme corporation you shouldn't be using
this computer. Log off now.", vbExclamation, "Usage Policy"
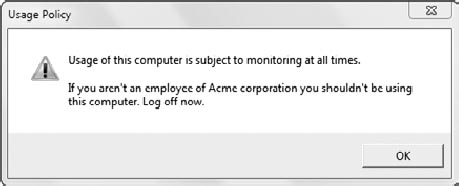
You can create this script in Notepad. You should enter it as a single line with no carriage returns and save it with a .vbs extension. The msgbox Visual Basic script command creates a message box, and this script creates the message box shown in Figure 2.

The first set of text (up to Log off now) identifies what will be displayed as the text. The & vbcrlf string represents a carriage return and line feed to start a new line; vbExclamation indicates that the warning triangle with an exclamation point icon should be included. The last set of text, Usage Policy, is used as the title of the message box.
|
You can also configure
messages that will be presented when users attempt to log on with the
Interactive Logon: Message Text For Users Attempting To Log On and
Interactive Logon: Message Title For Users Attempting To Log On Group
Policy settings. These are available in the Computer Configuration => Windows Settings => Security Settings => Security Options node.
|
|
Launch Notepad by clicking Start, typing in Notepad, and pressing Enter. Enter the following text in Notepad: msgbox "Usage of this computer is subject to monitoring.", vbInformation, Time
vbInformation will display an information icon, and Time is a variable that will display the current time. (If
you cut and paste this from the book's PDF file, the copied quote
characters will cause this to fail. Delete the quotes and retype them
within the Notepad document.) Press
Ctrl+S to save the file. Browse to a location on your hard drive where
you can save the file. You can name it whatever you like but you must
save it with the .vbs extension. Launch
Windows Explorer and browse to the location of the script you created.
Double-click it to ensure it runs, and correct the script if there are
any typos preventing it from running successfully. Right-click the script and select Copy. You will paste this into another folder in a later step. Launch the Group Policy Management console and expand the domain. Right-click the Default Domain Policy and select Edit. Browse to the User Configuration => Policies => Windows Settings => Scripts (Logon/Logoff) node. Right-click
Logon and select Properties. Click Show Files. Right-click within the
Windows Explorer window, and click Paste to paste your script into this
folder. Close Windows Explorer. Click
Add. Click Browse. Select the script you pasted into this folder and
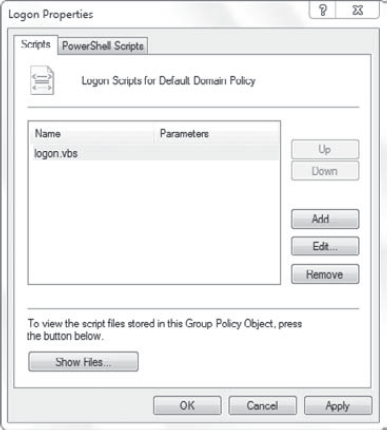
click Open. Click OK, and your display will look similar to the
following graphic.

Click
OK and close all open windows. At this point, each time a user logs on
to the domain, this script will run and display the message box.
|
Although this exercise showed
how a basic script can be created and configured to run when a user logs
on, you can use the same procedure to configure any scripts to run. When it comes to
scripting, there are almost no limitations. If you can't accomplish a
task another way, you can almost always accomplish it with a script.
It is possible to have more
than one script configured to run for any of the four events (logon,
logoff, startup, and shutdown). By default, multiple logon and logoff
scripts will run simultaneously, though you can change this with Group
Policy.
In contrast, multiple
startup and shutdown scripts are configured to run asynchronously by
default, but you can also change this. When scripts are configured to
run asynchronously, a script will not start until the previous script
has completed.
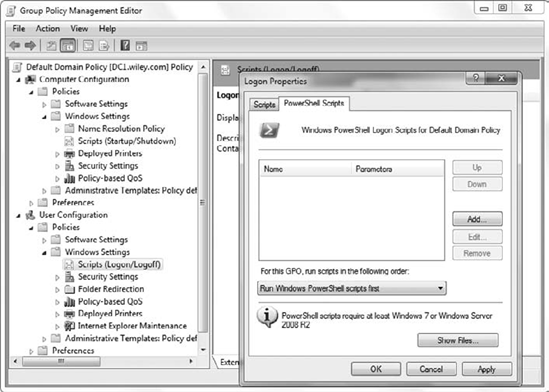
In addition, with Windows 7 and Windows Server 2008 R2, you can include PowerShell scripts with Group Policy. Figure 3
shows the GPMC with the Logon Properties page and the PowerShell
scripts selected. This looks the same in the Logon, Logoff, Startup, and
Shutdown Group Policy Properties pages.

One difference with
PowerShell scripts is that you can configure whether PowerShell scripts
should be run first or last. This can be useful if multiple scripts are
running and they conflict with one another.