Logo
programming4us
programming4us
programming4us
programming4us
Home
programming4us
XP
programming4us
Windows Vista
programming4us
Windows 7
programming4us
Windows Azure
programming4us
Windows Server
programming4us
Windows Phone
 
programming4us
Windows 7

Microsoft Excel 2010 : Protecting and Securing a Workbook - Locking or Unlocking Worksheet Cells

- Free product key for windows 10
- Free Product Key for Microsoft office 365
- Malwarebytes Premium 3.7.1 Serial Keys (LifeTime) 2019
5/27/2014 1:01:20 AM
To prevent accidental changes to your data, you can lock worksheet cells. When you lock selected cells, you cannot make changes to them until you unlock them. When you lock cells, users can unlock the data and make changes unless you add password protection to the worksheet. For security or confidentiality reasons, you might want to hide formulas from view. If so, you can hide or unhide them using the Protection tab in the Format Cells dialog box.

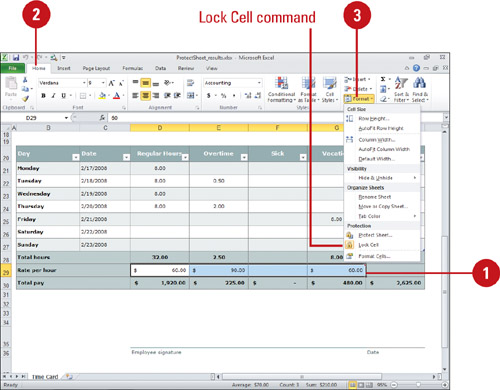
Lock or Unlock Worksheet Cells

1. Select the cell or range you want to lock or unlock.

2. Click the Home tab.

3. Click the Format button, and then click Lock Cell to lock or unlock the current selection.

This toggle command turns on or off the Locked check box on the Protection tab in the Format Cells dialog box.

Hide or Show Formulas

1. Select the cell or range with the formulas you want to hide or show.

2. Click the Home tab.

3. Click the Format button, and then click Format Cells.

4. Click the Protection tab.

5. Select the Hidden check box to hide formulas or clear it to show formulas.

6. Click OK.

Other -----------------
- Microsoft Excel 2010 : Protecting and Securing a Workbook - Protecting a Worksheet - Apply a Password to a Worksheet
- Microsoft Excel 2010 : Protecting and Securing a Workbook - Inspecting Workbooks
- Working in the Background : WORKING WITH THE NETWORK LIST MANAGER
- Working in the Background : IMPLEMENTING APPLICATION RESTART AND RECOVERY
- Working in the Background : PROVIDING POWER MANAGEMENT (part 2) - Detecting a Change in Monitor State
- Working in the Background : PROVIDING POWER MANAGEMENT (part 1) - Getting the Power Management State
- Automating Windows 7 Installation : Customizing Images Using Deployment Image Servicing and Management (part 3) - Servicing the Operating System in an Image , Committing an Image
- Automating Windows 7 Installation : Customizing Images Using Deployment Image Servicing and Management (part 2) - Mounting an Image , Servicing Drivers in an Image
- Automating Windows 7 Installation : Customizing Images Using Deployment Image Servicing and Management (part 1) - Viewing Information about an Image with DISM
- Automating Windows 7 Installation : Applying an Image Using ImageX
 
 
Top 10
- Microsoft Visio 2013 : Adding Structure to Your Diagrams - Finding containers and lists in Visio (part 2) - Wireframes,Legends
- Microsoft Visio 2013 : Adding Structure to Your Diagrams - Finding containers and lists in Visio (part 1) - Swimlanes
- Microsoft Visio 2013 : Adding Structure to Your Diagrams - Formatting and sizing lists
- Microsoft Visio 2013 : Adding Structure to Your Diagrams - Adding shapes to lists
- Microsoft Visio 2013 : Adding Structure to Your Diagrams - Sizing containers
- Microsoft Access 2010 : Control Properties and Why to Use Them (part 3) - The Other Properties of a Control
- Microsoft Access 2010 : Control Properties and Why to Use Them (part 2) - The Data Properties of a Control
- Microsoft Access 2010 : Control Properties and Why to Use Them (part 1) - The Format Properties of a Control
- Microsoft Access 2010 : Form Properties and Why Should You Use Them - Working with the Properties Window
- Microsoft Visio 2013 : Using the Organization Chart Wizard with new data
 
programming4us
Windows Vista
programming4us
Windows 7
programming4us
Windows Azure
programming4us
Windows Server