2. Applying Themes to Your Diagrams: Part 2
Now
that you know the basics of applying a theme, you are ready to explore
more sophisticated ways to use themes to differentiate among various
shapes on a page. The exercise in this section will walk you through one
technique for applying different colors to different shapes.
To get started, you will
manually apply a fill color to selected shapes. However, the key to
taking advantage of the color schemes that are built into themes is to
restrict your choices to theme colors.
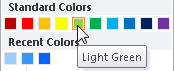
To see the distinction between theme colors and other colors, look more
closely at the color picker menu shown in the following graphic.
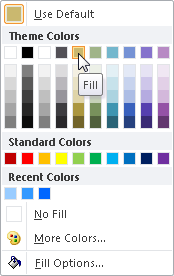
Notice that the color
choices are grouped into Theme Colors and Standard Colors. If you choose
a fill color from the Theme Colors section, the fill in your shape will
change color as you change themes. However, if you pick a Standard
Color or use the More Colors option, you have locked the color of your
shape; it will not be affected by themes.
You can use this knowledge
to your advantage: set fixed colors in shapes you always want to look
the same; set theme colors in shapes you want to look different as you
switch themes.
The leftmost columns in
the Theme Colors section contain color choices for five diagram
attributes. The columns from left to right are for White, Black,
Background, Line, and Fill. Below the primary color for each column are
five color shades, both darker and lighter than the color at the top of
the column.
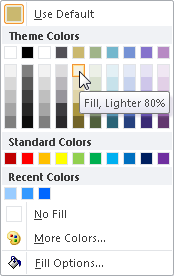
Pointing to any color box
will display a tooltip that includes the column function. For example,
in the previous graphic, the menu on the left shows the tooltip when you
point to the top of the Fill column. The menu on the right shows the
cursor pointing to a lighter shade of the fill color.
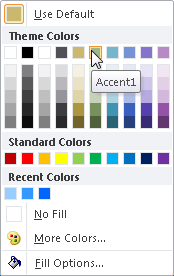
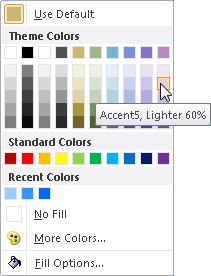
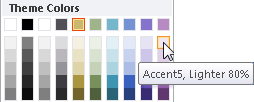
The
following graphic shows how accent colors fit into themes. The
rightmost five color columns show accent colors 1 to 5, respectively. As
a specific example, the left menu shows a tooltip for Accent1.
Below each accent color are color shades, both darker and lighter, that
are derived from the accent color. The right menu shows one of the
lighter shades of accent color 5.
In this exercise, you will apply fill colors and then apply different themes to see the effects.
Note:
You need the Org chart with themes drawing that you created in the preceding exercise. Open the drawing in Visio if it is not already open.
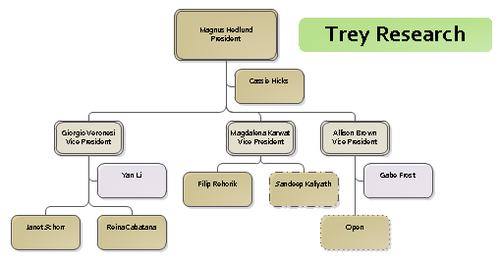
Right-click the Trey Research title block, click the arrow to the right of the Fill button on the Mini Toolbar, and then click and apply the light green color from the Standard Colors section of the color picker.
Hold down Shift and click the three shapes containing the title Vice President to select them. Open the color picker, and then click Fill, Lighter 60%.

Hold down Shift and click the Yan Li and Gabe Frost shapes. Open the color picker, and then click Accent5, Lighter 80%.
You can see that the shapes for the vice presidents are a lighter shade and the two assistants are a different color.
On the Design tab, in the Themes group, click the down arrow at the right end of the theme selection pane to view another row of themes.

On the Design tab, in the Themes group, click the More button to open the entire Themes gallery, then point to various theme icons to see the results.
As
you point to the theme icons, you will notice two things that are the
direct result of the color changes you made in Steps 1, 2, and 3:
The background color of the Trey Research title block does not change (though its font and other effects do change for some themes).
There are three distinct colors for the organization chart shapes, regardless of which theme you select.
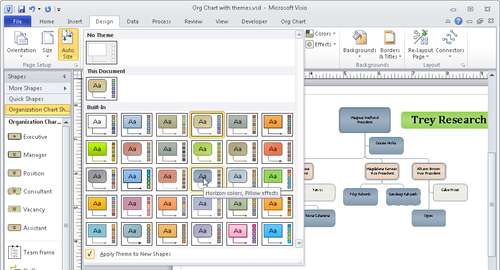
The Themes gallery shows you the current theme for This Document as well as all Built-In themes.
Tip:
The themes that are built
into Visio contain the same color sets that are used in the 2010
versions of other Office applications, such as Microsoft Word and
Microsoft PowerPoint.
The next step is not required but is included here so you know that it is as easy to remove a theme as it was to apply it.
No Theme

On the Design tab, in the Themes group, click the No Theme button.
Tip:
You can revert to your previous theme by pressing Ctrl+Z to undo the change.
Your organization chart is now back to the condition it was in before you applied the theme.
Note:
Save your changes to Org chart with themes and close your drawing.
