4. Saving Sets of Shape Data Fields
Now that you’ve toiled to create a set of Shape Data fields, you might want to save it so that you can apply it to other shapes.
You saw that you can edit Shape Data definitions for
multiple shapes by selecting a bunch at once and going to the Define
Shape Data window. A better way is to save a set of fields as a Shape
Data Set.
Creating and Applying Shape Data Sets
1. | Continue with Ch7 Shape Data.vsd.
|
2. | Select one bulb shape.
|
3. | Right-click
the Shape Data window and choose Shape Data Sets. The Shape Data Sets
window appears. It is a taskbar that remains open. You can float it
anywhere or dock it to any side of the drawing window.
|
4. | Note the Sample set that is already defined in the window.
|
5. | Highlight
Sample in the list and then click Define. The Define Shape Data window
appears, exactly the same as it appears for shapes. You can inspect and
edit field attributes for the set. Click Cancel for now, though.
|
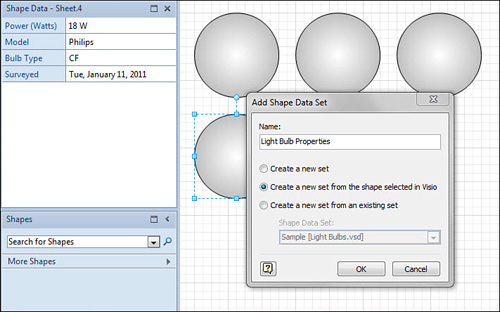
6. | In the Shape Data Sets window, click Add. The Add Shape Data Set window pops up.
|
7. | Enter a name, such as Light Bulb Properties, as shown in Figure 3.
|
8. | Check
the Create a New Set from the Shape Selected in Visio radio button.
Note that you could also create a new blank set or a new set based on
an existing set.
|
9. | Click OK. The new Shape Data set appears in the Shape Data Sets window.
|
10. | Inspect
the new set and check default values. I created this set from existing
fields in a shape. The fields are correct, but the default values might
not be right for generic application.
- a. Highlight Light Bulb Properties in the list.
- b. Click Define. The Define Shape Data window appears.
- c. Highlight each field in the Properties list and check the Value.
- d. Change
any specific default values to something more generic. For Power, set
Value to 0. For Bulb Type and Surveyed, leave Value blank, and for
Model, enter <model>.
- e. Click OK to save your changes.
|
11. | Take your Shape Data Set for a spin.
- a. Draw some rectangles on the page using the Rectangle tool.
- b. Select all the rectangles that you just added.
- c. In
the Shape Data Sets window, check Light Bulb Properties and then click
Apply. (Note: The check boxes allow you to apply multiple sets at once.)
- d. Check each shape to see that it has the Shape Data fields: Power, Model, Bulb Type, and Surveyed.
|
When you create a custom Shape Data Set, it isn’t
stored globally, so you don’t have access to it when you work on
another drawing. This sounds frustrating, but it’s easy to transfer
sets. Just copy a shape that has a Shape Data Set applied and paste it
to your drawing. The Shape Data Set comes along for the ride.
So one quick way to bring sets into other drawings is to
Quickly draw a rectangle.
Apply all the Shape Data Sets that you want to transfer to the rectangle.
Cut the rectangle and paste it into other drawings.
You can even add this rectangle to your Favorites stencil for easy access in the future.
