The Windows Live Family
Safety add-on adds Web filtering and activity reporting to your toolbox
of parental controls. To add these controls to your computer, first make
sure you have a Windows Live account. If you don't, you can create one
the first time you visit the Web site. Open Internet Explorer, browse to
http://home.live.com, and log in with your Windows Live ID (or create one). Then, click More and then click Family Safety.
|
The preceding links will get you to the download site at Windows Live, which is located at http://download.live.com. The Web is a fluid thing, so these links could be different by the time you read this. If all else fails, search at Live.com for downloads and parental controls.
|
|
Choose your language from the
drop-down list and then click the Download button. Follow the displayed
download instructions to start and complete the download process.
The Family Safety add-on gives you the following added capabilities:
Activity reports: View reports of the Web activity and other Internet activity for the selected child.
Content filtering: Specify the types of Web sites the child can access.
Contact management:
Specify the people the child can communicate with online through
Windows Live Messenger, Hotmail, and Spaces on Windows Live. You can
also allow the child to manage his or her own contact list.
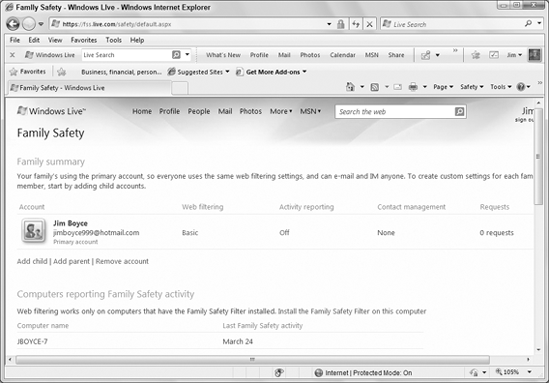
To access the new Family Safety settings, click Start => All Programs => Windows Live =>
Windows Live Family Safety to open the Windows Live Family Safety
Filter dialog box. Then, click the Go to the Family Safety link to
navigate to the Windows Live Family Safety Web site (Figure 1).
Through the Family Safety
Web site, you can add child and parent accounts, as well as configure
settings for each child's account. To configure settings for a child,
first add the child's account. Click the Add Child link, and if you have
already created the child's Windows Live account, click Sign in with
This Child's ID. If not, click Create Child ID.
After the account is
created, you see it listed when you browse to the Family Safety Web
site. You can click the link under the Web Filtering, Activity
Reporting, or Contact Management columns to set the corresponding
setting.
Each Windows account by
default uses the Windows Live ID that was used to install the Family
Safety add-on. Before you allow a child to browse the Web, you need to
log in to the computer with his/her account and log in to Family Safety
with his/her Windows Live ID. Here's how:
Log in to the computer using the child's Windows account.
Click Start => All Programs => Windows Live => Windows Live Family Safety.
Click Sign Out to switch family members.
In
the Sign In to Family Safety dialog box, enter the child's Windows Live
credentials. If you don't want the child to have to enter the
credentials each time, select the Remember My Password and Sign Me In
Automatically options. Then click Sign In.
|
You can use a single Windows
Live ID for all your children, imposing a common set of restrictions for
them all. However, you will not be able to track individual usage.
Instead, all usage will be reported against the common ID. For that
reason, it's a good idea to create a Windows Live ID for each child.
|
|
|
I need to point out that when
you use the Windows Live Family Safety add-on and reporting is enabled,
your child's browsing history is maintained on a Microsoft Web site.
This can be handy, because you have access to the browsing history from
any location, such as at work. However, it could potentially be a
privacy risk. If you don't like the idea of your child's Internet usage
history being stored on a public server, even if it is secured to
prevent others from browsing the history, consider using a third-party
Internet control and reporting program that installs on the computer and
stores its logs locally on that computer (or e-mails the logs to you).
|
|
The following sections explain how to manage parental settings.
1. Defining Web restrictions
The World Wide Web contains
millions of Web sites and billions of Web pages. No one person or
company has control over what goes on the Web. It's very much a public
place where anyone can post any content they wish. Obviously, not all
that content is suitable for children. (Much of it isn't particularly
appropriate for adults, either.)
To define Web restrictions,
navigate to the Family Safety Web site as described previously, and
click Add a Child. If the child's account already exists and is listed,
just click the child's account. In the resulting Web Filtering page, you
can choose between the following three options:
Strict: Block all Web sites except child-friendly sites and sites you've explicitly allowed.
Basic: Block only adult content.
Custom: Choose from multiple types of sites those you will allow the child to access.
In addition to choosing
between these three primary options, you can explicitly add sites to the
list of allowed or blocked sites. To add a site, click in the text box
under Allow or Block a Website, type the site's URL, and choose the
desired action from the drop-down list, such as Allow for This Account
Only. Then, click Add. When you're satisfied with the settings, click
Save.
|
For Web filtering to work,
the Family Safety Filter must be installed on the computer. If you have
more than one computer, make sure the filter is installed on each
computer that your children will use.
|
|
|
Every Web site has a unique
address called a URL (Uniform Resource Locator). To allow the child to
visit a Web site, you either have to type or paste the URL of that site
into the box under the Website address heading. To paste rather than
type, browse to a Web site (or have the child browse to the site) in
Internet Explorer or another Web browser. When you're at the Web site,
you know that the URL in the Web browser's address bar is the correct
URL for that site.
To paste that URL, you first have to copy it. To do so, select the URL by clicking the icon just to the left of the http://
in the browser's address bar. If that doesn't work, drag the mouse
pointer through the whole URL. When all the letters in the URL are
highlighted (that is, they show as white text against a blue
background), press Ctrl+C to copy. (You won't see anything happen on the
screen.) Then go to the Allow Block Webpages page (by clicking its
button in the taskbar). Click in the box under Website address where you
would have typed the URL, and press Ctrl+V to paste. Then click the
Allow button to add the URL to the list of Allowed sites.
Knowing how to copy and paste
is a valuable basic skill because any place you can type text, you can
also paste text. So you rarely need to paste text that you can just copy
from some other place on the screen.
|
2. Get Web sites working
If you've set restrictions on
Web sites, you might need to do a little tweaking to get the sites
working. Log out of your administrative account (click the Start button,
click the arrow next to the lock, and then click Log Off). Then log in
to the child's account. Browse to an allowed Web site. If some content
from the site is blocked, you'll see a warning in the information bar
(Infobar). You can click the Infobar to review portions of the site that
are blocked. Typically, allowing the child to see the blocked content
is perfectly safe because it's still age-appropriate. But you'll need to
choose Always Allow when prompted to make sure the child can visit the
site when you're away.
You can also use one of the
child's allowed sites as the default home page that appears when the
child first opens the Web browser. In Internet Explorer, browse to
whatever Web page you want to make the default. Then click the Home
button in the toolbar (or press Alt+M) and click Add or Change Home
Page. Choose Use this Webpage as Your Only Home Page and click Yes. You
might also want to add all the allowed sites to the child's Favorites.
When you want to get back to
performing parental (administrative) tasks, log out of the child's
account. Then log back into your administrative account.
Next,
you want to specify exactly what the child can and can't do with the
computer. Your options are described in the sections that follow.
