15. Route
All IP-based networked devices, including computers, have routing tables.
Routing tables describe the local network, remote networks, and
gateways that you can use to forward traffic between networks. In
networks with a single gateway, the routing table is very simple and
indicates that local traffic should be sent directly to the local
network, whereas traffic for any network other than the LAN should be
sent through the gateway.
However, some
networks have multiple gateways. For example, you might have two
gateways on a LAN: one that leads to the Internet and another that leads
to a private network. In that case, the local computer's routing table
must describe that specific networks are available through the internal
gateway and all other networks are available through the Internet
gateway.
Note:
A client computer is most
often configured with multiple routes in remote access scenarios.
Specifically, if a client is using a virtual private network (VPN)
connection, there might be separate routes for the networks accessible
through the VPN connection, and all other traffic will be sent directly
to the Internet.
Typically, computers running
Windows will be automatically configured with the correct routing table.
For example, network administrators will configure the DHCP server to
assign a default gateway. When making a VPN connection, the VPN server
will provide routing information that Windows will use to update the
routing tables. Therefore, you rarely need to use the Route command to
view or update the routing table.
However, if you are having
connectivity problems and you are connected to a remote network or if
your local network has multiple gateways, you can use Route to diagnose
routing problems and even test different routing configurations. To view
the local computer's IPv4 and IPv6 routing tables, open a command
prompt and run the following command.
C:\>route print
This command produces output similar to the following.
===========================================================================
Interface List
 11 ...00 80 c8 ac 0d 9e ......  D-Link AirPlus DWL-520+ Wireless PCI Adapter
  8 ...00 13 d3 3b 50 8f ......  NVIDIA nForce Networking Controller
  1 ...........................  Software Loopback Interface 1
  9 ...02 00 54 55 4e 01 ......  Teredo Tunneling Pseudo-Interface
 12 ...00 00 00 00 00 00 00 e0   isatap.{B1A1A1DE-A1E5-4ED6-B597-7667C85F8999}
 13 ...00 00 00 00 00 00 00 e0   isatap.hsd1.nh.comcast.net.
=============================================================================


IPv4 Route Table

==============================================================================

Active Routes:
Network Destination         Netmask          Gateway       Interface  Metric
          0.0.0.0          0.0.0.0      192.168.1.1     192.168.1.132     20
        127.0.0.0        255.0.0.0         On-link         127.0.0.1     306
        127.0.0.1  255.255.255.255         On-link         127.0.0.1     306
  127.255.255.255  255.255.255.255         On-link         127.0.0.1     306
      169.254.0.0      255.255.0.0         On-link   169.254.166.248     286
  169.254.166.248  255.255.255.255         On-link   169.254.166.248     286
  169.254.255.255  255.255.255.255         On-link   169.254.166.248     286
      192.168.1.0    255.255.255.0         On-link     192.168.1.132     276
    192.168.1.132  255.255.255.255         On-link     192.168.1.132     276
    192.168.1.255  255.255.255.255         On-link     192.168.1.132     276
        224.0.0.0        240.0.0.0         On-link         127.0.0.1     306
        224.0.0.0        240.0.0.0         On-link     192.168.1.132     276
        224.0.0.0        240.0.0.0         On-link   169.254.166.248     286
  255.255.255.255  255.255.255.255         On-link         127.0.0.1     306
  255.255.255.255  255.255.255.255         On-link     192.168.1.132     276
  255.255.255.255  255.255.255.255         On-link   169.254.166.248     286
==============================================================================
Persistent Routes:
  None


IPv6 Route Table
=============================================================================
Active Routes:
 If Metric Network Destination     Gateway
  9    18 ::/0                     On-link
  1   306 ::1/128                  On-link
  9    18 2001::/32                On-link
  9   266 2001:0:4136:e37a:14fc:39dc:3f57:fe7b/128
                                   On-link
  8   276 fe80::/64                On-link
 11   286 fe80::/64                On-link
  9   266 fe80::/64                On-link
 12   296 fe80::5efe:169.254.166.248/128
                                   On-link
 13   281 fe80::5efe:192.168.1.132/128
                                   On-link
  9   266 fe80::14fc:39dc:3f57:fe7b/128
                                   On-link
  8   276 fe80::41e9:c80b:416d:717c/128
                                   On-link
 11   286 fe80::c038:ad1f:3cc6:a6f8/128
                                   On-link
  1   306 ff00::/8                 On-link
  9   266 ff00::/8                 On-link
  8   276 ff00::/8                 On-link
 11   286 ff00::/8                 On-link
===========================================================================
Persistent Routes:
    None
Fully
interpreting the routing configuration requires a detailed understanding
of IP networking; however, you can quickly identify default routes
for traffic being sent to your default gateway by locating the Active
Route with a Network Destination and Network Mask of 0.0.0.0 for IPv4
routes and an Active Route with the prefix ::/0
for IPv6 routes. Other Active Routes with a Gateway assigned cause
traffic for the specific Network Destination and Network Mask to be sent
through that gateway, with a preference for the route with the lowest
metric.
If you must manually
update the IPv4 routing table (you should typically make changes to the
network infrastructure that assigned the routes to the client), you can
use the route add, route change, and route delete commands. For more information, type route –? at a command prompt.
To update the IPv6 routing table, you must use the netsh interface ipv6 add|set|delete route commands.
16. Task Manager
Task Manager (Taskmgr.exe) is a GUI tool
that you can use to view or end a process or an unresponsive
application. You can also use Task Manager to gather other information,
such as CPU statistics. To start Task Manager, click Start, type Taskmgr, and then press Enter. Alternatively, you can right-click the taskbar and then click Task Manager.
The Windows Task Manager window contains six tabs: Applications, Processes, Services, Performance, Networking, and Users.
The Applications
and Processes tabs provide a list of applications or processes that are
currently active on your system. These lists are valuable because
active tasks do not always display a user interface, which can make it
difficult to detect activity. Task Manager displays active processes and
lets you end most items by clicking End Process. You cannot end some
processes immediately; you might need to use the Services snap-in or
Taskkill to end them. You can also customize Task Manager to increase or
decrease the level of detail shown on the Processes tab.
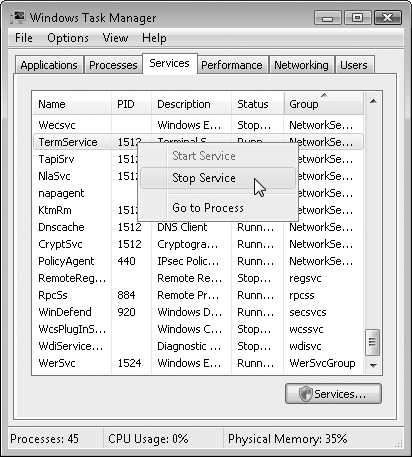
The
Services tab displays running services and their PID. If you determine
that a specific PID is using network resources and you find the PID on
this tab, you know that a service is causing the network utilization. To
stop a service, right-click it and then click Stop Service, as shown in
Figure 4.
The
Performance tab graphically displays process and memory utilization.
Viewing this tab quickly reveals the total utilization of all programs
and services on the computer. The Performance tab also shows key
performance counters including the number of processes, the number of
threads, and the total physical memory installed in the system.
The Networking tab shows the utilization of all network interfaces.
With the Users tab, you can disconnect and log off active users.
To view detailed information about processes, follow these steps:
Start Task Manager and then click the Processes tab.
Optionally, click Show Processes From All Users.
On the View menu, click Select Columns.
Select or clear the columns that you want to add to, or remove from, the Processes tab.
Click OK to return to Task Manager.
To identify the cause of high processor utilization, follow these steps:
Start Task Manager and then click the Performance tab.
Click the View menu and then select Show Kernel Times (if it is not already selected).
Examine
the CPU Usage History graph. If the graph shows values close to 100
percent, one process or multiple processes are consuming the bulk of the
computer's processing capability. The red line shows the percentage of
the processor consumed by the kernel, which includes drivers. If the
bulk of the processing time is consumed by the kernel, verify that you
are using signed drivers and have the latest version of all drivers
installed. If the kernel is not responsible for the majority of the
processor usage, continue following these steps to identify the process.
Click
the CPU column heading twice to sort the processes by processor
utilization with the highest utilization at the top of the list.
The process or processes
consuming the processor will show high CPU utilization values. When the
processor is not being used heavily, the System Idle Process shows high
CPU utilization.
To find the PID of an application, follow these steps:
Start Task
Manager and verify that the Process ID (PID) column is displayed on the
Processes tab. If it is not displayed, open the View menu, click Select
Columns, and then select PID. Click OK.
Click the Applications tab.
Right-click the application and then click Go To Process.
Task Manager will
display the Processes tab. The process associated with the application
will be highlighted. The PID is shown in the PID column.
To stop a process, follow these steps:
Start Task Manager and then click the Processes tab.
Right-click the process you want to stop and then click End Process.
Task Manager will attempt to end the process. If Task Manager fails, use Taskkill.
To identify the network
utilization, start Task Manager and then click the Networking tab. Task
Manager shows the utilization of each network adapter. The percentage of
utilization is measured in relation to the reported Link Speed of the
adapter. In most cases, network adapters are not capable of 100 percent
utilization; peak utilization is approximately 60 percent to 70 percent.
