5. Configuring Geosense for Windows Security
It's important to understand that
not everyone on a system needs access to every sensor. You may, in fact,
want to strictly limit access to some sensor types, depending on their
function. For example, you'll notice that the Geosense for Windows
sensor comes with a privacy warning as described at http://www.google.com/privacy-lsf.html. In addition, Windows provides the privacy information shown in Figure 4 (click the How Is My Privacy Affected? link in the Location and Other Sensors applet to see it).
Everyone can automatically
access a sensor after you install it. In order to control access to the
sensor, you must manually change its security settings or locate the
appropriate entry in the registry. To accomplish this task, click the
Geosense Location Sensor link in the Location and Other Sensors applet.
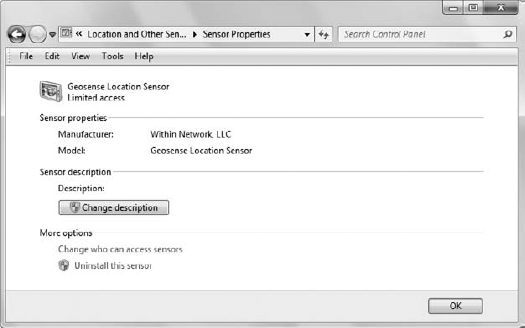
You'll see the Sensor Properties window shown in Figure 5.
This window provides access to all the sensor settings. In this case,
you can change the sensor description, modify the security settings, or
uninstall the sensor.

NOTE
Locating the appropriate entry in the registry can be a bit tricky. Begin by polling every numbered subkey of the HKEY_LOCAL_MACHINE\SYSTEM\CurrentControlSet\Enum\Root\SENSOR key. Check the HardwareID
value of each of these numbered subkeys for the name of the sensor you
want to change (the Geosense for Windows sensor appears as a
multi-string entry of Sensors\GeosenseSensor). You must then check the Device Parameters\SensorPermissions
subkey. For example, if the Geosense for Windows sensor is the only
sensor installed on your system, you can see the security settings in
the HKEY_LOCAL_MACHINE\SYSTEM\CurrentControlSet\Enum\Root\SENSOR\0000\Device Parameters\SensorPermissions
key. When everyone has access to the sensor, you'll see a DWORD value
entry for the S-1-1-0 well-known Security IDentifier (SID) with a value
of 1, which enables it (see the list of well-known SIDs at http://support.microsoft.com/kb/243330).
When you clear the Everyone entry, this SID value entry will equal 0.
Allowing services access to the sensor will add entries for the
following SIDs: S-1-5-18, S-1-5-19, and S-1-5-20. Theoretically, you can
provide finer-grained security control by modifying the registry
entries for the particular sensor, but then you need to worry about
potential side effects. The sensor may not work correctly if all
services can't access it, but you'll find out only through
experimentation.
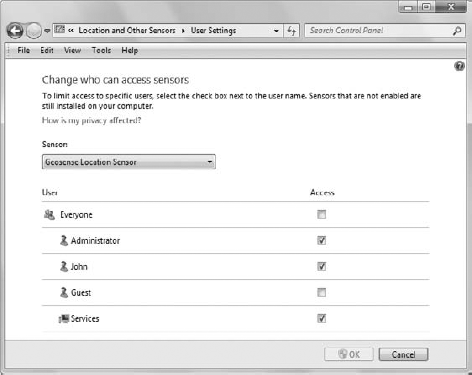
Click the Change Who Can Access Sensors link and you'll see the User Settings window shown in Figure 6.
Make sure the correct sensor is selected (the Geosense Location Sensor
in this case), then clear or check entries as needed to provide secure
access to the sensor. The example shows that the Administrator, John,
and three services accounts can access the Geosense for Windows sensor,
but not the Guest account.
An interesting thing will
happen in the example application when you change access. You'll
actually see two messages. First, you'll see a message box telling you
that the sensor access is denied. Second, you'll see another message box
telling you that the sensor is ready. When you change the sensor
access, Windows appears to remove permissions first and then add them
back in. The example application will also receive an update event, even
though you haven't clicked Get. You can verify this update by starting
the application and making the security changes without clicking Get
first. The blanks will automatically fill with information after you
clear the second message box telling you that the sensor is ready to
use.
6. Viewing Location Sensor Activity
Privacy is a concern when
using sensors, including the Geosense for Windows sensor. You may be
curious as to who is using the sensor on the system. Fortunately,
there's a quick way to find out. Click the View Location Activity link
in the Location and Other Sensors applet. Windows will display a message
that it's adding a snap-in for a few moments, and then you'll see the
Event Viewer applet displayed with the Location Activity entry
highlighted, as shown in Figure 7.
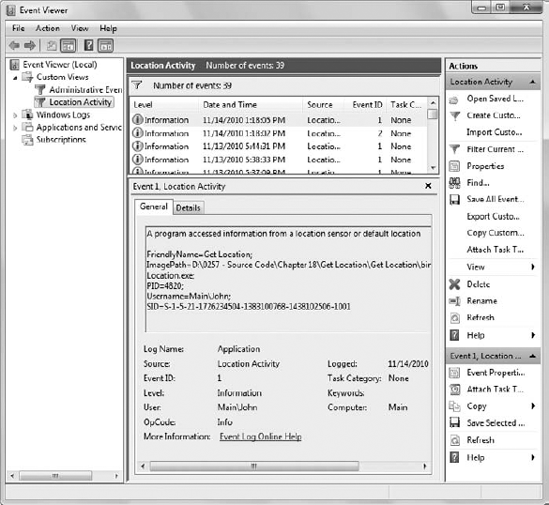
The event viewer logs tell you
everything you need to know about the location sensor access, including
the name of the application performing the access and the account name
used to run the application. Of course, you get all the normal event log
entries, such as the time the access occurred. In addition, you can
even determine details such as the Program IDentifier (PID) and Thread
IDentifier (TID), which is helpful in deciding how often the application
accessed the sensor during a single session. The event log entry won't
tell you precisely what kind of access was performed when working with
sensors that have multiple functions, but at least you know about the
sensor access.
