The User State Migration Tool (USMT) is a group of
command-line tools that can be used to capture and restore user
accounts, profiles, settings, and data. This data is collectively
referred to as user state data.
There are two primary components of the USMT:
ScanState
This command-line tool is normally run on the older computer or operating system to capture the user state data. When using the Windows.old
folder that is created for some installations of Windows 7, ScanState
is run after the installation of Windows 7 to retrieve the user state
data from this folder.
LoadState
This command-line tool is run on the newer computer hosting Windows 7 to restore the system state data that was captured by ScanState.
It can re-create all the users that existed on the original
installation and migrate the profile and other data for each of them.
Since these tools are command-line tools, you can
script and automate them. You can create batch files with the commands
and then schedule the batch files to run on the source and target
machines. Batch files allow you to perform large-scale migrations with
little user interaction.
There are several XML files used with the USMT. Each
of these files contains migration rules that specify what is migrated
from the source to the destination computers. You don't have to modify
these files for a migration. However, if you have some special needs,
you do have options. Most migrations will use the files (listed here)
just as they are:
MigApp.xml
This file identifies the application settings that are migrated. It can be used in both the ScanState and LoadState commands. MigApp.xml
is included in the same folder as other USMT tools and doesn't need to
be migrated. However, if you have special application settings that
aren't migrated by default, you can modify this file.
MigDocs.xml
This file is used by both ScanState and LoadState
to identify user data on the hard drive that will be migrated. Note
that this file does not specify the migration of system files, program
files, or application data. It is common to use MigDocs.xml with MigApp.xml when capturing or loading system state data. However, MigDocs.xml cannot be used with the MigUser.xml file. To clarify, the MigDocs.xml and MigApp.xml files are commonly used together, but the MigUser.xml and MigApp.xml file combination is not used as often.
One reason to modify MigDocs.xml is to exclude certain documents. For example, if you want to exclude MP3 files, you can modify MigDocs.xml by adding an <exc1ude> node.
MigUser.xml
This file identifies the user folders, files, and file types that are migrated. It can be used in both the ScanState and LoadState commands but is not used with the MigDocs.xml
file. Note that this file doesn't specify which user accounts and
profiles to migrate, but instead identifies the data to migrate within
each migrated user account and profile. You can specify which accounts
to migrate within the ScanState and LoadState commands.
Config.xml
This is an optional file that you can create with the ScanState / GenConfigiconfig.xml
command. This file is not needed, but you can use it if you want to
change default store-creation or profile-migration behavior. It includes
a list of components within XML nodes with a migrate="yes" clause. You can modify any of these components to migrate="no".
|
The User State Migration Tool 4.0 User's Guide has
additional information on modifying these XML files for a migration.
This help file is named USMT.chm and it is stored in the C:\Program Fi1es\ Windows AIK\Docs\CHMs folder after the WAIK has been installed. Here are some articles that may interest you:
|
1. Using the USMT in Four Deployment Scenarios
The bare-metal and upgrade scenarios don't require
the use of the USMT. The bare-metal installation installs Windows 7 on a
system that doesn't have any operating system on it. This could be a
new computer that doesn't have an operating system, or a computer on
which you want to remove the existing operating system. This scenario
implies that it is a brand-new system for a brand new-user: there isn't
any user state data to migrate. (If you did have user state data to
migrate, you could perform the steps in a replace scenario.) In an
upgrade, an existing computer running a compatible version of Windows
Vista or Windows 7 is upgraded to Windows 7. All existing user state
data is automatically migrated during this operating system upgrade.
In this section you'll see how you can use the USMT to restore the user's state data in the refresh and replace scenarios.
1.1. Refresh Scenario
The refresh scenario uses the same computer but
changes the operating system. For example, a computer may have been
running Windows XP, and it is refreshed so that it is now running
Windows 7. There are several methods of using the USMT when you do a
refresh:
Wipe-and-load with a Compressed Migration Store
A wipe-and-load is where the original computer is
wiped clean and includes any time the hard drive is reformatted,
repartitioned, or replaced before the new operating system is installed.
If you are planning a wipe-and-load, you can take the following steps
with the USMT:
Use
ScanState to collect the user state data and store it to a migration
store in a compressed state to save space. It can be stored on a network
share or a removable hard drive
Wipe the system clean and install Windows 7.
Use LoadState to restore the user data.
Refresh with a Hard-Link Migration
Hard-link migration is explained in more detail in the sidebar "Learning about Hard-Link Migration,"
but in short, it creates an additional link to the existing files prior
to installing the new operating system. LoadState can then change these
links to new locations understood by Windows 7.
The hard-link migration store method uses these steps:
Use ScanState to collect the user state data with the /hardlink and /nocompress switches and store it to a migration store. The migration store is stored on the same volume as the operating system.
Use LoadState to restore the user data using the /hardlink switch.
|
You can perform a hard-link migration in some
computer refresh scenarios. The hard-link migration provides significant
improvement in the migration performance. When you perform a hard-link
migration, the migration store is created as a full folder structure
similar to the following graphic:
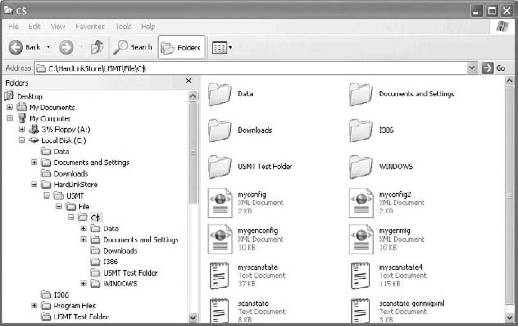
While it looks as though this is a full copy of all
the folders and files that will be included in the migration, they are
actually just links to the files. At this point, you have two links to
each of the files and folders but only one copy of the file on the
drive. If you delete only one link, the file still exists. The file is
only deleted when you delete both the links.
When the hard-link migration store is restored with
LoadState, the files aren't actually copied. Instead, the hard link is
modified to have the data in a different location in the directory
structure. In other words, if Sally's profile was stored in the C:\Documents and Settings\Sa11y folder in Windows XP, the hard-link migration changes the location to C:\Users\Sally in Windows 7.
The hard-link migration store takes up relatively little space. For example, the actual C:\Windows folder takes up about 1.6 GB of space on the hard drive but the C:\HardLinkStore folder shown in the graphic (which includes the \C$\Windows folder) takes up only 24
MB on disk. A hard-link migration store can't be compressed. Because
the migration is compressed by default, you need to include the /nocompress switch when using the /hardlink switch.
You cannot do a hard-link migration in any of the following scenarios:
You are migrating from one computer to a second computer, such as in a replace scenario. You
are migrating data from one volume to another volume (such as from the
C: drive to the D: drive). A hard link can only point to files on the
same volume. You are formatting or repartitioning the disk that contains the hard-link migration store.
|
Refresh Using
Windows.old
If you do a clean installation (not an upgrade)
of Windows 7 on a computer that has Windows XP, Windows Vista, or
Windows 7 installed, the installation will detect the previous operating
system and store files in a folder called Windows.old. You can then retrieve user state data from this folder using LoadState.
The high-level steps when using this method are as follows:
Install Windows 7 on a computer that includes another operating system.
Use ScanState to capture the user data from the Windows.old folder.
Use LoadState to restore the user data from the Windows.old folder.
1.2. Replace Scenario
There are times when the existing hardware is
replaced. This could be because the hardware is older and it can't
support the hardware requirements, or as part of a regular hardware
upgrade within the organization. Replace scenarios are also known as
side-by-side upgrades.
When the user receives a new computer, you can
restore their user state data just as if you're performing a
wipe-and-load. You can use these high-level steps:
Use
ScanState to collect the user state data and store it to a migration
store in a compressed state to save space. It can be stored on a network
share or a removable hard drive.
Install the new computer with Windows 7.
Use LoadState to restore the user data.
