In this section example, we take a closer look at a
Web service that is deployed to Windows Azure in order to better
understand the code-level impacts of moving a service to a cloud.
Let’s assume we moved a
service contact interface definition and a data contract into a custom
C# project. We choose ServiceClient to test our service and ServiceDemo
contains the Windows Azure application configuration and definition
files.
We further opt to host this
project in a Web role, which means that there is a little bit of
bootstrapping that needs to be done. The WebRole class inherits from the RoleEntryPoint
class, which contains methods that are used by Windows Azure to start
or stop the role. You can optionally override those methods to manage
the initialization or shutdown process of your role. Worker roles must
extend RoleEntryPoint, but it is optional
for Web roles. The Visual Studio tools will automatically extend this
class for you, as you can see from the WebRole.cs code:
Example 1.
using System.Linq;
using Microsoft.WindowsAzure.Diagnostics;
using Microsoft.WindowsAzure.ServiceRuntime;
using System.Diagnostics;
namespace ServiceDemo_WebRole
{
  public class WebRole : RoleEntryPoint
  {
    public override bool OnStart()
    {
      DiagnosticMonitor.Start("DiagnosticsConnectionString");
      RoleEnvironment.Changing += RoleEnvironmentChanging;
      Trace.TraceInformation("WebRole starting...");
      return base.OnStart();
    }
    private void RoleEnvironmentChanging(object sender,
      RoleEnvironmentChangingEventArgs e)
    {
      if (e.Changes.Any(change => change is
        RoleEnvironmentConfigurationSettingChange))
      {
        e.Cancel = true;
      }
    }
  }
}
|
Our
cloud service project includes two configuration files:
ServiceDefinition.csdef and ServiceConfiguration.cscfg. These files are
packaged together with the cloud service when it is deployed to Windows
Azure.
The ServiceDefinition.csdef file
contains the metadata needed by the Windows Azure environment to
understand the requirements of the service, including the roles it
contains. It also establishes configuration settings that will be
applied to all specified service roles:
Example 2.
<ServiceDefinition name="ServiceDemo" xmlns=
  "http://schemas.microsoft.com/ServiceHosting/2008/10/
  ServiceDefinition">
  <WebRole name="ServiceDemo_WebRole">
    <InputEndpoints>
      <InputEndpoint name=
        "HttpIn" protocol="http" port="80" />
    </InputEndpoints>
    <ConfigurationSettings>
      <Setting name="DiagnosticsConnectionString" />
    </ConfigurationSettings>
  </WebRole>
</ServiceDefinition>
|
The
ServiceConfiguration.cscfg file sets values for the configuration
settings defined in the service definition file and specifies the number
of instances to run for each role. Here is the
ServiceConfiguration.cscfg for the ServiceDemo service project:
Example 3.
<ServiceConfiguration serviceName="ServiceDemo"
  xmlns="http://schemas.microsoft.com/
  ServiceHosting/2008/10/ServiceConfiguration">
  <Role name="ServiceDemo_WebRole">
    <Instances count="2" />
    <ConfigurationSettings>
      <Setting name="DiagnosticsConnectionString"
        value="UseDevelopmentStorage=true" />
    </ConfigurationSettings>
  </Role>
</ServiceConfiguration>
|
The Instances
element tells the Windows Azure runtime fabric how many instances to
spin up for the ServiceDemo_WebRole role. By default, Visual Studio
tools set this to “1”, but this is generally not a good idea. If you
only have one role running and it crashes, it could take a while before
Windows Azure spins up another one. However, if you had multiple roles
and one goes down, the application wouldn’t experience a work stop while
a new instance is being generated. This is why it is a good practice to
have at least two role instances per role.
In the ConfigurationSettings section, there is a statement worth singling out:
Example 4.
<Setting name="DiagnosticsConnectionString"
  value="UseDevelopmentStorage=true" />
|
There is a set of
logging and diagnostic APIs that you can use to instrument your code and
provide better traceability. With these APIs, you can not only detect
and troubleshoot problems, but you can also gain insight into the
overall performance of an application.
This line of code passes in
the configuration setting name that is equal to the connection string
for the storage account that the Diagnostic Monitor needs to use to
store the diagnostic data. By default, the setting name is DiagnosticsConnectionString,
but you can name it whatever you like as long as the name matches up
with the service definition and service configuration files.
In the WebRole.cs, you will see the following statement:
Example 5.
DiagnosticMonitor.Start("DiagnosticsConnectionString");
|
This line of code starts up
the Diagnostic Monitor when the role starts. By default, the connection
string is set to use development storage, such as the SQL table that was
created when the SDK was installed. Before you deploy the service to
the Windows Azure cloud, you will need to update this setting with the
storage account name and account key information.
For example:
Example 6.
<ConfigurationSettings>
  <Setting name="DiagnosticsConnectionString"
    value="DefaultEndpointsProtocol=https;AccountName=
    [ACCOUNT NAME};AccountKey=[ACCOUNT KEY]" />
</ConfigurationSettings>
|
If we take a look at the Web role’s Web.Config file, we’ll also see that the project wizard automatically created the following:
Example 7.
<system.diagnostics>
  <trace>
    <listeners>
      <addtype="Microsoft.WindowsAzure.Diagnostics.
        DiagnosticMonitorTraceListener,
        Microsoft.WindowsAzure.Diagnostics, Version=1.0.0.0,
        Culture=neutral, PublicKeyToken=31bf3856ad364e35"
        name="AzureDiagnostics">
        <filter type=""/>
      </add>
    </listeners>
  </trace>
</system.diagnostics>
|
This creates a tracing listener for the diagnostic monitor, which means that we continue to use the System.Diagnostics.Trace class for instrumentation. The diagnostic monitor will just hook into those calls and push them into storage.
The following examples show the IOrderService interface contract and the Order data contract, followed by the final output:
Example 8.
namespace Contract
{
  [ServiceContract]
  public interface IOrderService
  {
    [OperationContract]
    int CreateOrder(Order o);
    [OperationContract]
    void UpdateOrder(string id, Order o);
    [OperationContract]
    Order GetOrderByOrderId(string id);
    [OperationContract]
    List<Order> GetOrdersByCustomer(string custName);
    [OperationContract]
    List<Order> GetOrders();
    [OperationContract]
    void DeleteOrder(string id);
  }
}
|
Example 9.
namespace Contract
{
[DataContract(Namespace=
  "http://example.cloudapp.net/servicedemo/1.0")]
  public class Order
  {
    [DataMember]
    public int OrderId { get; set; }
    [DataMember]
    public string OrderItem { get; set; }
    [DataMember]
    public string CustomerName { get; set; }
  }
}
|
Example 10.
namespace ServiceDemo_WebRole
{
  [ServiceBehavior(InstanceContextMode =
    InstanceContextMode.Single,
    AddressFilterMode =
    AddressFilterMode.Any)]
  public class OrderService : Contract.IOrderService
  {
    int id = 0;
    List<Order> Orders = new List<Order>();
    #region IOrderService Members
    int IOrderService.CreateOrder(Order o)
    {
      o.OrderId = ++id;
      Orders.Add(o);
      return o.OrderId;
    }
    void IOrderService.UpdateOrder(string id, Order o)
    {
      var first = Orders.First(order =>
        order.OrderId ==
        Convert.ToInt64(id));
      first = o;
    }
    List<Order> IOrderService.GetOrders()
    {
      return Orders;
    }
    void IOrderService.DeleteOrder(string orderId)
    {
      Orders.RemoveAll(order =>
        order.OrderId.Equals
        (Convert.ToInt64(orderId)));
    }
    Order IOrderService.GetOrderByOrderId(string orderId)
    {
      return Orders.First(o =>
        o.OrderId.Equals(Convert.ToInt64(orderId)));
    }
    public List<Order> GetOrdersByCustomer(string custName)
    {
      return (string.IsNullOrEmpty(custName))?
        Orders : Orders.FindAll(o =>
        o.CustomerName.Equals(custName));
    }
    #endregion
  }
}
|
Note that the InstanceContextMode
setting is set to to single because we want to use the same service
object instance across the communication session established between the
service and its consumer. In a real world scenario, you would choose a
more robust solution like SQL Azure or Windows Azure table storage
(covered later in this chapter).
Let’s briefly walk through the steps required to actually deploy the service to Windows Azure.
1. Create a Host Service and Storage Service
When
you create a storage service, you have to create a globally unique
storage account name, not to be confused with the overarching Windows
Azure account that is mapped to your Windows LiveID. For our example, we
chose juggercloud as the account name and received three storage
endpoints. Two access keys are also generated.
Before we deploy our Web
service, however, we will update the Web role service configuration
*.cscfg file with the account name and account key information, as
follows:
Example 11.
<ServiceConfiguration serviceName="StandardMoldHost"
  xmlns="http://schemas.microsoft.com/
  ServiceHosting/2008/10/ServiceConfiguration">
  <Role name="ServiceDemo_WebRole">
    <Instances count="2" />
      <ConfigurationSettings>
       <Setting name="DiagnosticsConnectionString"
         value="DefaultEndpointsProtocol=https;
         AccountName=standardmold;AccountKey=0lg82Oj...==" />
      </ConfigurationSettings>
   </Role>
</ServiceConfiguration>
|
2. Create and Deploy a Service Package
We deploy the service by
uploading a package through the Windows Azure portal. When using the
Windows Azure UI, we can navigate to the host service to determine
whether we are deploying to staging or production.
There’s really no
difference in hardware resource configuration between these two
settings. In fact, the separation between the two environments is
managed through the network load balancer’s routing tables.
Once we click “Deploy,” the package and configuration file will be uploaded.
Note
We could have also pulled
these bits from a Windows Azure storage account. For example, we could
create a custom MSBuild task leveraged within a Team Foundation Server
Team Build definition file. Instead of dropping the package to a normal
file drop, this would upload it into blob storage using the REST API, or
perhaps even leverage Windows Azure Drive.
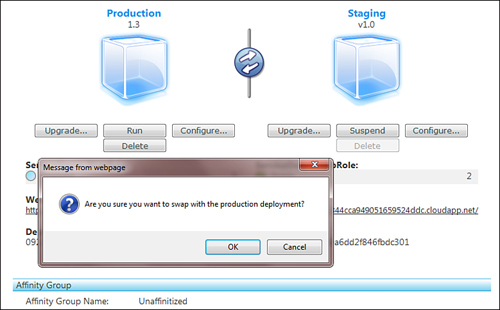
3. Promote the Service to Production
Let’s
imagine the previous step initially deployed the service to staging so
that we could test it before moving it into the production enviroment.
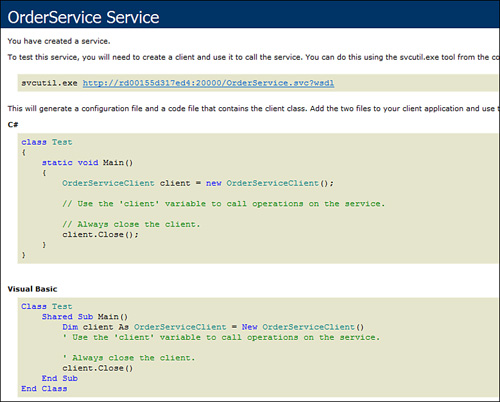
The Windows Azure UI allows you to invoke the service by clicking “Run,”
resulting in a page similar to Figure 1.
After verifying that the Web service is performing as desired, it can be deployed to production (Figure 2).