One
of the goals Microsoft had in delivering SQL Azure was to make it as
easy as possible to migrate an existing application and its database to
their Azure platform. Before SQL Azure was released, people were worried
they would have to re-architect their systems in order for them to run
in the cloud.
There are two basic ways to
migrate your on-premises SQL Server data to the cloud. The first is to
extract it, and copy it up. This is the same way you might move it from
server A to server B in your own data center. The second way is to use
an open source tool, SQL Azure Migration Wizard, that was created to
help ease the migration process.
1. Migrating the traditional way
The easiest way to migrate a
database to SQL Azure, and one that we have used ourselves, is to find a
DBA who already knows how to do it and buy them lunch. Barring that,
there are a few steps you can go through, following a traditional
approach.
The first step is to make sure
that you’ve created your SQL Azure server and know the administrative
username and password. Once that’s done, you can create the database
that will house your schema and data. Your goal is to script out the
existing database, including both schema and data, and then run that
script against your cloud server database to recreate it all.
For this example,
you’ll use SQL Server Management Studio to script out your source
database. Navigate to the database in SSMS, and right-click on it.
Select Generate Scripts from the Tasks menu, and then walk through the
wizard like normal. Make sure
that you select the option to script all objects in the database. Then,
on the options screen, make your selections according to this list:
Convert UDDTs to Base Types—True
Script Extended Properties—False
Script Logins—False
Script USE DATABASE—False
Script Data—True
Finish the wizard. When you’re done, the entire script will be loaded in a window.
You now need to remove some parts of the script to make sure it’ll work in the cloud:
Delete any occurrence of SET ANSI_NULLS ON.
Delete any occurrence of WITH
(PAD_INDEX = OFF, STATISTICS_NORECOMPUTE = OFF, IGNORE_DUP_KEY = OFF,
ALLOW_ROW_LOCKS = ON, ALLOW_PAGE_LOCKS = ON) ON [PRIMARY] in a CREATE TABLE command.
Delete any occurrence of ON [PRIMARY] in a CREATE TABLE command.
Once you’ve made these changes
to the script, you may connect to the destination database and execute
the script. You can use SQLCMD for this, or SSMS.
This is a lot of work, and it
can be tedious making sure you have modified the script to avoid
anything SQL Azure might not support. Thankfully there is an open source
tool that can help.
2. Migrating with the wizard
The previous section might
have scared you away from ever trying to migrate data to SQL Azure. It
wasn’t meant to, but there are a lot of little details to be considered.
Fortunately, there’s an open source project hosted on CodePlex called
SQL Azure Migration Wizard that can help you out with this process. The
project URL is http://sqlazuremw.codeplex.com.
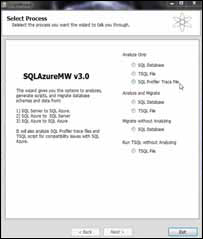
The wizard can be used in
several different scenarios. It can handle moving or analyzing a
database from a SQL Server to SQL Azure, from SQL Azure to a SQL Server,
or from SQL Azure to SQL Azure. When you run the tool, you can analyze
the database for compatibility, generate a compatible script, and
migrate the data. You can see the options available to you in figure 1.

When you start the tool, you’ll
need to point it at the source database. You’ll be given the options to
select the objects in the database you want to analyze and migrate.
The
wizard is driven by a powerful rules engine with over 1,000
compatibility rules already programmed in. These rules are in an XML
file, and it’s easy to modify them to meet your needs. The rules detect a
condition that isn’t supported by SQL Azure, and specify how to fix it.
This might be as simple as converting a data type to a type that’s
supported, or something more intense.
Once the analysis is done,
you’ll receive a report on the objects that need to be changed to become
compatible with SQL Azure. You can stop here and use the report to make
decisions, or you can keep going to migrate your data.
You’ll need to
provide a destination database connection string and credentials if you
want the wizard’s help in migrating your data. It’ll connect to SQL
Azure and execute the new script. It’ll handle creating the tables and
other objects, as well as migrating the data.
Migrating the data tends to be
the most difficult part. If you’re doing this by hand, even after you
sort out the changes you need to make to your script, you still need to
worry about timeouts in the connection and batching your data during the
upload. You don’t want all of your data thrown out because the
connection was reset. The migration wizard handles all of this for you,
so you don’t have to worry about anything.
Because SQL Azure is running
in the cloud, there are some limitations. Some of these are related to
schemas, and some are related to functional capabilities.