To demonstrate some of the concepts, parts, the following sections step through a
simplified process for building a basic user interface as a client
application.
Creating the Project
There are essentially five steps to creating a service-oriented client application using WPF or Silverlight with Prism:
1. | Create a solution with a shell project.
|
2. | Set up the bootstrapper.
|
3. | Create or reuse user interface modules.
|
4. | Create or reuse the view for the user interface modules.
|
5. | Manage the mapping of views and regions.
|
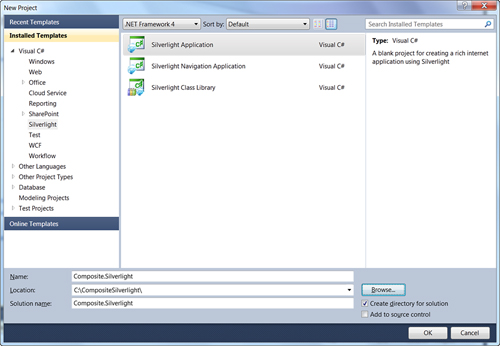
Let’s start with the creation of a Silverlight application called Composite.Silverlight, using Visual Studio. Figure 1 shows the initial screen.
On the New Silverlight Application
dialog box, make sure the “Host the Silverlight application in a new
Web site” option is selected. Visual Studio will create the Composite.
Silverlight project and the Composite.Silverlight.Web ASP.NET Web
application project. The first project will be the shell project and the
second will be a Web project that will host the Silverlight
application.
Using
Windows Explorer, create a folder named Library.Silverlight inside the
solution’s folder, and then copy the following assemblies into it:
Microsoft.Practices.Composite.dll
Microsoft.Practices.Composite.Presentation.dll
Microsoft.Practices.Composite.UnityExtensions.dll
Microsoft.Practices.Unity.dll
Microsoft.Practices.ServiceLocation.dll
Now that we have the solution created, we can set up the shell control:
In Solution Explorer, rename
the file MainPage.xaml to Shell.xaml. Open the code-behind file
MainPage.xaml.cs and rename the Page class to Shell using the Visual
Studio refactoring tools.
Let’s jump ahead and add an ItemsControl control to the Shell control and associate it with a region called MainRegion. In a little while, we will revisit this and dynamically add a view to this region.
In the Shell.xaml file, add the following namespace definition to the root UserControl element.
Example 1.
xmlns:Regions="clrnamespace:Microsoft.
  Practices.Composite.Presentation.Regions;
  assembly=Microsoft.Practices.Composite.Presentation"
|
You need this namespace to use an attached property for regions that are defined in Prism.
Next, replace the Grid control in the Shell user control with an ItemsControl control named MainRegion, as shown here.
Example 2.
<ItemsControl Name="MainRegion" />
|
In the ItemsControl control definition, set the attached property Regions:RegionManager.RegionName to MainRegion, as shown in the following example:
Example 3.
<ItemsControl Name="MainRegion"
  Regions:RegionManager.
  RegionName="MainRegion"
/>
|
This attached property indicates that a region named MainRegion is associated to the control.
Now, that we have the Shell project, we need to set up the bootstrapper,
which is responsible for the initialization of the application. We
first need to add a new class file named Bootstrapper.cs to the
Composite.Silverlight project.
Add the following using statements at the top of the file:
Example 4.
using Microsoft.Practices.Composite.Modularity;
using Microsoft.Practices.Composite.UnityExtensions;
|
Next we have to update the bootstrapper class’s signature to inherit from the UnityBootstrapper class:
Example 5.
class Bootstrapper : UnityBootstrapper
{
}
|
We need to override the CreateShell method in the Bootstrapper class. In this method, we are creating an instance of the Shell window, displaying it to the user, and then returning it:
Example 6.
protected override DependencyObject CreateShell()
{
  Shell shell = Container.Resolve<Shell>();
  Application.Current.RootVisual = shell;
  return shell;
}
|
Now we need to override the GetModuleCatalog
method. In this template method, you would typically create an instance
of a module catalog, populate it with modules, and return it:
Example 7.
protected override IModuleCatalog GetModuleCatalog()
{
  ModuleCatalog catalog = new ModuleCatalog();
  return catalog;
}
|
Next, we have to open the file App.xaml.cs, and replace the Application_Startup event handler with the following code to initialize the bootstrapper when the application starts:
Example 8.
private void Application_Startup
  (object sender, StartupEventArgs e)
{
  Bootstrapper bootstrapper = new Bootstrapper();
  bootstrapper.Run();
}
|
After building and
running the application, we should see an empty window, which indicates
that we have a functioning, bootstrapped shell. The next step is to
create and configure the loading of a user interface module.
To create a new module, we need
to add a new Silverlight class library project to the solution, set the
project’s name to FirstModule, and add references in the module to the
following Composite Application Library assemblies:
Example 9.
Microsoft.Practices.Composite.dll
Microsoft.Practices.Composite.Presentation.dll
|
In the Initialize method of the module initializer
class, we have to implement logic to initialize the module. For
example, we can register views and services or add views to regions.
We rename the Class1.cs file to FirstModule.cs and open the file FirstModule.cs and add the following using statement at the top (we will use it to refer to Modularity elements provided by Prism):
Example 10.
using Microsoft.Practices.Composite.Modularity;
|
We change the class signature to implement the IModule interface, as shown here:
Example 11.
public class FirstModule : IModule
{
}
|
In the FirstModule class, we add an empty definition of the Initialize method:
Example 12.
public void Initialize()
{
}
|
Next, we add a Views
folder to the FirstModule project. In this folder, we will store the
view implementations. For service interfaces, proxies and agents, it is
good practice to create separate sub-folders.
At this point, we have a
solution based on Prism with a single module. However, the module is not
being loaded into the application yet. Modules go through a three-step
process during the application lifecycle:
1. | Modules are registered into a module catalog that contains metadata that can be consumed by the module manager service.
|
2. | The module manager service manages the locating and the subsequent initialization of the modules.
|
3. | The module manager instantiates the module initializer class of each module and invokes their Initialize method.
|
To
populate the module catalog with the FirstModule module metadata, we
first add a reference to the module project from the Shell. We open the
Bootstrapper.cs file and update the GetModuleCatalog method to register the FirstModule module with the module catalog instance as follows:
Example 13.
protected override IModuleCatalog GetModuleCatalog()
{
  ModuleCatalog catalog = new ModuleCatalog()
    .AddModule(typeof(FirstModule.FirstModule));
  return catalog;
}
|
The next step is for us to
create (or reuse) a view for this module. Views are usually user
controls, and the addition of a view is accomplished by adding a user
control to the module. For this, we need to add a Static FirstModule text block to the view. To do this, we can replace the existing code in the file FirstModuleView.xaml with the following code:
Example 14.
<UserControl x:Class="FirstModule.Views.FirstModuleView"
  xmlns="http://schemas.microsoft.com/winfx/
    2006/xaml/presentation"
  xmlns:x="http://schemas.microsoft.com/winfx/2006/xaml">
  <Grid x:Name="LayoutRoot" Background="White">
    <TextBlock Text="Static FirstModule"
      Foreground="Green"
      HorizontalAlignment="Center"
      VerticalAlignment="Center"
      FontFamily="Calibri"
      FontSize="24"
      FontWeight="Bold">
    </TextBlock>
  </Grid>
</UserControl>
|
Now that we have a view for the
module, the final step is to associate a region with the view and to
manage this relationship. We first open the FirstModule.cs file and then
add the following using statement to the top:
Example 15.
using Microsoft.Practices.Composite.Regions;
|
We
create a private read-only instance variable to hold a reference to the
region manager by pasting the following code inside the class body:
Example 16.
private readonly IRegionManager regionManager;
|
We then modify the FirstModule class’s constructor to obtain a regionManager instance through constructor dependency injection and store it in the regionManagerMicrosoft.Practices.Composite.Regions.IRegionManager. instance variable. To do this, the constructor has to take a parameter of type We can paste the following code inside the class body to implement the constructor:
Example 17.
public FirstModule(IRegionManager regionManager)
{
  this.regionManager = regionManager;
}
|
In the Initialize method, we invoke the RegisterViewWithRegion
method on the regionManager instance. This method registers a region
name with its associated view type in the region of view registry (the
registry is responsible for registering and retrieving these mappings).
The RegisterViewWithRegion
method has two overloads. When we want to register a view directly, we
would use the first overload that requires two parameters (the region
name and the type of the view), as shown here:
Example 18.
public void Initialize()
{
  regionManager.RegisterViewWithRegion
    ("MainRegion", typeof(Views.FirstModuleView));
}
|
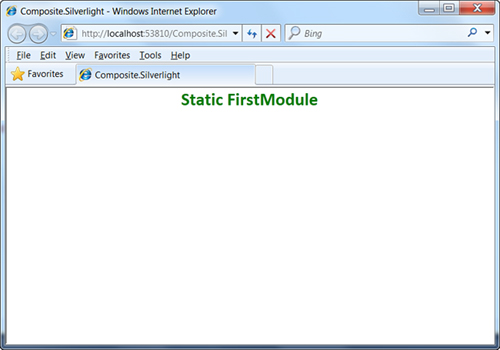
At this point, we have a simple, but functioning, client application that loads and displays a user interface module (Figure 2).
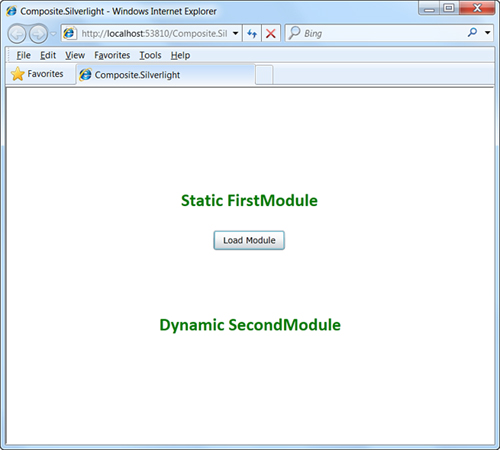
Now, let’s extend this application to demonstrate dynamically loading and composing user interface modules.
Dynamically Loading Modules
In order to enable the dynamic
loading of UI modules, we need to add a second module (appropriately
called SecondModule) to the solution by using the previously described
steps. As per these steps, we will be adding a view for this module
called the SecondModuleView.
We now modify the SecondModuleView user control by adding a Dynamic Second Module text block to the view. To do this, we replace the code in the file SecondModuleView.xaml with the following:
Example 19.
<TextBlock Text="Dynamic Second Module"
  Foreground="Green"
  HorizontalAlignment="Center"
  VerticalAlignment="Center"
  FontFamily="Calibri" FontSize="24"
  FontWeight="Bold">
</TextBlock>
|
As we have done earlier for the FirstModule, we modify the Initialize() method in SecondModule to register the SecondModuleView with the MainRegion:
Example 20.
public void Initialize()
{
  regionManager.RegisterViewWithRegion
    ("MainRegion", typeof(Views.SecondModuleView));
}
|
In the bootstrapper, we add metadata for the SecondModule as follows:
Example 21.
catalog.AddModule
  (
    typeof
      (SecondModule.SecondModule),
      InitializationMode.OnDemand
  )
|
We are informing the catalog
that the SecondModule will be loaded on-demand, as our scenario here is
to illustrate the dynamic loading and composition of the views.
Next, we add some
logic to the FirstModule view to demonstrate the loading and composition
of SecondModuleView. We start by adding a button to FirstModule.xaml,
as follows:
Example 22.
<Button
  Padding="5"
  VerticalAlignment="Center"
  Width="95"
  Click="LoadModule_ButtonClick"
  Content="Load Module">
</Button>
|
In the code-behind file (FirstModule.xaml.cs) we add a reference to Microsoft.Practices.Composite.Modularity and then a private variable to store the module manager reference:
Example 23.
private readonly IModuleManager moduleManager;
|
We then add a constructor for the FirstModuleView to initialize this reference:
Example 24.
public FirstModuleView(IModuleManager moduleManager)
  : this()
{
  this.moduleManager = moduleManager;
}
|
Lastly, we will add a LoadModule_ButtonClick handler in the FirstModule.xaml.cs code-behind file:
Example 25.
private void LoadModule_ButtonClick
  (object sender, RoutedEventArgs e)
{
  this.moduleManager.LoadModule("SecondModule");
}
|
At this point, if we
compile and execute the solution, we will find that the first module is
initialized and loaded statically. Subsequently, if we push the Load
Module button, we will see that the second module is loaded dynamically.