To begin, you will need to create an AppFabric account
that essentially gives you a piece of the AppFabric environment on
which you can manage your project, service namespaces, and security
settings.
Next, you will need to create
a new project and service namespace on the AppFabric portal. Using the
AppFabric portal, you can organize groups of service namespaces through
projects. For example, you might choose to have a project for service
namespaces related to development, a project related to QA, and a
project related to production. This type of structure enables you to
support a project throughout its lifecycle in parallel without having to
worry about sharing the same resources concurrently.
Note that each
service namespace must be globally unique so that it can be distinctly
identified by the service. When you create a service namespace, you can
pick which global region you would like your project to run in. In
general, you should pick the region that is physically the closest to
your user base.
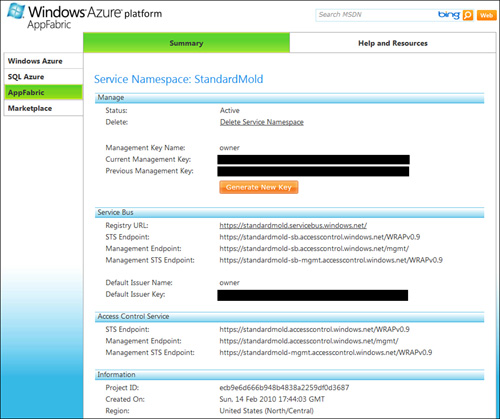
If you select a namespace, you will see its details, like in Figure 1. After confirming the namespace, you will need to install the latest version of the AppFabric SDK.
Setting up the AppFabric Service Bus
The
Service Bus was optimized for .NET developers using WCF, both in terms
of performance and usability. A central component of the Service Bus is
the scalable, available, and load balanced messaging fabric relay
service that supports a variety of messaging mediums, including SOAP
(versions 1.1 and 1.2), REST, and various WS-* standards.
There are some basic tasks that we need to perform to get our service up and running with the Service Bus:
1. | Create a service namespace (which we’ve already done).
|
2. | Define the AppFabric Service Bus contract.
|
3. | |
4. | Configure the service by specifying endpoint information and other behavior details.
|
5. | Build and run the service.
|
6. | Build and run the consumer.
|
Since we’ve already completed
Step 1, we are ready to start building our services and exposing them
via the AppFabric Service Bus. That is, we can continue with Steps 2
through 6.
Let’s revisit the Order
Service we built previously. If you recall, we took a simple WCF service
and showed how we could run that service on the Windows Azure platform.
Then we made the Order service a REST service on Windows Azure. We are
now going to take the Order service off of Windows Azure and host it
on-premise. Then we are going to expose it to the Service Bus.
We will begin by defining the contract, for which we are going to also use a custom WCF channel, as follows:
Example 1.
using System.Runtime.Serialization;
using System.ServiceModel;
using System.ServiceModel.Web;
using System.Text;
namespace Contract
{
  [ServiceContract(Name="IOrderService", Namespace=
    "http://standardmold.servicebus.windows.net/Order/1.0/")]
  public interface IOrderService
  {
    [OperationContract]
    int CreateOrder(Order o);
    [OperationContract]
    void UpdateOrder(string id, Order o);
    [OperationContract]
    Order GetOrderByOrderId(string id);
    [OperationContract]
    List<Order> GetOrdersByCustomer(string custName);
    [OperationContract]
    List<Order> GetOrders();
    [OperationContract]
    void DeleteOrder(string id);
  }
  public interface IOrderServiceChannel :
  IOrderService, IClientChannel {}
}
|
Next, we implement our Service Bus contract:
Example 2.
using System;
using System.Collections.Generic;
using System.Linq;
using System.Runtime.Serialization;
using System.ServiceModel;
using System.Text;
using Contract;
namespace OrderService
{
  [ServiceBehavior(Name = "OrderService",
    Namespace =
      "http://standardmold.servicebus.windows.net/Order/1.0/",
    InstanceContextMode = InstanceContextMode.Single,
    AddressFilterMode = AddressFilterMode.Any)]
  public class OrderService : Contract.IOrderService
  {
    int id = 0;
    List<Order> Orders = new List<Order>();
    #region IOrderService Members
    int IOrderService.CreateOrder(Order o)
    {
      o.OrderId = ++id;
      Orders.Add(o);
      return o.OrderId;
    }
            void IOrderService.UpdateOrder(string id, Order o)
    {
      var first = Orders.First(order =>
        order.OrderId == Convert.ToInt64(id));
      first = o;
    }
    List<Order> IOrderService.GetOrders()
    {
      if (Orders.Count == 0)
      {
        Order o = new Order();
        o.OrderId = ++id;
        o.CustomerName = "Bart";
        o.OrderItem = "Playdough";
        Orders.Add(o);
      }
      return Orders;
    }
    void IOrderService.DeleteOrder(string orderId)
    {
      Orders.RemoveAll(order =>
        order.OrderId.Equals(Convert.ToInt64(orderId)));
    }
    Order IOrderService.GetOrderByOrderId(string orderId)
    {
      return Orders.First(o =>
        o.OrderId.Equals(Convert.ToInt64(orderId)));
    }
    public List<Order> GetOrdersByCustomer(string custName)
    {
      return (string.IsNullOrEmpty(custName))? Orders :
        Orders.FindAll(o => o.CustomerName.Equals(custName));
    }
    #endregion
  }
}
|
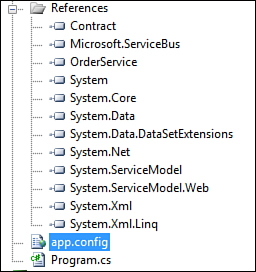
We are going to use a console application to host the service. We will need to reference the System.ServiceModel and Microsoft.ServiceBus assemblies for this purpose (Figure 2).
Now
we need to configure the service to make it ready for the Service Bus.
You can choose to configure the service programmatically or in an
application configuration file:
Example 3.
<system.serviceModel>
  <services>
    <service>
      <endpoint address=
        "sb://StandardMold.ServiceBus.windows.net/OrderService"
        binding="basicHttpRelayBinding"
        contract="Contract.IOrderService">
      </endpoint>
    </service>
  </services>
</system.serviceModel>
|
The binding specifies the
protocol used for consumer communication; it does not control the
protocol used to connect the service to Service Bus. Rather the ServiceBusEnvironment.SystemConnectivity singleton class controls those connectivity settings.
Notice that the address URI begins with sb://
because it allows us to abstract away the actual underlying protocol.
In other words, if we wanted to turn our service into a RESTful service
through the Service Bus, we only need to change the binding type from basicHttpRelayBinding to webHttpRelayBinding.
We also need to set
security and authentication. The Service Bus uses two types of security:
authentication and end-to-end security. Authentication refers to the
steps that our service must perform with the Service Bus before the
Service Bus will register the service. It also refers to the
authentication steps that a consumer may need to take before the Service
Bus grants it access to the service.
Service Bus authentication
leverages AppFabric Access Control, which you can programmatically
access through a set of APIs that ship with the SDK. Access Control
allows you to authenticate via either a shared secret, a SAML token, or a
Simple Web Token (SWT).
End-to-end
security refers to message and transport-layer security. It follows the
same programming model that exists in WCF. Every WCF Service Bus
binding has the following four property settings:
Mode–
This property defines the security across the entire connection, which
ultimately determines the type of security that protects the connection
between the service and consumer. You can set this property to None,
Message, Transport, or TransportWithMessageCredential.
The default is Transport, which means that the transport-specific
security settings are enabled. If you choose any setting that includes
Message or Transport, you will need to set additional properties. In
general, Mode follows the standard WCF security programming model.
Message– This property defines security on a per-message basis. If you set end-to-end message security to EndToEndSecurityMode.Message or EndToEndSecurityMode.TransportWithMessageCredential,
you will need to set additional properties on your binding that control
message security. Ultimately, the Message property consists of defining
the type of credentials used, as well as the algorithm used to secure
the credentials. As with Mode, the message security setting follows the
WCF programming model.
Transport– This property is a wrapper for security properties unique for a given transport. For example, the RelayedOnewayTransportSecurity class contains the ProtectionLevel setting on the NetEvent and NetOneWay bindings. In contrast, the HttpRelayTransportSecurity
type sets proxy credentials for BasicHttp and WS2007 bindings. As with
the previous properties, Transport security generally follows the WCF
security model.
RelayClientAuthenticationType–
This is the main security property that is unique to the AppFabric
Service Bus because it controls whether service consumers are required
to present a security token issued by Access Control when sending
messages. As mentioned previously, services are always required to
authenticate with Access Control and present an authorization token to
the AppFabric Service Bus. However, the Service Bus leaves it to the
service itself to decide if a consumer is required to authenticate
itself.
To enable consumer-side authentication, you must set the RelayClientAuthenticationType property to RelayAccessToken (the default setting). Setting RelayClientAuthenticationType
to None waives the requirement of a token and therefore you can opt out
of authentication on the consumer (sender) in the Service Bus leg of
the communication if you are providing your own authentication or if you
do not need authentication. The default value is RelayClientAuthenticationType.RelayAccessToken.
In this example, we are going to configure the application binding authentication (RelayClientAuthenticationType) to RelayAccessToken. We will also set the endpoint behavior to sharedSecretClientCredentials.
Using a shared secret means that a consumer will use a predefined
secret that it shares with the service. In this case, we are going to
use the issuer name/secret combination that the Service Bus
automatically generates for us when we create our service namespace.
Here is what our updated configuration file looks like:
Example 4.
<system.serviceModel>
<bindings>
  <basicHttpRelayBinding>
    <binding name="default">
      <security relayClientAuthenticationType=
        "RelayAccessToken" />
    </binding>
  </basicHttpRelayBinding>
</bindings>
<services>
  <service name="OrderService.OrderService">
    <endpoint
      name="RelayEndpoint" address=
        "sb://StandardMold.ServiceBus.windows.net/OrderService"
      binding="basicHttpRelayBinding"
      bindingConfiguration="default"
      behaviorConfiguration="sharedSecretClientCredentials"
      contract="Contract.IOrderService">
    </endpoint>
  </service>
</services>
<behaviors>
  <endpointBehaviors>
    <behavior name="sharedSecretClientCredentials">
      <transportClientEndpointBehavior
        credentialType="SharedSecret">
        <clientCredentials>
          <sharedSecret issuerName="owner" issuerSecret="
          ...secret..." />
        </clientCredentials>
      </transportClientEndpointBehavior>
    </behavior>
  </endpointBehaviors>
</behaviors>
</system.serviceModel>
|
Now
we are ready to move to Step 5 and create and configure the service
host. This process will be similar to how you would normally set up an
in-process WCF service host, but there are some additional requirements.
First, we need to set the protocol that our service will use to establish a connection session with the Service Bus. We use the ServiceBusEnvironment.SystemConnectivity class and set it to AutoDetect.ServiceBusEnvironment.SystemConnectivity.Mode = ConnectivityMode.AutoDetect;.
SystemConnectivity returns a singleton instance of type ConnectivitySettings which holds the connectivity settings for TCP and HTTP-based endpoints. Setting this to AutoDetect
instructs our service to first try connecting to the Service Bus using
TCP, and if unable to do so, fall back on HTTP. This enables a most
efficient connection between the service and the Service Bus. If,
however, TCP will never be available for the service, we could save some
time by setting the mode to HTTP instead.
If we wanted, we could set
the mode to TCP, thus forcing a TCP connection-only scenario. However,
it doesn’t necessarily buy us anything since TCP is attempted first when
using the AutoDetect mode.
We can now set up a WCF service host and open a connection:
Example 5.
using System;
using System.Collections.Generic;
using System.Linq;
using System.Text;
using System.ServiceModel;
using Microsoft.ServiceBus;
using OrderService;
using System.ServiceModel.Description;
using Microsoft.ServiceBus.Description;
namespace Host
{
  class Program
  {
    static void Main(string[] args)
    {
      ServiceBusEnvironment.SystemConnectivity.Mode =
        ConnectivityMode.AutoDetect;
      ServiceHost h = new ServiceHost
        (typeof(OrderService.OrderService));
      ServiceRegistrySettings serviceRegistrySettings = new
        ServiceRegistrySettings(DiscoveryType.Public);
      serviceRegistrySettings.DisplayName = "OrderService";
      foreach (ServiceEndpoint se in h.Description.Endpoints)
      {
        se.Behaviors.Add(serviceRegistrySettings);
      }
      h.Open();
      Console.WriteLine("Service address: {0}",
        h.Description.Endpoints[0].Address);
      Console.WriteLine("Press [Enter] to exit:");
      Console.ReadLine();
      h.Close();
    }
  }
}
|
When we build and run the service, we will see a console window open with the service’s listening address (Figure 3).

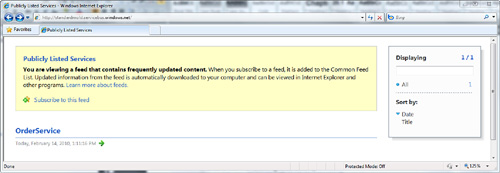
We can also publish the service into the service registry and make it publicly available with the following code:
Example 6.
ServiceRegistrySettings serviceRegistrySettings = new ServiceRegistry-
Settings(DiscoveryType.Public);
serviceRegistrySettings.DisplayName = "OrderService";
foreach (ServiceEndpoint se in h.Description.Endpoints)
{
  se.Behaviors.Add(serviceRegistrySettings);
}
|
If we set the binding’s clientRelayAuthenticationType to None, we can simply open up a Web browser and go to http://standardmold.servicebus.windows.net/. We will see our service displayed (Figure 4) and if we had other service endpoints, we could do this with them as well.