To
switch your application from the development storage to the live
storage account, you need to create a live storage account and switch
your configuration to it. In this section, we won’t go through the
process of creating a storage account; it’s pretty simple and the
information you require is available in this chapter. We’re going to
focus on configuring your application to work against your live storage
account.
1. Switching to the live storage account
To make your application
work against the live system, all you need to do is modify the value of
your configuration setting in the service configuration file. That’s it,
the end, nothing else to do. If you remember earlier, you set your
storage account configuration setting to the following:
<Setting name="DataConnectionString"
              value="UseDevelopmentStorage=true" />
Although this is great for the
development storage, it doesn’t give you a clue to the structure of the
setting for when you want to use the live system. The following setting
shows how the string should be structured.
<Setting name="DataConnectionString"
              value="DefaultEndpointsProtocol=protocol;
              AccountName=storageaccountname;
              AccountKey=storageaccountkey" />
To make this run against the live system, plug in the appropriate values:
<Setting name="DataConnectionString"
         value="DefaultEndpointsProtocol=http;
         AccountName=silverlightukstorage;
         AccountKey=Eby8vdM02xNOcqFlqUwJPLlmEtlCDXJ1OUzFT50uSRZ6IFsuFq2UVErCz4I6tq/K1SZFPTOtr/KBHBeksoGMGw==
" />
Now that you’ve configured the
live settings, you can use the live BLOB storage system either from the
development fabric or from the live production fabric. The only thing
left to do is to configure the access key.
2. Configuring the access key
If you’re unsure where you get
the account key for the storage account, you can always refer to the
Azure portal. When a new storage account is created in Windows Azure, a
primary and secondary access key is generated for you to secure your API
requests. The access key for your live account is used by all storage
services and is available from the storage account section of the
portal. Figure 1
shows the window in which you can retrieve your access key. When you
retrieve this key, it replaces the development key held in the service
configuration file.
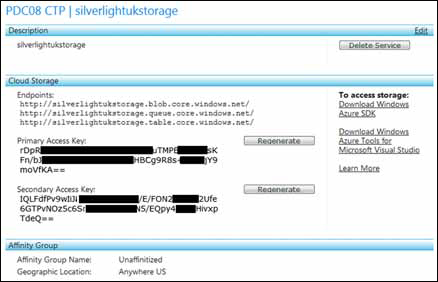
If your access key is compromised at any point, you can generate a new key by clicking the Regenerate button shown in figure 8.12.
After a new key has been generated, you’ll need to update the key in
the service configuration for your application. You also have two keys
that are valid at one point in time. Both keys are identical in what
they allow the user to do with them. Having two keys is a great way to
provide rolling key updates without any downtime in your system.
