Fog
Real-world objects that are
farther away are not only smaller but also obscured by the amount of
atmosphere between the viewer and the object. On most days when the air
is clear, the visibility of objects far away are not obscured too much,
but on other days a layer of fog might cover the ground lowering the
visibility.
In games, you can simulate
the fog that obscures objects by interpolating the color of an object as
it moves farther into the distance with a fog color. Fog can be any
color, but all objects should use a similar fog color; otherwise, some
objects will stand out more than others.
There are multiple ways to
interpolate the fog value as distance increases. The first method is to
use a simple linear interpolation as distance increases. The equation
you will use to calculate the linear fog value is
Fog = (Distance – Fog Start) / (Fog End – Fog Start)
The distance is from the
camera to the current pixel you are drawing. The fog start is the
distance that the fog can start to be seen or where the interpolation
should start. The fog end is the distance where the object will be in
complete fog. The calculated fog is a floating point value, which is in
the range of 0 and 1. Values over 1 should be treated as 1, which means
fully in fog. The fog value is then used as the interpolation value of
how much of the fog color to use with the final calculated pixel color.
To add linear fog to the ongoing sample, you will add three new member variables to your game.
// Fog color and properties
Vector3 fogColor;
float fogStart;
float fogEnd;
These values store the fog color and distance values you need to send to your custom effect.
These values need to be set to some defaults, so in the game’s Initialize method, add the following lines of code:
// Set fog properties
fogColor = Color.CornflowerBlue.ToVector3();
fogStart = 2;
fogEnd = 18;
Use a color value that is the
same as your clear color, so that the objects appear to fade away as
they move into the distance. In your game, set the color based on the
time of day. If your game is at night, fade to a dark almost black
color. If it is daytime, then use a lighter gray color. The fog color
can also be used for special effects to simulate some type of toxic gas
in a city so you can use some other interesting colors.
The other two values are set to
sensible values for the scene. Depending on the size and depth of your
scene and the camera’s view, update these values to match the scales.
In the game’s Draw method, send the new values to your custom effect.
fogEffect.Parameters["FogColor"].SetValue(fogColor);
fogEffect.Parameters["FogStart"].SetValue(fogStart);
fogEffect.Parameters["FogEnd"].SetValue(fogEnd);
Finally, update how you are
drawing the meshes in sample so that you have many more objects that
move farther and farther away from the camera.
// Draw the models 5 times in the negative Z direction
for (int i = 0; i < 5; i++)
{
    world = Matrix.CreateTranslation(0, 0, i * -4.0f);
    colorIndex = 0;

    foreach (ModelMesh mesh in model.Meshes)
    {
        // Set mesh effect parameters

fogEffect.Parameters["World"].SetValue(modelTransforms[mesh.ParentBone.Index]
                                               * world);

        foreach (ModelMeshPart meshPart in mesh.MeshParts)
        {
            // Set vertex and index buffer to use
            GraphicsDevice.SetVertexBuffer(meshPart.VertexBuffer, meshPart.VertexOffset);
            GraphicsDevice.Indices = meshPart.IndexBuffer;

            // Set diffuse color for the object
            fogEffect.Parameters["DiffuseColor"].SetValue(diffuseColor[colorIndex]);
            fogEffect.Parameters["SpecularColorPower"].SetValue(
                                                  specularColorPower[colorIndex]);
fogEffect.Parameters["EmissiveColor"].SetValue(emissiveColor[colorIndex]);
            colorIndex++;

            // Apply our one and only pass
            fogEffect.CurrentTechnique.Passes[0].Apply();

            GraphicsDevice.DrawIndexedPrimitives(PrimitiveType.TriangleList, 0, 0,
                                                    meshPart.NumVertices,
                                                    meshPart.StartIndex,
                                                    meshPart.PrimitiveCount);
        }
    }
}
Loop five times to draw
the model multiple times and farther and farther depths. This should
enable you to get a better idea of the effect of the fog as the distance
from the camera increases.
With all of the game code
changes complete, you just need to make a few simple changes to your
custom effect file to support the linear fog. First, you need the global
variables for the fog color and distance properties.
float3 FogColor;
float FogStart;
float FogEnd;
Next, you need to calculate the
fog value per vertex, so you need to pass the fog value into the pixel
shader. To do this, add the following value to your vertex output
structure.
struct VertexShaderOutput
{
    float4 Position : POSITION0;
    float3 Normal   : TEXCOORD0;
    float3 View     : TEXCOORD1;
    float Fog       : TEXCOORD2;
};
In the vertex shader, calculate the fog value before outputting the vertex.
// Calculate fog value
output.Fog = saturate((length(CameraPosition - worldPosition) - FogStart) /
                      (FogEnd - FogStart));
Use the same equation described
previously. In this code, the distance is calculated by subtracting the
world position of the vertex from the camera position. Then, use the length intrinsic function to calculate the length of the resulting vector. The saturate intrinsic function is used to clamp the calculated for value from 0 to 1.
The
final change is to update the pixel shader to use the newly calculated
fog value. Just before returning the final color from the pixel shader,
add the following line of code:
// lerp between the computed final color and the fog color
finalColor = lerp(finalColor, FogColor, input.Fog);
The lerp intrinsic
function interpolates between two vectors given the interpolation
value, which should be between 0 and 1. Interpolate between the already
calculated final color and the fog color depending on the fog value that
you calculated in the vertex shader.
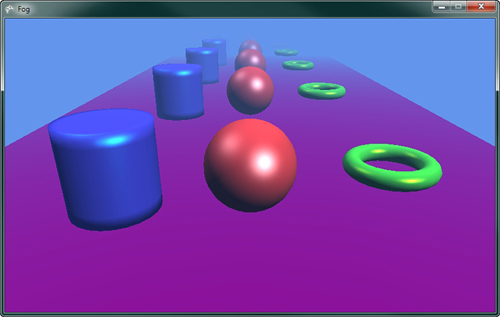
Running the sample now should
display multiple versions of the models that are farther and farther
away from the camera that slowly fade to the background color. This
should look similar to Figure 11.

The fog value does not have to
interpolate linearly with distance. You can also use other types of
interpolation such as an exponential falloff to achieve difference
results. Because you have the control in the vertex shader, there are
many different ways that you can use the distance to calculate the fog
value.