Point Lights
All of the examples up to this
point use one or more directional lights when calculating the light’s
influence on the color of the triangles. Although directional lights
work well to simulate the type of light that is coming from distant
objects such as the sun, they don’t work to simulate how objects look
indoors when lit from multiple smaller artificial lights such as light
bulbs. In computer graphics, we call these types of light sources point
lights.
Point lights have a known
position in 3D space, which differs from directional lights that only
have a direction. The direction to the point light must be calculated
because it changes depending on the location of the object drawn.
The light that comes from
smaller lights like the ones in your home tends to lose its brightness
the farther away an object is from the light. You can see this in your
home when you turn off the lights in a room and have only a single table
lamp to light the room. Notice that the light is brightest close to the
lamp, but falls off quickly with distance from the light. This falloff
from the light source is called attenuation and differs depending on the
size and type of light.
There are multiple ways in
which you can calculate the attenuation when simulating the light that
comes from point light sources. Use the following attenuation equation:
Attenuation = 1 - (((Light Position - Object Position) / Light Range) * ((Light Position - Object Position) / Light Range))
In the previous
equation, the light position is the location of the point light. The
object position is the location you are currently drawing in world
space, and the light range is how far the light rays will travel from
the light source.
To demonstrate how point lights work in the game, update the previous specular lighting example, which uses directional lights.
First, you need some
different member variables for the game. Remove the vector that
represents the light direction and update it with the following code:
// The position the light
Vector3 lightPosition;
// The range of the light
float lightRange;
The light now has a position and a float value that represents the distance from the light that objects can be lit from.
In the game’s Initialize method, give the point light the following values:
// Set light starting location
lightPosition = new Vector3(0, 2.5f, 2.0f);

// The range the light
lightRange = 6.0f;
In the same location where you set the light direction for the effect in your game’s Draw method, update the effect with the new point light properties.
pointLightEffect.Parameters["LightPosition"].SetValue(lightPosition);
pointLightEffect.Parameters["LightRange"].SetValue(lightRange);
Most of the changes to support
the point light occur in the effect file. You need two new global
variables to store the light position and range.
float3 LightPosition;
float LightRange;
You need the position of
the pixel you are rendering in the pixel shader in world space. To do
this, add an additional value to the vertex output structure to store
the position in world space.
struct VertexShaderOutput
{
    float4 Position : POSITION0;
    float3 Normal   : TEXCOORD0;
    float3 View     : TEXCOORD1;
    float3 WorldPos : TEXCOORD2;
};
The vertex shader needs to be updated to save the calculated world space position of the vertex.
output.WorldPos = worldPosition;
The pixel shader should be updated to the following:
float4 PixelShaderFunction(VertexShaderOutput input) : COLOR0
{
    // Normalize the interpolated normal and view
    float3 normal = normalize(input.Normal);
    float3 view = normalize(input.View);

    // Direction from pixel to the light
    float3 light = LightPosition - input.WorldPos;

    // Attenuation
    float attenuation = saturate(1 - dot(light / LightRange, light / LightRange));

    // Normalize the light direction
    light = normalize(light);

    // Store the final color of the pixel
    float3 finalColor = float3(0, 0, 0);

    // Start with ambient light color
    float3 diffuse = AmbientLightColor;

    // Calculate diffuse lighting
    float NdotL = saturate(dot(normal, light));
    diffuse += NdotL * DiffuseLightColor * attenuation;

    // Calculate half vector
    float3 half = normalize(view + light);

    // Calculate N * H
    float NdotH = saturate(dot(normal, half));
    // Calculate specular using Blinn-Phong
    float specular = 0;
    if (NdotL != 0)
        specular += pow(NdotH, SpecularColorPower.w) * SpecularLightColor * attenuation;

    // Add in diffuse color value
    finalColor +=  DiffuseColor * diffuse;

    // Add in specular color value
    finalColor +=  SpecularColorPower.xyz * specular;

    // Add in emissive color
    finalColor += EmissiveColor;

    return float4(finalColor, 1);
}
Although
it appears to be a lot of code at first, it is actually close to the
pixel shader used for the specular lighting example. Let’s walk though
the important differences.
The input world position
is interpolated for each pixel giving the location of the current pixel
in world space, which is what you need to calculate the distance to the
light source. The light variable is stored with the vector form the pixel to the light. The attenuation is then calculated using the equation from earlier in the article. The light
vector is then normalized because you use this value as the direction
of the light as you would if this was a directional light. The new
normalized light is then used in the calculations of NdotL and half. Finally the attenuation is multiplied when calculating the diffuse and specular intensity values.
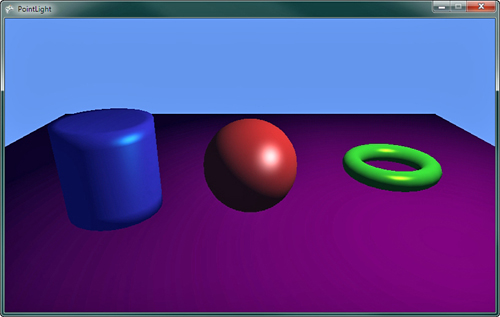
Running the sample now shows the
objects in the scene lit from a point location where the light falls
off the farther the objects are away from the light. Rotating the light
or moving the light source from each frame can make this much more
visible. Figure 12 shows the objects in the scene lit from a single point light.

Adding multiple point
lights works in a similar way as adding additional directional lights.
The lighting influence of each additional light source needs to be
calculated for each light and added into the diffuse and specular
intensity values. You can also mix and match by supporting a directional
light and point lights in your effect.