Your game will most likely contain more than one
animation. If you switch between animations, the location of the bones
of the avatar quickly move to their new position and appear to pop from
one location to another. What you really want is a way to blend from one
animation to another smoothly so that the avatar does not appear to pop
from one to the other.
To accomplish this, blend
from using one set of transforms to the other over a short period of
time. The bone’s position and rotation values need to be interpolated
over the time from one animation to the other.
To demonstrate how to blend
between two avatar animations, create a new type that you will use to
play back the blending avatar animation.
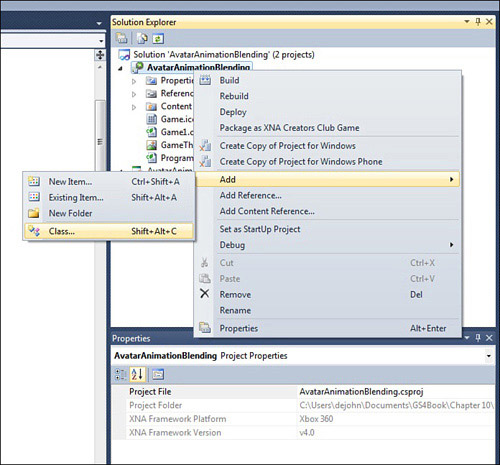
Add a new class to the sample by right-clicking the project and selecting Add -> Class as seen in Figure 1.
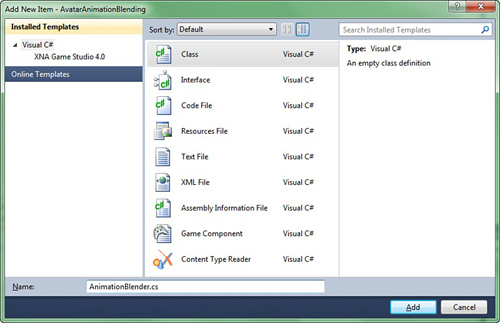
When the Add New Item dialog appears, enter the name of the new class called AnimationBlender.cs and select Add as in Figure 2.
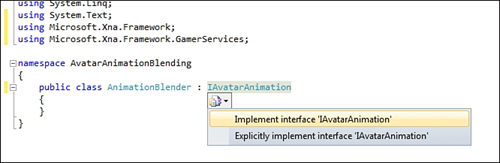
Our new class needs to be public and implement the IAvatarAnimation interface. Update the class definition for your new class to the following:
public class AnimationBlender : IAvatarAnimation
After
you type the interface name, Visual Studio displays a tool tip that can
be used to implement the interface with stubs as shown in Figure 3.
The AnimationBlender
contains a two-member variable to hold references to the current and
next animation that are blended together. There are two states the AnimationBlender can be in. The first is playing just a single animation, which works just like a normal AvatarAnimation.
The second is a blending state where the current animation starts to
blend to the next animation and ends when the blend is complete and the
next animation becomes the current animation.
Add the following member variables to the new AnimationBlender class:
// The current aniamtion that is playing
private AvatarAnimation currentAnimation;
// The animation to blend to
private AvatarAnimation nextAnimation;
// The total time to blend to the next animation
private TimeSpan totalBlendTime = TimeSpan.FromMilliseconds(300);
// How far along the blend we are
private TimeSpan currentBlendTime;
We also need two variables to store the current blend time and how long the blend from one animation to the other should take.
Implement each of the properties exposed by the IAvatarAnimation interface. The first is the BoneTransfroms.
/// <summary>
/// Returns the bone transforms to use with the AvatarRenderer
/// </summary>
public ReadOnlyCollection<Matrix> BoneTransforms
{
    get { return boneTransforms; }
}
private Matrix[] blendedAvatarBones = new Matrix[AvatarRenderer.BoneCount];
private ReadOnlyCollection<Matrix> boneTransforms;
Next, implement the CurrentPosition property.
/// <summary>
/// The current position in the animation
/// If we are blending then we use the next animation
/// </summary>
public TimeSpan CurrentPosition
{
    get
    {
        TimeSpan returnValue;

        if (nextAnimation != null)
            returnValue = nextAnimation.CurrentPosition;
        else
            returnValue = currentAnimation.CurrentPosition;

        // Call update to set the avatar transforms
        Update(TimeSpan.Zero, false);

        return returnValue;
    }
    set
    {
        if (nextAnimation != null)
            nextAnimation.CurrentPosition = value;
        else
            currentAnimation.CurrentPosition = value;
    }
}
For the CurrentPosition, use the value from the nextAnimation if you are currently blending; otherwise, use the currentAnimation value. Do the same for the Expression and Length properties.
/// <summary>
/// The current expression in the animation
/// If we are blending then we use the next animation
/// The expression is not blended so we just use
/// the next animations expression
/// </summary>
public AvatarExpression Expression
{
    get
    {
        if (nextAnimation != null)
            return nextAnimation.Expression;
        else
            return currentAnimation.Expression;
    }
}

/// <summary>
/// The length of the animation
/// If we are blending then we use the next animation
/// </summary>
public TimeSpan Length
{
    get
    {
        if (nextAnimation != null)
            return nextAnimation.Length;
        else
            return currentAnimation.Length;
    }
}
The constructor is quite simple and takes the initial AvatarAnimation that should be playing. Add the following constructor to the AnimationBlender:
public AnimationBlender(AvatarAnimation startingAnimation)
{
    currentAnimation = startingAnimation;

    boneTransforms = new ReadOnlyCollection<Matrix>(blendedAvatarBones);
}
Set the currentAnimation variable and initialize the ReadOnlyCollection of matrices that you return from the BoneTransforms property.
Now
you need an animation to call when you start playing a new animation.
This kicks off the blend from the current animation to the new
animation. Add the following method to the AnimationBlender class:
/// <summary>
/// Starts the process of blending to the next animation
/// </summary>
public void Play(AvatarAnimation animation)
{
    // Animation to blend to
    nextAnimation = animation;
    // Reset the animation to start at the beginning
    nextAnimation.CurrentPosition = TimeSpan.Zero;

    // Set our current blend position
    currentBlendTime = TimeSpan.Zero;
}
First, set the nextAnimation to the one passed into the method. Then, reset the animation’s CurrentPosition
so that it is at the start of the animation. This is not required, but
is helpful when playing the same animations over and over again. The
last line of code resets the currentBlendTime back to zero.
The final method that is required for your AnimationBlender class is to implement the Update method. The Update method is where you update the private bone transforms and perform any blending that is required. Add the following Update method to the AnimationBlender class:
/// <summary>
/// Updates the animation and performs blending to the next animation
/// </summary>
public void Update(TimeSpan elapsedAnimationTime, bool loop)
{
    // Update the current animation
    currentAnimation.Update(elapsedAnimationTime, loop);

    // If we are not blending to an animation just copy the current transforms
    if (nextAnimation == null)
    {
        currentAnimation.BoneTransforms.CopyTo(blendedAvatarBones, 0);
        return;
    }

    // If we get here we are blending and we need to update the next animation
    nextAnimation.Update(elapsedAnimationTime, loop);

    // Update where we are in the blend
    currentBlendTime += elapsedAnimationTime;
    // Calculate blend factor
    float blendAmount = (float)(currentBlendTime.TotalSeconds /
                                totalBlendTime.TotalSeconds);

    // If the blend is over 1 then we are done blending
    // We can just use the next animation transforms
    if (blendAmount >= 1.0f)
    {
        // Set the current animtion and remove the target animation
        currentAnimation = nextAnimation;
        nextAnimation.BoneTransforms.CopyTo(blendedAvatarBones, 0);
        nextAnimation = null;
        return;
    }

    // We need to store the rotation and translation for each bone in
    // the current and next animations. We then need to calculate the
    // final values using the blend amount as a weight between the
    // current and next values.
    Quaternion currentRotation, nextRotation, blendedRotation;
    Vector3 currentTranslation, nextTranslation, blendedTranslation;

    // Loop all bone transforms
    for (int i = 0; i < blendedAvatarBones.Length; ++i)
    {
        currentRotation =
          Quaternion.CreateFromRotationMatrix(currentAnimation.BoneTransforms[i]);
        currentTranslation = currentAnimation.BoneTransforms[i].Translation;
        nextRotation =
             Quaternion.CreateFromRotationMatrix(nextAnimation.BoneTransforms[i]);
        nextTranslation = nextAnimation.BoneTransforms[i].Translation;

        // Calculate the blended rotation
        Quaternion.Slerp(ref currentRotation, ref nextRotation,
                         blendAmount, out blendedRotation);

        // Calculate the blended translation
        Vector3.Lerp(ref currentTranslation, ref nextTranslation,
                     blendAmount, out blendedTranslation);

        // Create the blended bone matrix
        blendedAvatarBones[i] = Matrix.CreateFromQuaternion(blendedRotation) *
                                Matrix.CreateTranslation(blendedTranslation);
    }
}
That
was a lot code, so let’s take a look at it piece by piece. The first
section of code updates the current animation and checks whether there
is blending by checking the nextAnimation for null. If there is no blending, the transforms from the current animation are copied to the blendedAvatarBones.
If there is blending, then the nextAnimation Update
method is called to update the playback of the animation. The amount of
time the blending has been occurring is then updated and the blendAmount is calculated. The blendAmount
ranges from 0 to 1 over the course of the blend. If the value is equal
to 1 or higher, then you should complete the blend and set the currentAnimation to the nextAnimation.
The final section of code is
the blend between the two sets of bones from the animations. Each bone
in the avatar skeleton is looped over and the matrix value for the
animation frame is broken down into its rotation and translation
components. The rotation value is then calculated by taking the Slerp value using the blendAmount. The translation value is then calculated with a linear transformation using Lerp. The rotation and translation are then combined to form the blended bone transform that is saved in the blendedAvatarBones array.
Now that you created the AnimationBlender class, you can use it in the ongoing sample. The game needs an array of AvatarAnimations and an instance of the AnimationBlender. You also need to save the state of the GamePad, so you can track button presses. Add the following member variables to your game class:
AvatarAnimation[] avatarAnimations;
AnimationBlender animationBlender;

GamePadState lastGamePadState;
In the game’s LoadContent method, load the multiple animations that you will use and initialize your AnimationBlender. Add the following lines of code to the LoadContent method:
// Load all of the animation
avatarAnimations = new AvatarAnimation[3];
avatarAnimations[0] = new AvatarAnimation(AvatarAnimationPreset.Celebrate);
avatarAnimations[1] = new AvatarAnimation(AvatarAnimationPreset.Clap);
avatarAnimations[2] = new AvatarAnimation(AvatarAnimationPreset.Wave);

// Create the animation blender
animationBlender = new AnimationBlender(avatarAnimations[0]);
Next, in the game’s Update method, call Update on the AnimationBlender. Also detect button presses and play different animations depending on which button you press.
// Update the animation blender
animationBlender.Update(gameTime.ElapsedGameTime, true);

// Get the current state of player one controller
GamePadState currentGamePadState = GamePad.GetState(PlayerIndex.One);
// If the user presses the X, Y, or B buttons blend to an animation
if (currentGamePadState.Buttons.X == ButtonState.Pressed &&
    lastGamePadState.Buttons.X == ButtonState.Released)
{
    animationBlender.Play(avatarAnimations[0]);
}
if (currentGamePadState.Buttons.Y == ButtonState.Pressed &&
    lastGamePadState.Buttons.Y == ButtonState.Released)
{
    animationBlender.Play(avatarAnimations[1]);
}
if (currentGamePadState.Buttons.B == ButtonState.Pressed &&
    lastGamePadState.Buttons.B == ButtonState.Released)
{
    animationBlender.Play(avatarAnimations[2]);
}

// Save the state so we can prevent repeat button presses
lastGamePadState = currentGamePadState;
The final step is to use the AvatarBlender to draw the avatar. Update the Draw method with the following line to draw the avatar using the blended animation:
avatarRenderer.Draw(animationBlender);
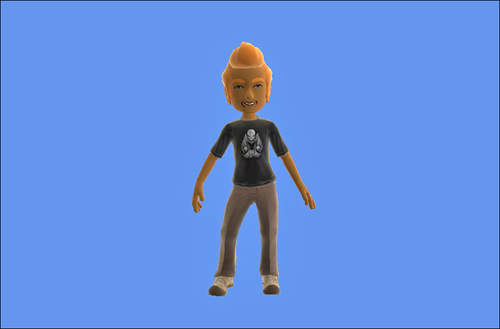
Running the sample now
should enable you to press the X,Y, and B buttons to blend between
animations. The blended animation should look similar to Figure 4 below: