Your younger brother (who seems to have taken on the
role of lead game designer) has come to you with an idea for 100 "killer
tangerines" that appear on the screen once the player has scored 500
points. He is not sure what they would do, or how they would work, but
he reckons that they would "scare the player to death," as he puts it.
Because you are making up the game as you go along, you reckon that this
might be a fun thing to do, and you can work out what to do with them
once you have created them. The first thing you
need is a picture of a tangerine to use for a sprite. Fortunately, the
Great Programmer likes oranges, and so you are able to take a picture of
one and convert it for use as a game texture. You decide to call this
new type of sprite a KillerSprite for now; you can always change its name later if you need to.
1. Creating a KillerSprite Class
You use the MovingSprite as the basis of your KillerSprite sprite:
public class KillerSprite : MovingSprite
{
    public KillerSprite(
        Texture2D inSpriteTexture,
        float widthFactor, float ticksToCrossScreen,
        float inMinDisplayX, float inMaxDisplayX,
        float inMinDisplayY, float inMaxDisplayY)
        : base(inSpriteTexture, widthFactor, ticksToCrossScreen,
            inMinDisplayX, inMaxDisplayX,
            inMinDisplayY, inMaxDisplayY,
            0, 0) // set the initial position to 0,0 for now
    {
        // TODO: Calculate a random initial position for the Killer Sprite
    }

}
The big scary lump of code in the class is the call of the constructor of the MovingSprite
class. This needs to be given all the information it needs to create
the sprite rectangle and set up the movement of the sprite. At the
moment, the constructor for KillerSprite doesn’t actually do anything—it just passes all the values to the base constructor of its parent class.
The base constructor for the parent MovingSprite class must be given an initial position for the sprite. At the moment we don’t know where to put the sprite, so all KillerSprite objects are initially placed at 0,0. The constructor code for the KillerSprite
will calculate a random position of this sprite, so there is a TODO
comment in the constructor to remind us to add this code later.
Your game could construct a KillerSprite instance like this:
KillerTangerine  = new KillerSprite(
    Content.Load<Texture2D>("Images/Tangerine"),
    0.03f,    // a tangerine takes 0.03 of the screen width
    1000,     // tangerine takes 200 ticks to cross the screen
    minDisplayX, maxDisplayX, minDisplayY, maxDisplayY);
2. Positioning the KillerSprites Using Random Numbers
Your younger brother
wants the tangerine killer sprites to appear at random all over the
screen. This means that you need a source of random numbers to position
them. Computers are carefully designed to do exactly the same thing when
given the same sequence
of instructions. A computer that did not do this would be called a
"broken" one. From a programming perspective, getting truly random
behavior is difficult. Fortunately, the Microsoft .NET Framework
provides a way of getting "pseudorandom" numbers very easily.
2.1. Pseudorandom Numbers
A source of
pseudorandom numbers is not completely random, but it is random enough
to be useful. It uses the previous random number to generate the next
one and so produces a sequence of numbers that appear random.
The sequence
starts with a particular "seed" value. The process always produces the
same sequence from the same seed. This is why it’s called "pseudorandom"
rather than "completely random." Pseudorandom numbers are actually
quite useful, in that they can produce complex but repeatable behavior.
You are going to use this feature so that the killer sprites always
appear in the same places on the screen. This would make it possible for
a keen player to learn these locations and use this to improve their
game play.
2.2. The .NET Random Class
The .NET Framework provides a class called Random
which exposes a number of methods that can be used to obtain random
numbers in a variety of ways. The first thing the program must do is
create an instance of the Random class:
Random rand = new Random(1); // create a random number generator seeded at 1
This statement creates a new Random instance and sets the variable rand
to refer to it. The instance has been seeded with the value 1, so that
it will always produce exactly the same sequence of values. The program
can now call methods on this reference to get a hold of random numbers
from it:
int diceSpots;
int winner;

diceSpots = rand.Next(1, 7);   // get a value between 1 and 6
winner = rand.Next(100);       // get a value between 0 and 99
The constructor for the KillerSprite
must generate random numbers that will place the sprite somewhere
within the boundary of the playfield. To do this it can use the maximum
and minimum values for the screen size along with the width and height
of the sprites that will be drawn:
initialX = rand.Next((int)minDisplayX,                             // min value
                     (int)(maxDisplayX - spriteRectangle.Width));  // max value
initialY = rand.Next((int)minDisplayY,                             // min value
                     (int)(maxDisplayY - spriteRectangle.Height)); // max value
The previous code sets the initial position for a KillerSprite so that it is random but within the screen boundary. Note that the Next method requires integer parameters, and so the values must be cast to int before being passed into it.
2.3. Creating a Static Random Generator for the KillerSprite
The KillerSprite
class must have one random number generator which is shared among all
instances of the class. If the program made a new random number
generator each time it made a new KillerSprite
instance this would not work. All the sprites would be placed in the
same location because they would each contain a brand-new random number
generator seeded with the value 1. They would then set their positions
by using the same first two numbers produced by the identically seeded
generator.
You can get around this problem by making the random number generator a static
member of the class. When a class member is made static it is not held
inside an instance, but is actually part of the class, and shared by all
the instances.
static Random rand = new Random(1);
Whenever an instance of KillerSprite uses the rand member variable, it will use the single, static variable which is part of the class.
The KillerSprite constructor uses the random number generator to position a sprite at a random position, as shown here in bold:
public class KillerSprite : MovingSprite
{
    static Random rand = new Random(1);

    public KillerSprite(
        Texture2D inSpriteTexture,
        float widthFactor, float ticksToCrossScreen,
        float inMinDisplayX, float inMaxDisplayX,
        float inMinDisplayY, float inMaxDisplayY)
        : base(inSpriteTexture, widthFactor, ticksToCrossScreen,
            inMinDisplayX, inMaxDisplayX,
            inMinDisplayY, inMaxDisplayY,
            0, 0)  // set the initial position to 0,0 for now
    {
        initialX = rand.Next((int)minDisplayX,
							(int)(maxDisplayX - spriteRectangle.Width));
							initialY = rand.Next((int)minDisplayY,
							(int)(maxDisplayY - spriteRectangle.Height));
    }
}
2.4. Getting a Random Sequence of Numbers
Your
younger brother has been reading this section with interest. He is
obviously planning some kind of card game program where he can know
exactly what cards the other players are holding, because of the way
that he can get a predictable sequence of values from the Random class. If you need to get truly random behavior you can create a Random instance without giving it an initial seed value:
Random rand = new Random(); // create a truly random number generator
If you do not provide a seed
value the .NET Framework uses a seed that’s obtained from the precise
time that the program runs, so that the game program gets a different
random sequence each time the game is played.
3. Using Lists of References
The next problem to solve is how to store all the KillerTangerine
variables that you are going to create. Arrays are, at the moment, the
only way we know to hold large numbers of things.
You could use arrays to
hold all the game objects, but the C# libraries provide a much better
mechanism for doing this. It is called a List. The List
is a "collection" class, which is designed to hold lists of things. It
is so useful that you feel like taking it home to meet your parents.
The List collection uses a C# feature called generics, where a program construction can be designed and made to work on items independent of their type. The great thing about a List
is that you can create it and add items to it without worrying about it
filling up. Some clever software behind the scenes (that you don’t have
to know about) reserves extra space when required. The List
collection seems to have arrived just in time. For now, you need to
create something that can manage a very large number of sprites.
3.1. Creating a List Collection
You declare a List collection as you would any other variable, as shown in bold here:
// The Game World
public BreadSprite Bread;
public CheeseSprite Cheese;
public DeadlyPepper Pepper;
public TomatoRowSprite Tomato;
public TitleSprite Title;
public BaseSprite Background;

public List<BaseSprite> GameSprites = new List<BaseSprite>();
This is the game world for our game. It includes all the original sprites, plus the list variable called GameSprites,
which is going to hold all the sprites that are on the screen when the
game is active. The type of the items you want to put in the list is
given between the left-angle bracket (<) and the right-angle bracket (>) characters. In this case, you are creating a list of BaseSprite
references, but you can create lists to hold any type. Note that
because a reference to a parent class is able to refer to any of the
child classes of that parent, we can add any of our sprite types to the
list.
3.2. Adding Items to a List
The List class provides a method called Add, which can be used to add things to the List, as shown here in bold:
for (int i = 0; i < 100; i++)
{
    KillerSprite Tangerine;
    Tangerine = new KillerSprite(
        Content.Load<Texture2D>("Images/Tangerine"),
        0.03f,   // a tangerine takes 0.03 of the screen width
        1000,    // tangerine takes 200 ticks to cross the screen
        minDisplayX, maxDisplayX, minDisplayY, maxDisplayY);
    GameSprites.Add(Tangerine);
}
This code creates 100 tangerines and adds them to the GameSprites
list. Note that if we wanted 1,000 of them (which would really scare
the player), we just have to change the upper limit of the for loop and hope that the Xbox can keep up.
3.3. Accessing List Elements
Getting a hold of elements from a list turns out to be very easy. You can use subscripts just like an array, as follows:
for (int i = 0; i < 100; i++)
{
    GameSprites[i].Draw(spriteBatch);
}
This code would call the Draw
method on all the tangerines in the list. If the program tries to
access an element that is not present (perhaps the one with a subscript
of 100), then the program fails with an exception, just as an array
would. The List class provides a Count method, which can be used to find out how many items the list contains:
for (int i = 0; i < GameSprites.Count(); i++)
{
    GameSprites[i].Draw(spriteBatch);
}
This version of the loop would work correctly for any size of list. In this respect, the Count method is directly analogous to the Length property of an array.
3.4. Working Through List Elements Using foreach
Lists (and indeed arrays) can also be used with another form of C# loop construction called foreach.
This provides a really neat way of performing an operation on a large
number of items in a collection. It removes the need for you to create a
control variable and worry about the size of the collection:
foreach (BaseSprite sprite in GameSprites)
{
    sprite.Draw(spriteBatch);
}
The foreach
construction takes each item out of a collection and feeds it into the
statements to be repeated. This code asks all the sprites in the game to
perform their Draw operation. The elements of the List collection are fetched by the foreach loop in the same order that they were added. You can also use foreach
to work through the elements of an array in the same way. Note however
that other collection classes might not return the elements in the same
order that you stored them; only lists and arrays are guaranteed to do
this.
3.5. Setting Up the Game Sprites
It makes sense to add all the sprites into the game into the GameSprites list. This means that the Draw and Update methods can be made much simpler because they just have to use a foreach construction. The sprites would be added to GameSprites when they are created:
CheeseBall = new BallSprite(
    Content.Load<Texture2D>("Images/Cheese"),
    0.07f,   // a cheese takes 0.07 of the screen width
    200,     // cheese takes 200 ticks to cross the screen
    minDisplayX, maxDisplayX, minDisplayY, maxDisplayY,
    displayWidth / 4,   // a quarter across the screen
    displayHeight / 4); // a quarter down the screen

GameSprites.Add(CheeseBall);
Note that you now have two ways that to get to the BallSprite instance that represents the cheese in the game. The program can either follow the CheeseBall reference, or use the reference stored in the GameSprites list. You can now remove the use of the individual references in the Draw and Update methods so that they are now even simpler, as shown in the complete Draw method below:
protected override void Draw(GameTime gameTime)
{
    GraphicsDevice.Clear(Color.CornflowerBlue);

    spriteBatch.Begin();

    switch (state)
    {
        case GameState.titleScreen:
            Title.Draw(spriteBatch);
            drawHighScore();
            break;
        case GameState.playingGame:
            foreach (BaseSprite sprite in GameSprites)
            {
                sprite.Draw(spriteBatch);
            }
            drawScore();
            break;
    }

    spriteBatch.End();

    base.Draw(gameTime);

}
The only sprite that is not added to the list of GameSprites is the Title sprite, which is drawn when the title screen must be displayed.
3.6. Extra List Features
The List collection also provides Remove
methods that let you remove elements from a list. When an element is
removed, the list is "shuffled down" to so that there is no empty slot.
This would be a very useful way of removing items from game that have
been destroyed. If they are removed from the list, they are not drawn.
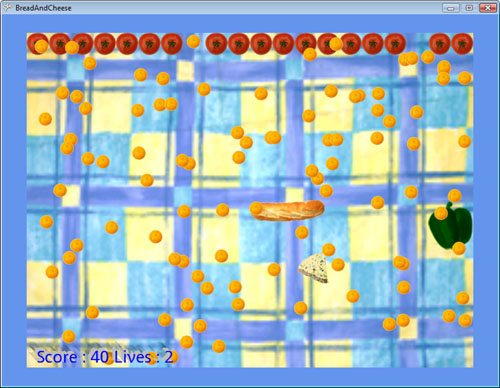
Figure 1
shows how the tangerines are drawn. Note that because the code uses a
random number generator seeded with the same number each time, the
tangerines are placed in exactly the same position each time the program
runs.