You can combine the two approaches of drawing on a WriteableBitmap.
The next sample displays a Path on a WriteableBitmap
against a gradient that uses transparency so that you can see how the
premultiplied alphas work.
I’m sure you remember the Path element from the end of the previous chapter that
displayed a cat from a string in the Silverlight Path Markup Syntax. The
goal of the VectorToRaster
program is to make a bitmap of precisely the right size for that cat,
and then put that cat in the bitmap.
The Path Markup Syntax for the
cat is defined in a Path element in the
Resources section of the MainPage.xaml
file:
Example 1. Silverlight
Project: VectorToRaster File: MainPage.xaml (excerpt)
<phone:PhoneApplicationPage.Resources>
    <Path x:Key="catPath"
          Data="M 160 140 L 150 50 220 103
                M 320 140 L 330 50 260 103
                M 215 230 L 40 200
                M 215 240 L 40 240
                M 215 250 L 40 280
                M 265 230 L 440 200
                M 265 240 L 440 240
                M 265 250 L 440 280
                M 240 100 A 100 100 0 0 1 240 300
                          A 100 100 0 0 1 240 100
                M 180 170 A 40 40 0 0 1 220 170
                          A 40 40 0 0 1 180 170
                M 300 170 A 40 40 0 0 1 260 170
                          A 40 40 0 0 1 300 170" />
</phone:PhoneApplicationPage.Resources>
|
This is not exactly the way
I wanted to define the PathGeometry in
the XAML Resources collection. I
would have preferred defining the PathGeometry
directly without a Path. But no matter
how I tried it—setting the Path Markup
Syntax string to the Figures property
of a PathGeometry or putting the string
between a PathGeometry
start tag and end tag—I could not get it to work.
I’m using this Path element solely
to force the XAML parser to acknowledge this string as Path Markup
Syntax; the Path
element won’t be used for any other purpose in the program.
The content area consists of
just an Image element awaiting a
bitmap:
Example 2. Silverlight
Project: VectorToRaster File: MainPage.xaml (excerpt)
<Grid x:Name="ContentPanel" Grid.Row="1" Margin="12,0,12,0">
    <Image Name="img"
           HorizontalAlignment="Center"
           VerticalAlignment="Center" />
</Grid>
|
Everything else happens
in the constructor of the MainPage class. It’s a little lengthy but well commented and
I’ll also walk you through the logic:
Example 3. Silverlight
Project: VectorToRaster File: MainPage.xaml.cs (excerpt)
public MainPage()
{
    InitializeComponent();
    // Get PathGeometry from resource
    Path catPath = this.Resources["catPath"] as Path;
    PathGeometry pathGeometry = catPath.Data as PathGeometry;
    catPath.Data = null;

    // Get geometry bounds
    Rect bounds = pathGeometry.Bounds;

    // Create new path for rendering on bitmap
    Path newPath = new Path
    {
        Stroke = this.Resources["PhoneForegroundBrush"] as Brush,
        StrokeThickness = 5,
        Data = pathGeometry
    };

    // Create the WriteableBitmap
    WriteableBitmap writeableBitmap =
        new WriteableBitmap((int)(bounds.Width + newPath.StrokeThickness),
                            (int)(bounds.Height + newPath.StrokeThickness));

    // Color the background of the bitmap
    Color baseColor = (Color)this.Resources["PhoneAccentColor"];

    // Treat the bitmap as an ellipse:
    //  radiusX and radiusY are also the centers!
    double radiusX = writeableBitmap.PixelWidth / 2.0;
    double radiusY = writeableBitmap.PixelHeight / 2.0;

    for (int y = 0; y < writeableBitmap.PixelHeight; y++)
        for (int x = 0; x < writeableBitmap.PixelWidth; x++)
        {
            double angle = Math.Atan2(y - radiusY, x - radiusX);
            double ellipseX = radiusX * (1 + Math.Cos(angle));
            double ellipseY = radiusY * (1 + Math.Sin(angle));

            double ellipseToCenter =
                Math.Sqrt(Math.Pow(ellipseX - radiusX, 2) +
                          Math.Pow(ellipseY - radiusY, 2));

            double pointToCenter =
                Math.Sqrt(Math.Pow(x - radiusX, 2) + Math.Pow(y - radiusY, 2));

            double opacity = Math.Min(1, pointToCenter / ellipseToCenter);

            byte A = (byte)(opacity * 255);
            byte R = (byte)(opacity * baseColor.R);
            byte G = (byte)(opacity * baseColor.G);
            byte B = (byte)(opacity * baseColor.B);

            int color = A << 24 | R << 16 | G << 8 | B;

            writeableBitmap.Pixels[y * writeableBitmap.PixelWidth + x] = color;
        }

    writeableBitmap.Invalidate();

    // Find transform to move Path to edges
    TranslateTransform translate = new TranslateTransform
    {
        X = -bounds.X + newPath.StrokeThickness / 2,
        Y = -bounds.Y + newPath.StrokeThickness / 2
    };

    writeableBitmap.Render(newPath, translate);
    writeableBitmap.Invalidate();

    // Set bitmap to Image element
    img.Source = writeableBitmap;
}
|
The code begins by obtaining the PathGeometry from
the Resources collection. Because it’s
attached to a Path
element, it normally wouldn’t be usable for other purposes. That’s why
the Data property of that Path element is assigned null. The Path element is now abandoned and has no more role
in this program.
The Bounds property
defined by Geometry returns the Rect object indicating
the coordinate of the upper-left corner of the PathGeometry—in this case the point (40,50)—and its width and
height, in this case, 400 and 250, respectively. Notice that these
values are strictly geometric and do not take account of any non-zero
stroke widths that may be present when rendering the geometry.
The code then creates a Path element for
this geometry. Unlike the Path element
in the Resources
collection of the XAML file, this Path
has an actual Stroke brush and a StrokeThickness value of 5.
How large will the
rendered geometry actually be? We know it will be at least 400 pixels
wide and 250 pixels tall. Beyond that, an exact
calculation is difficult, but a reasonable calculation is easy: If all the lines in the
geometry are stroked with a thickness of 5, then the rendered geometry
will be 2.5 pixels more on the left, top, right, and bottom, or 5 pixels
more than the width and height of the geometry. This is the calculation
used to create a WriteableBitmap of
the correct size. (This is not sufficient to account for miter joins, and might be
a little more than is needed for other line caps and joins, but the
calculation is easy and usually adequate.)
Before rendering the Path
on the WriteableBitmap,
I want to give the bitmap a gradient brush that is transparent in the center but
the current accent color at the edges:
Color baseColor = (Color)this.Resources["PhoneAccentColor"];
The gradient actually might be more attractive the other way
around (that is, transparent at the edges) but I want you to see how
close the bitmap comes to matching the size
of the rendered geometry.
At this point, two nested for
loops take x and y though all the
pixels of the bitmap. For each pixel, an opacity value is calculated ranging from 0 (transparent)
to 1 (opaque):
double opacity = Math.Min(1, pointToCenter / ellipseToCenter);
This opacity value is used not only to calculate the Alpha byte
but also as a pre-multiplication factor for the Red, Green, and Blue
values:
byte A = (byte)(opacity * 255);
byte R = (byte)(opacity * baseColor.R);
byte G = (byte)(opacity * baseColor.G);
byte B = (byte)(opacity * baseColor.B);
Then it’s just a matter of
shifting all the color
components into place and indexing the Pixels
array:
int color = A << 24 | R << 16 | G << 8 | B;
writeableBitmap.Pixels[y * writeableBitmap.PixelWidth + x] = color;
At this point, the program is done referencing the Pixels
array, so the actual image must be updated:
writeableBitmap.Invalidate();
Now the Path element
named newPath must be rendered on the
bitmap. This Path element has a PathGeometry with an upper-left corner at the
point (40, 50) but the WriteableBitmap was sized only to account for the width and
height of the geometry with non-zero stroke thickness. When rendering the Path
on the WriteableBitmap, a TranslateTransform must
shift left and up by the X and Y values of
the rectangle obtained from the Bounds
property of the PathGeometry. But then
the Path also
needs to be shifted a little right and down to accommodate the stroke
thickness:
TranslateTransform translate = new TranslateTransform
{
    X = -bounds.X + newPath.StrokeThickness / 2,
    Y = -bounds.Y + newPath.StrokeThickness / 2
};
Now the Path can be
rendered on the WriteableBitmap:
writeableBitmap.Render(newPath, translate);
writeableBitmap.Invalidate();
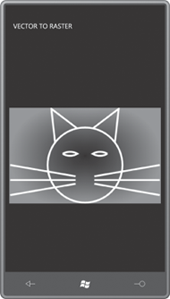
Here’s the result:

The bitmap matches the
geometry exactly at the bottom, but it’s a little larger on the left and
right. (Give those whiskers rounded ends and they’ll come precisely to
the edge.) The top of the bitmap is insufficient to accomodate the miter
join of the ears. Make that a round join, and you’ll see a better
match. Try adding the following three assignments to the definition of newPath:
StrokeStartLineCap = PenLineCap.Round,
StrokeEndLineCap = PenLineCap.Round,
StrokeLineJoin = PenLineJoin.Round,
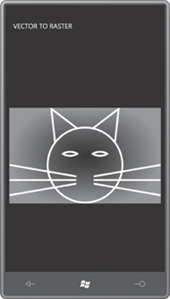
Now the bitmap is precisely
right:
