The two types of text-entry
controls available in Silverlight for Windows Phone are TextBox, which
allows typing and editing single-line or multiline plain unformatted text, and PasswordBox, which briefly displays each letter you type
but then replaces it with another character, by default an asterisk.
These are the only two ways
your program can get input
from the hardware keyboard of the phone (if it exists) or invoke the
Software Input Panel (SIP), the virtual on-screen keyboard.
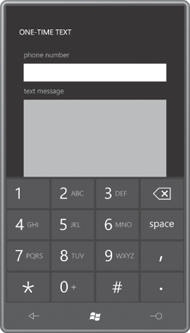
Let’s just jump right into a program. The OneTimeText program is
designed to let you send an SMS (Short Message Service) text message to a
particular phone number. The program requires you to type in that phone
number but doesn’t save it anywhere. That’s why I called the program
“one time” text.
Here’s the content area:
Example 1. Silverlight
Project: OneTimeText File: MainPage.xaml (excerpt)
<Grid x:Name="ContentPanel" Grid.Row="1" Margin="12,0,12,0">
    <Grid Margin="24">
        <Grid.RowDefinitions>
            <RowDefinition Height="Auto" />
            <RowDefinition Height="Auto" />
            <RowDefinition Height="Auto" />
            <RowDefinition Height="*" />
            <RowDefinition Height="Auto" />
        </Grid.RowDefinitions>

        <TextBlock Grid.Row="0"
                   Text="phone number"
                   Style="{StaticResource PhoneTextSmallStyle}" />

        <TextBox Name="toTextBox"
                 Grid.Row="1"
                 InputScope="TelephoneNumber"
                 TextChanged="OnTextBoxTextChanged" />

        <TextBlock Grid.Row="2"
                   Text="text message"
                   HorizontalAlignment="Left"
                   Style="{StaticResource PhoneTextSmallStyle}" />

        <TextBlock Name="charCountText"
                   Grid.Row="2"
                   HorizontalAlignment="Right"
                   Style="{StaticResource PhoneTextSmallStyle}" />

        <TextBox Name="bodyTextBox"
                 Grid.Row="3"
                 MaxLength="160"
                 TextWrapping="Wrap"
                 VerticalScrollBarVisibility="Auto"
                 TextChanged="OnTextBoxTextChanged" />

        <Button Name="sendButton"
                Grid.Row="4"
                Content="send"
                IsEnabled="False"
                HorizontalAlignment="Center"
                Click="OnSendButtonClick" />
    </Grid>
</Grid>
|
The first TextBox control is for the phone number so it only needs a
single line. The second TextBox is for the body of the message. It takes up the
remainder of the Grid not used by any of the other siblings; the TextWrapping property set to Wrap turns on
the multi-line feature, which is generally used in conjunction with
vertical scrolling.
The Button labeled “send” is initially disabled
because nothing is typed into either TextBox yet. That’s one reason why the TextChanged event is set on both.
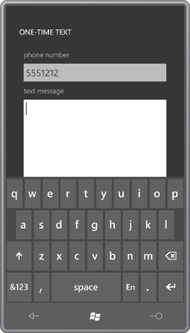
The first TextBox
has its InputScope property set to TelephoneNumber. When you
press on that TextBox, a numeric
keypad pops up:
The second doesn’t have its InputScope property set so a standard general-purpose
keyboard comes up:
The MaxLength
property is set on this second TextBox
so you can’t enter more than 160 characters—the maximum for SMS.
The various names you
can use with InputScope are documented
in the InputScopeNameValue enumeration
defined in the System.Windows.Input
namespace. If you prefer to invoke Intellisense in Visual Studio for helping you out,
you need to break out the InputScope as a property element and set it like this:
<TextBox Name="toTextBox"
         Grid.Row="1"
         TextChanged="OnTextBoxTextChanged">
    <TextBox.InputScope>
        <InputScope>
            <InputScopeName NameValue="TelephoneNumber" />
        </InputScope>
    </TextBox.InputScope>
</TextBox>
Once you type the equal sign
after NameValue,
you’ll get a list of the possible choices.
The XAML doesn’t show the most
important property of the TextBox, which is the property named Text of type string.
At any time, you can programmatically access the Text property to see
what’s in there, or you can set the Text property to initialize the contents. It’s
also possible to insert something into the existing contents of the TextBox, or delete something: Get the current
Text property, use normal methods of
the String class
to create a new string containing the new text, and then set that
string back to the Text property.
Here’s a good chunk of the MainPage
code-behind file:
Example 2. Silverlight
Project: OneTimeText File: MainPage.xaml.cs (excerpt)
public partial class MainPage : PhoneApplicationPage
{
    PhoneApplicationService appService = PhoneApplicationService.Current;
    SmsComposeTask smsTask;

    public MainPage()
    {
        InitializeComponent();

        smsTask = new SmsComposeTask();
    }

    void OnTextBoxTextChanged(object sender, TextChangedEventArgs args)
    {
        if (sender == bodyTextBox)
            charCountText.Text = String.Format("{0} chars", bodyTextBox.Text.Length);

        sendButton.IsEnabled = toTextBox.Text.Length > 0 && bodyTextBox.Text.Length >
 0;
    }

    void OnSendButtonClick(object sender, RoutedEventArgs e)
    {
        smsTask.To = toTextBox.Text;
        smsTask.Body = bodyTextBox.Text;
        smsTask.Show();
    }
    . . .
}
|
The single TextChanged
handler can differentiate between the two TextBox
controls by comparing the sender argument with the names defined in the XAML file.
For the second TextBox, a display is updated showing how many characters are
typed. The “send” Button remains
disabled if either TextBox is empty of
text.
When that Button is
pressed, the program invokes SmsComposeTask,
which is the standard texting
program on the phone. At this point, the user has a somewhat friendlier
interface to send this text, to edit it, or to send other texts.
At some point the user might
return to the OneTimeText program. The SmsComposeTask object doesn’t return anything to the program that
invoked it—it’s a launcher rather than a
chooser—but it
would still be nice for the user to see the text previously entered. For
this reason, the program overrides the OnNavigationFromOnNavigationTo methods to save and restore that program
state:
and
Example 3. Silverlight
Project: OneTimeText File: MainPage.xaml.cs (excerpt)
protected override void OnNavigatedFrom(NavigationEventArgs args)
{
    appService.State["toText"] = toTextBox.Text;
    appService.State["bodyText"] = bodyTextBox.Text;

    base.OnNavigatedFrom(args);
}

protected override void OnNavigatedTo(NavigationEventArgs args)
{
    object text;

    if (appService.State.TryGetValue("toText", out text))
        toTextBox.Text = text as string;

    if (appService.State.TryGetValue("bodyText", out text))
        bodyTextBox.Text = text as string;

    base.OnNavigatedTo(args);
} |
The last sample program in this article is called QuickNotes. It is
intended to provide a quick way to type some notes and be assured that they’ll be
retained without any explicit saving or loading. It’s basically a
Windows Phone 7 version of Notepad but only capable of working with a
single file.
The program also allows
changing the font size, so the QuickNotesSettings class for the program’s application settings
has two public properties named Text
and FontSize,
plus methods to save and load those properties in isolated storage:
Example 4. Silverlight
Project: QuickNotes File: QuickNotesSettings.cs
public class QuickNotesSettings
{
    public QuickNotesSettings()
    {
        this.Text = "";
        this.FontSize = (double)Application.Current.Resources["PhoneFontSizeMediumLar
ge"];
    }

    public string Text { set; get; }
    public double FontSize { set; get; }

    public static QuickNotesSettings Load()
    {
        IsolatedStorageSettings isoSettings = IsolatedStorageSettings.
ApplicationSettings;
        QuickNotesSettings settings;

        if (!isoSettings.TryGetValue<QuickNotesSettings>("settings", out settings))
            settings = new QuickNotesSettings();

        return settings;
    }

    public void Save()
    {
        IsolatedStorageSettings isoSettings = IsolatedStorageSettings.
ApplicationSettings;
        isoSettings["settings"] = this;
    }
}
|
As with the Jot program, these
setting are saved, loaded, and exposed in the App
class:
Example 5. Silverlight
Project: QuickNotes File: App.xaml.cs
public partial class App : Application
{
    // Application settings
    public QuickNotesSettings AppSettings { set; get; }

    . . .

    private void Application_Launching(object sender, LaunchingEventArgs e)
    {
        AppSettings = QuickNotesSettings.Load();
    }

    private void Application_Activated(object sender, ActivatedEventArgs e)
    {
        AppSettings = QuickNotesSettings.Load();
    }

    private void Application_Deactivated(object sender, DeactivatedEventArgs e)
    {
        AppSettings.Save();
    }

    private void Application_Closing(object sender, ClosingEventArgs e)
    {
        AppSettings.Save();
    }
    . . .
}
|
The XAML file creates a
multiline TextBox
the size of the content area. Besides setting TextWrapping
for multiline editing, the markup also sets AcceptsReturn
to trueEnter key will go to a
new line, which I thought was appropriate for this program. (In the
context of a dialog box, you usually want the Enter key to instead
invoke the OK button, even if a TextBox
is currently getting input from the user.) so that the
Example 6. Silverlight
Project: QuickNotes File: MainPage.xaml
<Grid x:Name="ContentPanel" Grid.Row="1" Margin="12,0,12,0">
    <TextBox Name="txtbox"
             TextWrapping="Wrap"
             AcceptsReturn="True"
             VerticalScrollBarVisibility="Auto"
             TextChanged="OnTextBoxTextChanged" />
</Grid>
|
The XAML file also contains an ApplicationBar
with two buttons I designed myself for increasing and decreasing the
size of the font:
Example 7. Silverlight
Project: QuickNotes File: MainPage.xaml
<phone:PhoneApplicationPage.ApplicationBar>
    <shell:ApplicationBar>
        <shell:ApplicationBarIconButton IconUri="/Images/littleletter.icon.png"
                                        Text="smaller font"
                                        Click="OnAppBarSmallerFontClick" />

        <shell:ApplicationBarIconButton IconUri="/Images/bigletter.icon.png"
                                        Text="larger font"
                                        Click="OnAppBarLargerFontClick" />
    </shell:ApplicationBar>
</phone:PhoneApplicationPage.ApplicationBar>
|
With all this preparation,
the actual code file for MainPage is
rather short and straightforward:
Example 8. Silverlight
Project: QuickNotes File: MainPage.xaml.cs
public partial class MainPage : PhoneApplicationPage
{
    QuickNotesSettings appSettings = (Application.Current as App).AppSettings;

    public MainPage()
    {
        InitializeComponent();

        txtbox.Text = appSettings.Text;
        txtbox.FontSize = appSettings.FontSize;
    }

    void OnTextBoxTextChanged(object sender, TextChangedEventArgs args)
    {
        appSettings.Text = txtbox.Text;
    }

    void OnAppBarSmallerFontClick(object sender, EventArgs args)
    {
        txtbox.FontSize = Math.Max(12, txtbox.FontSize - 1);
        appSettings.FontSize = txtbox.FontSize;
    }

    void OnAppBarLargerFontClick(object sender, EventArgs args)
    {
        txtbox.FontSize = Math.Min(48, txtbox.FontSize + 2);
        appSettings.FontSize = txtbox.FontSize;
    }
}
|
Whenever the text in
the TextBox changes, the OnTextBoxChanged
method saves the new version in application settings. The two methods to
increase and decrease the font size similarly save the new setting but
also use it to set the FontSize
property of the TextBox. Here’s the program in action:

What the program does not do
is save the text
insertion point (visually indicated by the TextBox caret), so whenever the program starts up,
you need to tap on the screen to indicate where you want to continue
typing. It’s possible that you left off at the end of the file, but QuickNotes will
always bring you back to the top.
I toyed around with fixing
this problem. The insertion point is available as the SelectionStart,
property, and as the name suggests, it’s used in conjunction with text
selection. There’s also a SelectionLength property, which has a value of 0 if no text is
selected. (You can also access or set the selected text using the SelectedText property.)
TextBox also has a SelectionChanged
event, so it’s certainly possible for QuickNotes to save the new value
of SelectionStart
in application settings every time it changes. Then it would be a
simple matter to set the SelectionStart
property along with Text and FontSize in the constructor of MainPage.
But that doesn’t quite work.
When you launch QuickNotes or return to it after navigating away, the TextBox doesn’t have input focus. You need
to tap on the screen to give the TextBox focus and start typing something in. But by
tapping on the screen, you’re also setting a new insertion point!
The solution to that little
problem is to give input
focus to the TextBox programmatically. It doesn’t work in the
constructor to MainPage, but if you install a handler for the Loaded event, you can do it there:
txtbox.Focus();
But doing that creates quite a
dramatic entrance to the program! As soon
as the program starts up, the virtual keyboard pops up! I
struggled with the propriety of doing that, and at last I decided it
was just too intrusive.
But who knows? Maybe I’ll put
that feature back in at a later time. That’s why they call it software.
