1. Problem
You need to take a photo from your application without pressing the hardware Camera button provided by the phone.
2. Solution
You have to use the CameraCaptureTask chooser, which provides the Show method used to programmatically show the same camera application that is executed by the hardware Camera phone button.
3. How It Works
Choosers are used to run external native Windows Phone 7 applications
or tasks. The main difference as compared to launchers is that choosers
return data to your program. On the contrary, a chooser such as CameraCaptureTask opens the photo camera on the device and returns the photo taken from the camera to your application.
The CameraCaptureTask class provides the Show
method, which is responsible for running the external application that
enables you to take a picture from the camera and to set some options
such as flash on/off, and zoom.
After the picture is taken, CameraCaptureTask raises the Completed event that your application can hook in order to have information on the photo. Indeed, the PhotoResult
event argument provided by this event contains very important
information about the photo such as the temporary path where it has been
stored—the OriginalFileName property—and the stream containing the data of the phone—the ChosenPhoto property.
4. The Code
To demonstrate the use of
the photo camera, we have created an application that enables us to take
a picture and upload it to an account on the Flickr site.
Open Visual Studio 2010 and load the FlickrPhotoAlbum application. In the MainPage.xaml.cs file, we defined a CameraCaptureTask object at the class level and we initialized it in the class constructor. The Completed event is managed by the camera_Completed event handler:
public partial class MainPage : PhoneApplicationPage
                    {
                        CameraCaptureTask camera = null;
                        Popup popup = null;

                        // Constructor
                        public MainPage()
                        {
                            InitializeComponent();

                            camera = new CameraCaptureTask();
                            camera.Completed += new EventHandler<PhotoResult>(camera_Completed);
. . .
The camera_Completed
event handler contains the code that stores the image in a memory
stream to be reused during the Flickr upload, and the code to show a
preview by using the Image control defined in the MainPage.xaml file. Before performing any operation, the TaskResult property is checked to see whether the task has given a positive result returning OK. Next, the ChosenPhoto property containing the stream of picture data is copied to a byte array and, successively, to the memory stream. Finally, the OriginalFileName property is used by the BitmapImage class constructor to create a new image and set the Image control's Source property to it.
void camera_Completed(object sender, PhotoResult e)
                {
                   App app = Application.Current as App;

                   if (e.TaskResult == TaskResult.OK)
                   {
                       byte[] data;
                       using (var br = new BinaryReader(e.ChosenPhoto)) data =
                              br.ReadBytes((int)e.ChosenPhoto.Length);
                       app.settings.Image = new MemoryStream(data);

                       imgPhoto.Source = new BitmapImage(new Uri(e.OriginalFileName));
                       btnUpload.IsEnabled = true;
                   }
                }
NOTE
In the preceding code, you can see the App class having the settings property. This property points to an object from the Settings class that we added to contain useful information to be shared with all the pages within the application.
In the MainPage.xaml.cs
code file, there is a button to take the photo that is enabled after
you have successfully logged on to the Flickr site and given
authorization to the phone application. In the Click event of this button, we call the Show method provided by the CameraCaptureTask class so that the Camera application is shown:
private void btnTakePicture_Click(object sender, RoutedEventArgs e)
                {
                    camera.Show();
                }
That's all about camera
usage from the code; let's focus our attention on Flickr
functionalities. We have used the Flickr.NET library that you can
download from the http://flickrnet.codeplex.com site. This library contains a lot of assemblies targeting almost all .NET systems, including Windows Phone 7.
To use this library in your
code, you need to register your application on the Flickr site and
receive an application API key and a security key. Then in your code you
have to use both keys in the Flickr class's constructor, as shown in
the following code.
NOTE
Because API and
security keys are private, you will not find ours in the code. You have
to register your application on Flickr and use yours in the Flickr
class's constructor.
public partial class App : Application
    {
        /// <summary>
        /// Provides easy access to the root frame of the Phone Application.
        /// </summary>
        /// <returns>The root frame of the Phone Application.</returns>
        public PhoneApplicationFrame RootFrame { get; private set; }

        private FlickrNet.Flickr _flickr;
        public FlickrNet.Flickr FlickrService { get { return _flickr;  } }

. . .

_flickr = new FlickrNet.Flickr("apiKey", "secureKey");
Because your application will
be used by different users who want to upload photos on their accounts,
the first thing you need to do in your code is to authenticate the user.
This is accomplished adding a WebBrowser control to the MainPage.xaml page, to point to an URL calculated by the AuthCalcUrl method. This method accepts Frob as an input parameter; Frob is a sort of application identifier that we have to use in different API calls such as AuthCalcUrl ones. Frob is returned by a call to the AuthGetFrobAsync
method. This is an async method that accepts a callback function as a
parameter. We used a lambda expression in our code to create an inline
callback function. Moreover, we used the BeginInvoke static method from the Dispatcher class so that the application is not stuck waiting for the Flickr API response and the user can continue to use it. The r parameter represents the result; we check whether there are errors by using the HasError property, and if there are no errors, we store the result in the Frob property from the Settings class. Finally, we call the AuthCalcUrl method to retrieve the calculated URL that we pass to the Navigate method provided by the WebBrowser control.
private void ConnectToFlickr()
                {
                    App a = Application.Current as App;

                    Flickr flickr = a.FlickrService;

                    flickr.AuthGetFrobAsync(r =>
                    {
                        Dispatcher.BeginInvoke(() =>
                        {
                            if (r.HasError)
                            {
                                MessageBox.Show(r.Error.Message);
                            }
else
                            {
                                a.settings.Frob = r.Result;
                                string url = flickr.AuthCalcUrl(a.settings.Frob, AuthLevel.Write);
                                Uri uri = new Uri(url);
                                wbBrowser.Navigate(uri);
                            }
                        });
                    });
                }
The next step is retrieving the authentication token after the user is authenticated at the Flickr site. The AuthGetTokenAsync method accepts the Frob identifier and, like AuthGetFrobAsync,
accepts a callback function that is called by this async method after
the authorization process is finished. Even in this method we used a
lambda expression as an inline callback function. If no errors occur,
some buttons are enabled and the authorization token key is stored in
the application settings.
private void btnAuthenticate_Click(object sender, RoutedEventArgs e)
                {
                   App app = Application.Current as App;

                   app.FlickrService.AuthGetTokenAsync(app.settings.Frob, r =>
                   {
                      Dispatcher.BeginInvoke(() =>
                      {
                          if (r.HasError)
                          {
                              MessageBox.Show(r.Error.Message);
                          }
                          else
                          {
                              app.settings.Token = r.Result;
                              btnTakePicture.IsEnabled = true;
                              wbBrowser.Visibility = System.Windows.Visibility.Collapsed;
                              imgPhoto.Visibility = System.Windows.Visibility.Visible;
                          }
                      });
                  });
              }
Finally, the photo uploading is accomplished by the UploadPictureAsync method. Among the many parameters it accepts, the ones worth noting are the first parameter (a Stream
object containing the image data) and the third parameter (which is the
name of the image that will be associated with the photo).
private void Button_Click(object sender, RoutedEventArgs e)
{

    if (txtName.Text == string.Empty)
    {
        MessageBox.Show("Please, specify the photo name");
        return;
    }

    App app = Application.Current as App;

    app.FlickrService.UploadPictureAsync(app.settings.Image,
                                        txtName.Text,
                                        txtName.Text,
                                        txtDescription.Text,
                                        txtTag.Text,
                                        true,
                                        true,
                                        true,
                                        ContentType.Photo,
                                        SafetyLevel.None,
                                        HiddenFromSearch.None, r =>
                                        {
                                            Dispatcher.BeginInvoke(() =>
                                            {
                                                if (r.HasError)
                                                {
                                                    MessageBox.Show("Ooops,
                                                        error during upload...");
                                                }
                                                else
                                                {
                                                    MessageBox.Show("Upload
                                                        done successfully...");
                                                }
                                            });
                                       });
}
5. Usage
With Visual Studio 2010 opened,
set the target output to Windows Phone 7 Emulator and press Ctrl+F5.
The emulator starts, briefly showing the animated splash screen.
Meanwhile, the application is requiring the Frob identifier and uses it to calculate the URL. When this process is accomplished, the main page is shown with the WebBrowser control filled with the Flickr page (see Figure 1).
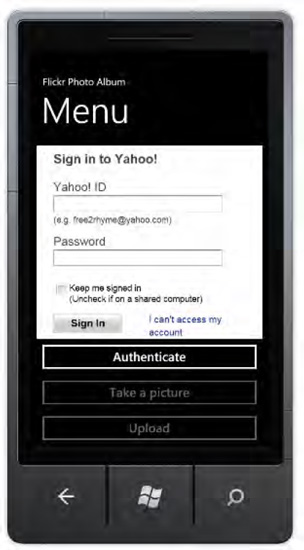
After inserting your Flickr credentials and accepting that the FlickrPhotoAlbum
application can access your account, you can press the Authenticate
button. If the process doesn't return errors, the Take A Picture button
will be enabled. Press this button and you will see the emulator
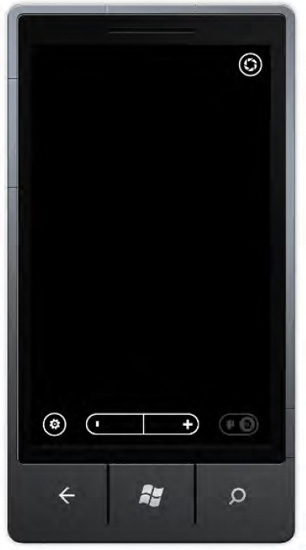
simulating the Windows Phone Camera application (see Figure 2).
The emulator will show a moving square, simulating a moving target. By
pressing the top-right icon, you can take a photo shot.
NOTE
If you are using the
Windows Phone 7 device with Zune running and connected, you will not be
able to accomplish this step, because Zune software locks the camera.
You have to shut Zune down and use the WPConnect tool that you can find
in the %Program Files%\Microsoft SDKs\Windows Phone\v7.0\Tools\WPConnect path. This tool is available only after having installed the Windows Phone Developer Tools January 2011 Update.
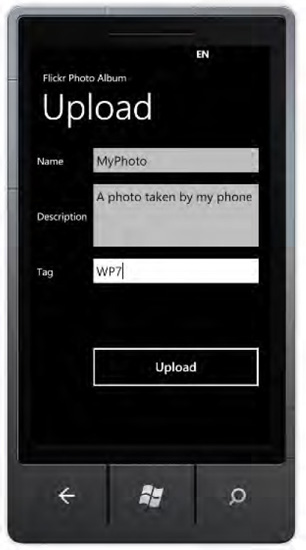
After taking the picture and
accepting it, you can see that the Upload button is enabled. By pressing
the Upload button, the Upload page is shown. Here you have to fill some
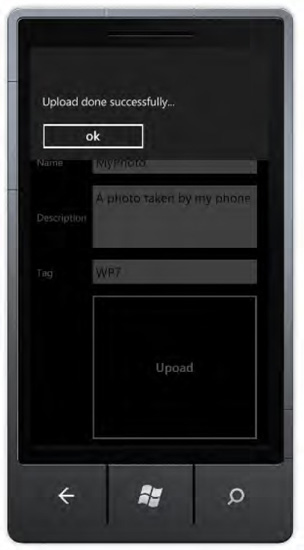
text boxes with the picture's name, description, and tag (see Figure 3). Press the Upload button (maybe you can't see it because it is too small!) to start the upload process.
Depending on your
Internet connection speed and its traffic, after a few seconds you will
be informed by a dialog box that the upload has been accomplished (see Figure 4).