Creating the Content Processor
Now that you have the types that
make up the avatar’s custom animation, create the custom content
processor that converts the model’s animation data into the format that
you want at runtime.
First, create a new
pipeline extension project. Right-click the solution and select Add
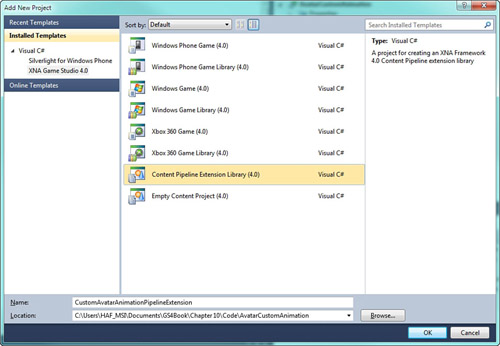
-> New Project. In the Add New Project dialog, select the Content
Pipeline Extension Library project type and name it CustomAvatarAnimationPipelineExtension. Click OK as shown in Figure 3.

Next, add two
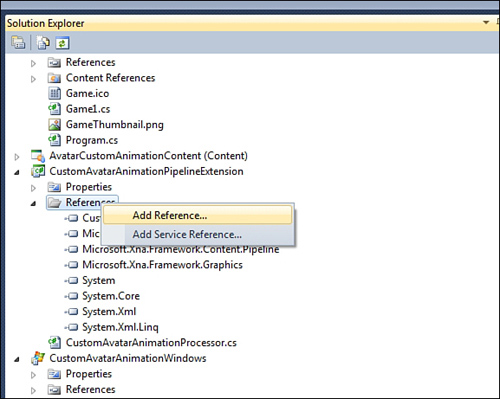
assemblies to the new content pipeline extension project. Right-click
the References list and select Add Reference as shown in Figure 4.

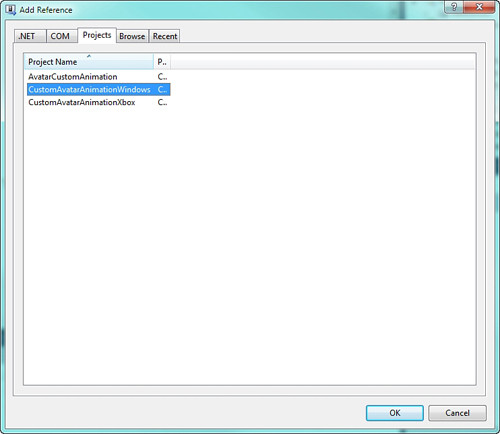
Click the Projects tab and select the CustomAvatarAnimationWindows project that you previously created and click OK (see Figure 5).

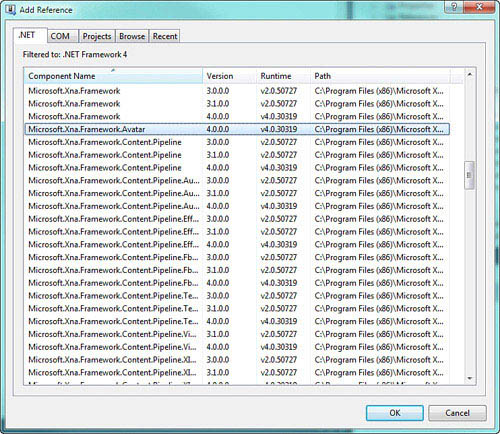
Select the add reference menu again, but this time select the .NET tab. Scroll down, select the Microsoft.Xna.Framework.Avatar assembly, and click the OK button (see Figure 6).

You need these two
assemblies when you write the custom processor. The project file
reference to the custom avatar types needs to be a Windows project
because the processor will run on Windows during the build. Even if the
content is built for the Xbox 360, the content project needs to
reference Windows libraries.
Now you are ready to start
writing the custom processor. First, add the following two namespaces to
the list already defined in the processor file:
using Microsoft.Xna.Framework.GamerServices;
using CustomAvatarAnimation;
This enables you to use the AvatarRenderer and the custom animation types you created previously.
You now need to update
the processor class definition and display name. Update the default
processor class with the following class definition:
[ContentProcessor(DisplayName = "CustomAvatarAnimationProcessor")]
public class CustomAvatarAnimationProcessor :
                                 ContentProcessor<NodeContent, CustomAvatarAnimationData>
The processor contains a single field member to store a list of Matrix transforms that make up the bind pose of the avatar rig. Add the following member variable to the CustomAvatarAnimationProcessor:
// The bind pose of the avatar
List<Matrix> bindPose = new List<Matrix>();
The ContentProcessor defines a Process method, which converts the input type, for example, a NodeContent into the output type that is the CustomAvatarAnimationData. To override and provide an implementation for this method, add the following method to the CustomAvatarAnimationProcessor class:
public override CustomAvatarAnimationData Process(NodeContent input,
                                                  ContentProcessorContext context)
{
    // Find the skeleton of the model
    NodeContent skeleton = FindSkeleton(input);

    // We have to find the skeleton and it needs to have 1 animtion
    if (skeleton == null || skeleton.Animations.Count != 1)
    {
        throw new InvalidContentException("Invalid avatar animation.");
    }

    // Update the skeleton to what we expect at runtime
    CleanSkeleton(skeleton);

    // Flat list of the bones in the skeleton
    IList<NodeContent> bones = FlattenSkeleton(skeleton);

    // The number of bones should match what the AvatarRender expects
    if (bones.Count != AvatarRenderer.BoneCount)
    {
        throw new InvalidContentException("Invalid number of bones found.");
    }
    // Populate the bind pose list
    foreach (NodeContent bone in bones)
    {
        bindPose.Add(bone.Transform);
    }

    // Build up a table mapping bone names to indices
    Dictionary<string, int> boneNameMap = new Dictionary<string, int>();
    for (int i = 0; i < bones.Count; i++)
    {
        string boneName = bones[i].Name;
        if (!string.IsNullOrEmpty(boneName))
        {
            boneNameMap.Add(boneName, i);
        }
    }

    CustomAvatarAnimationData avatarCustomAnimationData = null;
    foreach (KeyValuePair<string, AnimationContent> animation in skeleton.Animations)
    {
        // Animation duration needs to be greater than 0 length
        if (animation.Value.Duration <= TimeSpan.Zero)
        {
            throw new InvalidContentException("Animation has a zero duration.");
        }

        // Build a list of the avatar keyframes in the animation
        List<Keyframe> animationKeyFrames = ProcessAnimation(animation.Value,
                                                             boneNameMap);

        // Check for an invalid keyframes list
        if (animationKeyFrames.Count <= 0)
        {
            throw new InvalidContentException("Animation has no keyframes.");
        }

        // Create the custom-animation object
        avatarCustomAnimationData = new CustomAvatarAnimationData(animation.Key,
                                                         animation.Value.Duration,
                                                         animationKeyFrames);
    }

    return avatarCustomAnimationData;
}
Next, you pass the skeleton into a method called CleanSkeleton.
The skeleton is exported from the avatar animation rig that contains
bones that are not used at runtime, so remove them. Also, clean up some
of the naming that might be used in the rig. If you remove a bone from
the skeleton, make sure you don’t process the keyframes from the bone
later in the processor.
Now, you have a clean skeleton hierarchy, but you really want a flattened list of bones that match what is expected by the AvatarRenderer.
This list of bones is sorted by the depth of the bone in the hierarchy
and within a level they are sorted by the name of the bone. You call the
FlattenSkeleton method to convert the NodeContent skeleton hierarchy into the sorted flat list you want. Check that the number of bones returned from the FlattenSkeleton method equals the number of bones in the AvatarRenderer using the BoneCount constant value.
Now that you have the real
list of bones, save their transform value. The transform set on each of
the bones is called the bind pose. This is the starting location of the
animation rig before the animator changes the rig to create the
animations. The animation keyframe transforms are relative to this
starting position called the bind pose. You loop over all of the bones
and add their transforms to the bindPose list.
When you process the animation keyframes, you will have the string
name of the bone they transform. The custom avatar animation needs the
index value of the bone. To be able to find the bone index, create a Dictionary of string and int
values that store the name of the bone and the index of the bone. This
enables you to quickly look up the index of a bone for a given string name. To populate the Dictionary, loop over the flat list of bones and add the name of the bone and the index value to the Dictionary.
The final state of the Process method is to convert the animation data into the format, which is a list of keyframes that you will use to construct the new CustomAvatarAnimationData object.
Loop over the animations that are attached to the skeleton. The ProcessAnimation method is called passing in the AnimationContent and the boneNameMap Dictionary you created. A list of Keyframe values returns that is then used to construct the new CustomAvatarAnimationData before returning it from the Process method.
The Process method called into a number of helper methods that you now need to create. The first is the FindSkeleton method. Add the following method to the CustomAvatarAnimationProcessor class:
private NodeContent FindSkeleton(NodeContent input)
{
    // This is the node we are looking for
    if (input.Name.Contains("BASE__Skeleton"))
    {
        return input;
    }

    // Recursively check all children until we find the root of the skeleton
    foreach (NodeContent child in input.Children)
    {
        NodeContent skeleton = FindSkeleton(child);

        if (skeleton != null)
            return skeleton;
    }

    return null;
}
The root of the skeleton in the avatar rig is called BASE__Skeleton. Check whether the current NodeContent
has the same name. If you have not found the root of the skeleton, loop
over all of the children of the current node and recursively call the FindSkeleton method for each of the children.
To flatten the skeleton hierarchy, implement the FlattenSkeleton method. Add the following method to the processor:
// Flatten the skeleton into a list ordered by level depth
static IList<NodeContent> FlattenSkeleton(NodeContent skeleton)
{
    // Return list of bones we find in the skeleton
    List<NodeContent> bones = new List<NodeContent>();

    // Skeleton bones in the current level
    List<NodeContent> currentLevelBones = new List<NodeContent>();

    // Start with the root node
    currentLevelBones.Add(skeleton);

    while (currentLevelBones.Count > 0)
    {
        List<NodeContent> nextLevelBones = new List<NodeContent>();

        // Avatar bones are sorted by name in each level
        IEnumerable<NodeContent> sortedBones = from item in currentLevelBones
                                                orderby item.Name
                                                select item;
        // Add the sorted list to our list
        foreach (NodeContent bone in sortedBones)
        {
            bones.Add(bone);

            // Add all of the children for the next level
            foreach (NodeContent child in bone.Children)
            {
                nextLevelBones.Add(child);
            }
        }

        currentLevelBones = nextLevelBones;
    }

    return bones;
}
Create a loop that
continues until the current level contains no bones. The first level is
the root so it contains only the single item. As you process each level,
sort the bones in the level, and then add the children of the current
level into a list for the next level. Continue this looping until there
are no children left to process. The resulting list is correctly sorted
for use with the AvatarRenderer.
The CleanSkeleton
method is used to remove bones that are not needed at runtime and to
fix the names of the bones. Add the following method to the CustomAvatarAnimationProcessor class:
// Removes bones not used in the AvatarRenderer at runtime
// and fixes the names of some bones
static void CleanSkeleton(NodeContent bone)
{
    // Remove unwated text from the bone name
    bone.Name = bone.Name.Replace("__Skeleton", "");

    // Process all of the children
    for (int i = 0; i < bone.Children.Count; ++i)
    {
        NodeContent child = bone.Children[i];
        if (child.Name.Contains("_END"))
        {
            bone.Children.Remove(child);
            —i;
        }
        else
        {
            CleanSkeleton(child);
        }
    }
}
Loop over each of the
children bones looking for any bone that contains _END. You don’t need
these bones, so remove them from the hierarchy.
The final two methods are responsible for converting the animation data from the content pipeline format AvimationContent into a list of Keyframe objects that you use within the custom animation. Add the following two methods to your CustomAvatarAnimationProcessor class:
// Convert animation from content pipeline format to a list of keyframes
List<Keyframe> ProcessAnimation(AnimationContent animation,
                                Dictionary<string, int> boneMap)
{
    // Return keyframe list
    List<Keyframe> keyframes = new List<Keyframe>();

    foreach (KeyValuePair<string, AnimationChannel> channel in animation.Channels)
    {
        // Don't process the end bone channel. We have removed these from the skeleton
        if (channel.Key.Contains("_END"))
            continue;

        // Find which bone this channel has keyframes for
        int boneIndex;
        if (!boneMap.TryGetValue(channel.Key.Replace("__Skeleton", ""), out boneIndex))
        {
            throw new InvalidContentException(string.Format(
                "Found animation for bone '{0}', " +
                "which is not part of the skeleton.", channel.Key));
        }

        // Craete the keyframes for the channel
        foreach (AnimationKeyframe keyframe in channel.Value)
        {
            keyframes.Add(new Keyframe(boneIndex,
                                       keyframe.Time,
                                       CreateKeyframeMatrix(keyframe,
boneIndex)));
        }
    }

    // Sort the final list of keyframes by time
    keyframes.Sort((frame1, frame2) => frame1.Time.CompareTo(frame2.Time));

    return keyframes;
}
// Convert animation keyframes info the format used by the AvatarRenderer
Matrix CreateKeyframeMatrix(AnimationKeyframe keyframe, int boneIndex)
{
    Matrix keyframeMatrix;

    // The root node is transformed by the root of the bind pose
    // We need to make the keyframe relative to the root
    if (boneIndex == 0)
    {
        // If you are using an older verion of the FBX exporter the root
        // of the bind pose my be translated incorrectly
        // If your model appears to be floating use the following translation
        //Vector3 bindPoseTranslation = new Vector3(0.000f, 75.5199f, -0.8664f);
        Vector3 bindPoseTranslation = Vector3.Zero;

        Matrix inverseBindPose = bindPose[boneIndex];
        inverseBindPose.Translation -= bindPoseTranslation;
        inverseBindPose = Matrix.Invert(inverseBindPose);

        Matrix keyTransfrom = keyframe.Transform;
        keyframeMatrix = (keyTransfrom * inverseBindPose);
        keyframeMatrix.Translation -= bindPoseTranslation;

        // Scale from cm to meters
        keyframeMatrix.Translation *= 0.01f;
    }
    else
    {
        keyframeMatrix = keyframe.Transform;
        // Remove translation from anything by the root
        keyframeMatrix.Translation = Vector3.Zero;
    }

    return keyframeMatrix;
}
The ProcessAnimation starts by creating a new list of Keyframe instances that you use to store the newly created Keyfame values. Loop each of the Channels in the AnimationContent. An AnimationChannel contains all of the keyframes for a specific bone in the skeleton over the course of the animation.
As you loop over the
animation channels, don’t process any of the channels for the bones that
include _END in their name. These were the bones that you removed when
you flattened the skeleton, and you don’t need them in the animation.
Store the bone index for each keyframe in the animation. To get the bone index, perform a lookup into the boneMap Dictionary. After you have the bone index, create the new Kayframe object using the index, the keyframe’s Time, and a transform matrix that you create using the CreateKeyframeMatrix method.