1. Configuring Dial-in Conferencing
If a dial-in conferencing service has been
purchased from an approved Microsoft partner, dial-in conferencing can
be enabled for each user by configuration of the dial-in conferencing
properties of the user accounts. Although this can be performed
manually, if there are many accounts to be configured, then this would
require a lot of administrative effort. To ease this process, it is
possible to import a file supplied by the audio conferencing provider
containing the phone numbers and passcodes for the user accounts. To
start the process, a file containing the list of users to be enabled
for dial-in conferencing must be exported using the online portal. This
list is then used by the provider to generate a file that can be used
to import the settings for the user accounts.
The following steps are used to configure dial-in conferencing for Lync Online users in bulk using the export and import method:
1. Log on to the Office 365 Portal.
2. On the main page, click the Admin tab at the top, and then select Lync from the drop-down menu to open the Lync Admin Center.
3. On the left side, click Dial-in conferencing, and then click on Provider at the top.
4. Under Import and Export users, click the link for Export wizard.
5. At the Export Users Wizard Getting Started screen, click Next.
6. At the Select Users
screen, click the Ctrl key, select each of the users in the list that
will be enabled for dial-in conferencing, and then click Add. When
finished, click Next.
7. At the File Download prompt, click Save and then choose a local subdirectory to save the file to.
8. Click Finish to complete the Export Users Wizard and return to the Dial-in Conferencing Provider page.
9. Send the downloaded file, named AcpUsers.csv, to the audio conferencing provider so that the appropriate dial-in conferencing properties can be filled in.
10.
After the file has been returned by the audio conferencing provider,
save the file to a local subdirectory, and return to the Dial-in
conferencing Provider page in the Lync Admin Center.
11. Under Import and Export users, click the link for Import wizard.
12. At the Import Users Wizard Getting started screen, click Next.
13. At the Select
File screen, click Browse. Then navigate to and select the import file
that was sent by the audio conferencing provider, and click Next.
14. At the Results
screen, the results of the import process are displayed. If the import
was successful, click Finish to complete the Import Wizard. If errors
are contained in the file, the option to download the error log file is
automatically selected. If this is the case, click Finish; then at the
File Download prompt, click Save and choose a local subdirectory to
save the error log file to.
15. If necessary, send the downloaded error log file named ErrorUsers.csv to the audio provider to make any needed corrections.
16. After the
adjusted file has been returned, repeat steps 12 to 15 to import the
adjusted file and confirm that the import is now successful.
17. After the file
from the audio provider is successfully imported, click on Dial-in
users in the Lync Admin Center to view the newly applied conferencing
properties for the users, as shown in Figure 1.
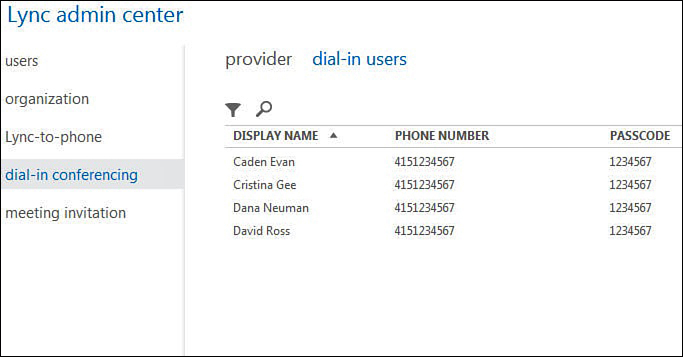
Figure 1. Dial-in conferencing properties applied to Lync Online user accounts.
2. Configuring Lync Properties for User Accounts
After user accounts have been added to Lync
Online, the Lync properties of the user accounts can be configured
using the Online Portal. Use the following procedure to adjust the Lync
properties for a user:
1. Log on to the Office 365 Portal.
2. On the left side of the main page, click Users and Groups.
3. At the Users and
Groups page, select the check box for the user account to be edited;
then, under Quick Steps on the right side of the screen, click on Edit
Lync Properties.
4. At the Options screen, options are presented for various basic Lync features, as shown in Figure 2. Select or deselect the check boxes to enable or disable individual features.
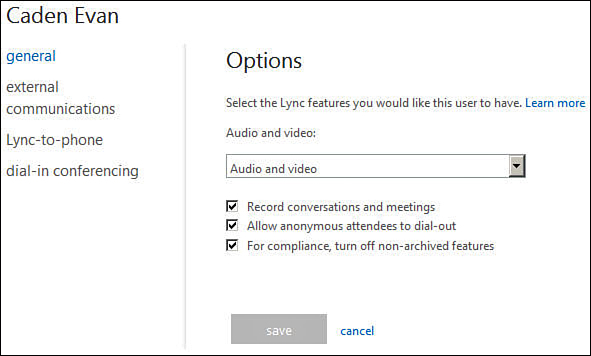
Figure 2. Editing the Lync properties of a user account.
5. On the left side,
click External communications to view options for federation and public
IM. Select or deselect the check boxes to enable or disable individual
features.
6. On the left side,
click Lync-to-phone. If a Lync-to-phone service has been purchased, the
service can be selected from the drop-down menu.
7. On the left side,
click Dial-in conferencing. If a dial-in conferencing service has been
purchased, select the provider from the drop-down menu. The values for
toll number, toll-free number, and passcode can then be assigned using
the appropriate fields.
8. When finished, click Save.
Tip
The values for dial-in conferencing
can also be applied to user accounts in bulk, instead of configuring
each user account manually.
