3. Creating BDC Models
You can create the BDC Model
using SharePoint Designer 2010, Visual Studio 2010, or an XML editor.
The most easy and effective way of creating a model is to use SharePoint
Designer 2010. However, SharePoint Designer only creates BDC Models for
WCF/Web Services, SQL Server, or .NET assemblies. Use the following
steps to create a BDC Model for an SQL Server database.
Open SharePoint Designer 2010 and then open a SharePoint site where you want to create your dashboard.
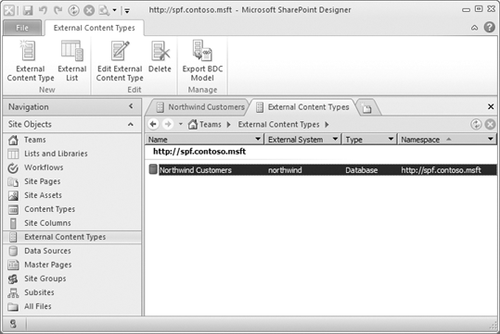
In
the left navigation pane, click External Content Types to open the
External Content Types pane that lists the ECT created on this site, as
shown in Figure 5.
Note:
After you have created and
tested your BDC Model and you are creating it in a development or
prototyping environment, you use the External Content Types pane to
export the BDC Model to a file, which you can then use to deploy the BDC
Model in your SharePoint 2010 production environment. If you want to
use the BDC Model in an Office 2010 application, make sure that you
select the Settings: Client option when you export the BDC model.
In the New group on the Ribbon, click External Content Type. The summary view of the ECT is displayed, as shown in Figure 6.
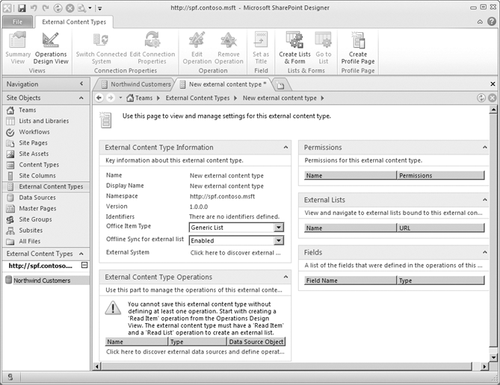
Click New External Content Type to the right of Display Name and enter the name of the ECT.
Click
the Click Here To Discover External Data Sources And Define Operations
link to the right of External System to display the operations design
view of the ECT.
In
the External Data Source Type Selection dialog box, select the
appropriate data source type, such as SQL Server, and then click OK to
display the source type connection dialog box.
Enter
the connection details and then click OK. For example, for a SQL Server
source type, enter the database server name, the database name, and the
authentication type: User’s Identity, Impersonated Windows Identity,
and Custom Identity. For the two impersonated identities, you will need
to supply the secure store application ID.
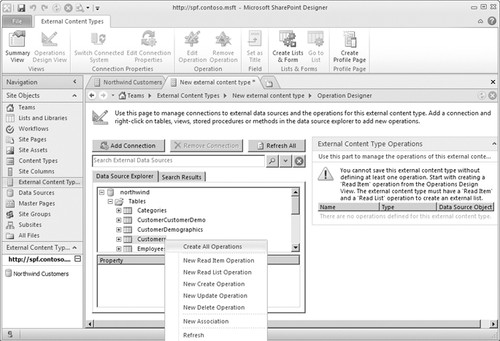
In
the Data Source Explorer, expand the database node by clicking the plus
sign (+) to the right of the database name and then expand Tables.
Right-click
the table you want to create a BDC Model for and then click the
operation for the methods you want to create, as shown in Figure 7.
Depending on the operations exposed by the external system, you can add
the operations Create, Read Item, Update, Delete, and Read List.
The Operation Properties dialog box opens. Use this dialog box to specify parameters for the operations and then click Next.
Select
the field that you want to use as an Identifier and those fields you
want to display in the external data picker when adding an External Data
Column to a list or library or when configuring the external data Web
Parts.
Click
Next to display the Filter Parameters Configuration page and then click
Add Filter Parameter. Always add a filter of type limit with a value of
less than 2000 to prevent poor performance. If your business requires
more than 2000 rows of data to be returned, then you will need to
increase the throttle value of the BCS.
Click
Finish and then Save. This will create and import the Model to the BCS
service application that the SharePoint site is associated with.
Note:
SharePoint Designer does not
have support for creating resources; you will need to use an XML editor
or Visual Studio 2010 to create a BDC project and add a new BCS resource
item. Alternatively, if you have configured these properties after you
have imported the Model, you can export the resource file separately
using the Central Administration website.
4. Importing BDC Models
Remember that the key to a
successful solution based on the BCS is the information defined in the
BDC Model, which you import into a BCS database
also known as the metadata store. The data then becomes available to
all the Web applications that the BCS service is associated with. In the
previous section, the BDC Model was created and imported into the
metadata store in one activity. In a production environment, this may
not be allowed. To import a BDC Model using the Central Administration
website, use the following steps.
Note:
When Visual Studio is used to
create a BDC Model and optionally a resource file, they are commonly
included in a solution package (.wsp). Solutions can be uploaded at the
SharePoint farm level using the stsadm –o addsolution command or by
using the Add-SPSolution Windows PowerShell cmdlet. After they are
uploaded, solutions can be managed using the Manage Farm Solutions page
on the Central Administration website.
Open a browser and go to the SharePoint Central Administration website.
Under Application Management, click Manage Service Applications.
On
the Service Applications page, click the name of the Business Data
Connectivity Service where you want to import the Model file to display
the BCS Application Information page shown in Figure 18-5. On the BCS Application Information page, you can manage permissions, export the BDC Model, or delete the BDC Model.
Click Import on the Edit tab of the Ribbon to display the Import BDC Model page shown in Figure 8.
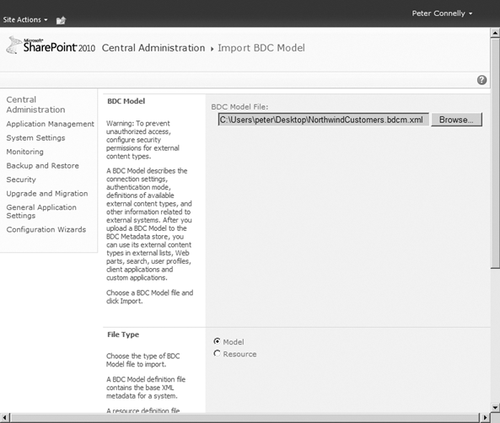
In the BDC
Model section, either click the Browse button to navigate to the Model
file or type the location of the Model file in the text box.
If you are importing a resource file, select the resources defined in your model file in the Advanced Settings section.
Note:
SECURITY ALERT
When you choose to import permissions that are defined in your BDC
model and an entry for a ECT already exists in the ACL, its value is
overwritten with the permission information from the imported file.
Click
Import to display the Importing Web page. The import process parses the
file and validates it. If errors are found during the import process,
the Web page will display additional information. Information can be
found in the Windows event logs and the SharePoint 2010 log file located
at %ProgramFiles%\Common Files\Microsoft Shared\web server
extensions\14\LOGS, where the relevant messages will be in the Business Data
category. You might have to pass this information back to the developer
or designer of the Model. The software development kit (SDK) contains
more information on troubleshooting metadata exceptions and interpreting
the log files.
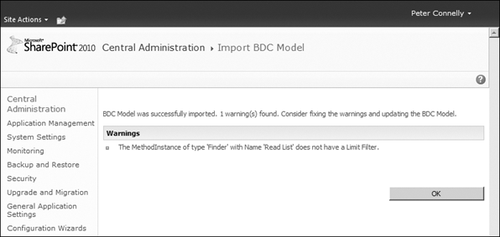
A
successful import will result in the message “Application definition was
successfully imported.” The import process can identify any deficits
that the ADF has, in which case you will see the message “Application
definition was successfully imported” message together with any warnings
issued, similar to the Web page shown in Figure 9. The BDC Model file is validated with appropriate warnings displayed.
Click OK to display the Service Application Information page.
After you have imported a
BDC Model, SharePoint 2010 separates the external system and the ECT
information. You should view these and give appropriate access rights
according to your requirements, especially if you have chosen to copy
all permissions to descendants at the metadata store level. You should
then create a profile page for the ECT.
Note:
The XML schema for the Model
file has changed between SharePoint Server 2007 and SharePoint 2010. If
you upgrade your SharePoint Server 2007 farm to a SharePoint 2010 farm,
the upgrade process also upgrades the Model schema that is loaded into
the Shared Services Provider (SSP). The XML schema will not be upgraded
by simply importing a SharePoint Server 2007 Model file into SharePoint 2010.
If you have errors in your BDC
Model and need to make amendments, before you re-import the BDC Model,
change the version number within the BDC Model or delete the external
system.
Note:
You
should not rely on the import process validation checks to identify
errors in the BCS Model. You should check that the external system
features, such as the external data
Web Parts, external data actions, and External Lists, include an
External Data Column in a list, and that the crawl process can function
correctly. Also check the profile page, if you created one.
