New
users will be very happy if they find the process of saving documents
to SharePoint easy and intuitive. And generally, users don’t like always
having to open a browser, find their favorite to get to SharePoint,
navigate to the site they’re using, find the document library, and then
have to upload a document after saving it locally.
There are several ways to
facilitate the process of saving documents to SharePoint by creating
favorites and shortcuts. This first set of steps that follows shows how
to create a shortcut by using the Connect to Office button in a document
library, and the section that follows that describes how to manually
create the shortcut from Windows Explorer.
Another method of
creating shortcuts, which can be used on computers not using Office
2010, is to simply create a shortcut under Network Places, which is
useful to know about if the SharePoint Sites folder isn’t available for
certain users.
Note
This section assumes Windows 7 is installed along with Office 2010
Using the Connect to Office Tool to Create Shortcuts
Users should be informed that
the Connect to Office tool available on the Library tab is the easiest
way to create shortcuts that will be available from Office 2010
applications via the Save As interface.
Follow these steps to use the Connect to Office feature in a SharePoint document library:
1. | Visit
a SharePoint document library using a computer with Office 2010
installed and an account with at least read permissions to the library.
|
2. | Click
the Connect to Office button from the Library tab, and the select Add
to SharePoint sites. A message appears that states “In order to connect
libraries in this site to Microsoft Office, your machine must register
the user profile service application used by this site....” Click Yes;
the SharePoint folder will be created under Favorites for the user, and
the shortcut will be added.
Note
If Office 2007 or an earlier version of Office is installed, the Connect to Office button will be inactive.
|
3. | Next,
click the Connect to Office button again, but this time click Manage
SharePoint Sites, and the MyQuickLinks page will display, showing the
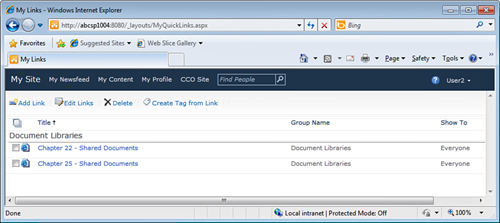
links available, as shown in Figure 1. Note that additional tools are available, including Add Link, Edit Link, Delete, and Create Tag from Link.

|
4. | Verify that the new link appears in Word 2010 by opening Word 2010, and click the Save As button from the File tab.
|
5. | Click
SharePoint Sites from the Favorites section in the left pane, and the
new SharePoint shortcut will appear. Double-click the new shortcut added
in step 2, and the Save As window will now display the document library
and existing contents, as shown in Figure 2.

|
6. | Enter a valid filename and click Save.
|
Note
During testing, links added
by using the Add Link tool on the MyQuickLinks page did not show up
reliably in the SharePoint Sites folder. Let end users know that they
can manually add these links by accessing the SharePoint Sites folder on
their computer by following the steps in the section titled “Manually Add a Shortcut to the SharePoint Sites Folder.”
Manually Add a Shortcut to the SharePoint Sites Folder
The previous section
described how to add a shortcut from the Connect to Office button, but
administrators might want to distribute shortcuts to end users either in
bulk or on an as-needed basis. The following example assumes the
SharePoint Sites folder exists under Favorites for the user, which is
created when the user uses the Connect to Office button and clicks Yes
to the warning that is provided (as described in the previous section):
1. | Click the Start button and select Computer.
|
2. | Double-click the SharePoint Sites folder under Favorites in the left pane.
|
3. | Assuming there are already shortcuts in place, right-click an existing one and click Copy. Then click a blank portion of the right pane and click Paste.
|
4. | This will paste a copy of the shortcut with the suffix - Copy. Right-click the copy and select Properties.
|
5. | As shown in Figure 3,
the path starts as follows: file://abcsp1004/ DavWWWRoot/sites/....
Therefore, a similar path needs to be entered for other shortcuts to
work. The intuitive path of http://servername/sitename/libraryname won’t
work. Now, simply edit the path to the desired site and document
library. In this example, the path is Shared Documents library or to the following complete path:
file://abcsp1004/DavWWWRoot/sites/Chapter%2022/ Shared%20Documents. Then
click the General tab and change the name of the shortcut to reflect
the new path. Click OK.

Note
The %20 equates to a space in the URL.
|
6. | Now double-click the new shortcut to make sure the SharePoint document library opens.
|
7. | Open Word 2010, click the File tab, and then click Save As.
|
8. | In
the Save As window, scroll down to the shortcut under Favorites, and
then double-click the new shortcut, and verify that the file saves properly.
|
Manually Create a Network Location Shortcut
This method allows the end
user or an administrator to create shortcuts in the My Computer Explorer
Window. This is important for users who aren’t on Office 2010 (for
example, Office 2007 users) because they won’t be able to use the
Connect to Office tool from a document library—it will be inactive
because Office 2007 doesn’t support this level of interaction. By
providing this shortcut, these users will still be easily able to save
documents to SharePoint libraries.
Follow these steps to create a shortcut manually:
1. | Access the Start button and click Computer.
|
2. | Right-click in an empty section of the Explorer window in the right pane.
|
3. | Click Add a Network Location.
|
4. | Click Next.
|
5. | Click Choose a Custom Network Location. Click Next.
|
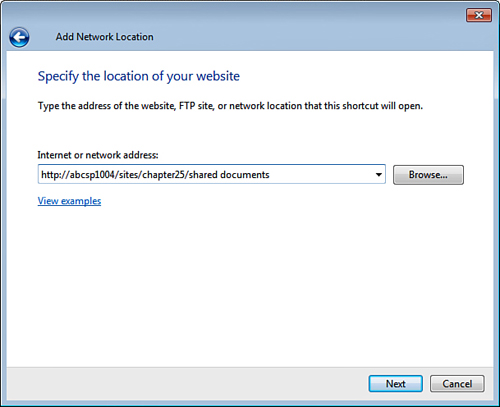
6. | Enter
the URL for the SharePoint site and document library (for example,
http://abcsp1004/sites/chapter25/shared documents, as shown in Figure 4).

|
7. | Click Next and enter a name for the shortcut, and click Next, and then click Finish, leaving the box next to Open
This Network Location When I Click Finish checked. Click Finish and
verify that the document library opens.
|
8. | Open
Word and click access the Save As tool, click Computer from the left
pane, and the shortcut should appear in the right pane. Double-click the
shortcut and the SharePoint library will open. Provide a name for the
document and click Save.
|