Deploying RemoteApp and
Desktop Connection
To deploy RemoteApp and
Desktop Connection, use the following steps.
Adding RD Session
Broker to the TS Web Access Computers Group
On every RD Session Host
server that is being used as a source for the RD Session Broker server,
complete the following steps:
1. | Log on to
the RD Session Host server that is a RemoteApp source for the RD
Session Host server farm with local administrator privileges.
| 2. | Click Start, and then click Run.
| 3. | In the Run dialog box, type in ServerManager.msc
and click OK.
| 4. | Under the
Configuration/Local Users and Groups node, click Groups.
| 5. | Next, double-click the TS Web Access Computers group.
| 6. | Click the Add button.
| 7. | In the Select Users, Service Accounts, or Groups dialog
box, click Object Types.
| 8. | Select the Computers check box, and then click OK.
| 9. | Locate and then add the computer account for RD
Connection Broker server, and then click OK.
|
Adding a RemoteApp
Source for RemoteApp and Desktop Connection
1. | Log on to
the RD Connection Broker server with local administrator privileges.
| 2. | Click Start, Administrative Tools, Remote Desktop
Services, Remote Desktop Connection Manager.
| 3. | Click RemoteApp Sources, and then in the Actions pane,
click Add RemoteApp Source, as shown in Figure 10.

| 4. | In the
RemoteApp Source Name box, enter the FQDN of the RD Session Host server
that is a RemoteApp source for the RD Session Host server farm.
|
Configuring RemoteApp
and Desktop Connection Properties
1. | Log on to
the RD Connection Broker server with local administrator privileges.
| 2. | Click Start, Administrative Tools, Remote Desktop
Services, Remote Desktop Connection Manager.
| 3. | Click the root node, and then in the Actions pane,
click Properties.
| 4. | In the
RemoteApp and Desktop Connection Properties dialog box, on the
Connection Settings tab, define the following:
- Display name— The name that
users will use to identify the customized view of RemoteApp programs and
virtual desktops provided by this server
- Connection ID— The ID that is used to
identify the customized view of RemoteApp programs and virtual desktops
provided by this server
| 5. | Next select the RD Web Access tab, and then in the
Server Name text box, enter in the FQDN for the RD Web Access server.
| 6. | Click the Add button.
| 7. | Click Apply and then click OK.
|
Adding Programs to the
RemoteApp Programs
1. | Log on to
the RD Session Host server that is a RemoteApp source for the RD
Session Host server farm with local administrator privileges.
| 2. | Click Start, Administrative Tools, Remote Desktop
Services, RemoteApp Manager.
| 3. | In the Actions pane, click Add RemoteApp Programs.
| 4. | On the Welcome page for the RemoteApp Wizard, click
Next.
| 5. | On the
Choose Programs to Add to the RemoteApp Programs List page, select the
program(s) that are to be added to the RemoteApps list from the list as
shown in Figure 11.

Note
The applications that are
shown on this page are shortcuts that are found in the All Users Start
Menu folder. If there is an application that is not listed on this page,
an administrator can click on the Browse button, and then specify the
location to that application’s executable.
| 6. | After
selecting an application or applications to add to the RemoteApps list,
an administrator can then choose to configure the different RemoteApp
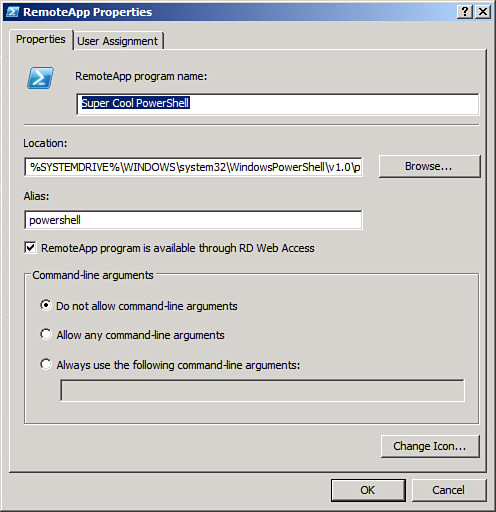
properties for that application or applications, as shown in Figure 12.
To do this, select the application name, click Properties, make any
needed modifications, and then click OK.

Note
It is important to note that,
by default, the RemoteApp Program Is Available Through RD Web Access
option is enabled. Also, only system environment variables can be used
in the pathname for an application (such as %windir%). Per-user environment variables cannot be used. Lastly,
if needed, using the User Assignment tab, an administrator can define
which users/groups have access to the RemoteApp program.
| 7. | Click
Next.
| 8. | Finally,
review the settings on the Review Settings page, and then click Finish.
| 9. | The RemoteApps list will then appear, as shown in Figure 13.

|
Configuring Global
Deployment Settings
In the RD RemoteApp
Manager interface, an administrator can also configure a number of
deployment settings that globally apply to all RemoteApp programs in the
RemoteApps list. The settings are grouped into the following
categories:
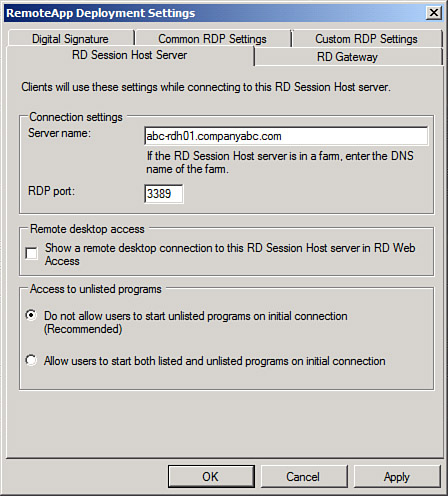
RD Session Host
Server Settings— These settings are used
to define how users will connect to an RD Session Host server or RD
Session Host server farm to access RemoteApp programs, as shown in Figure 14.

RD
Gateway Settings— These settings are used
to define RD Gateway deployment settings. Digital Signature Settings— This setting is used to define the
digital certificate that is used to digitally sign .rdp files. RDP
Settings— These settings are used to
define common RDP settings for RemoteApp connections, such as device and
resource redirection.
Accessing RemoteApp and
Desktop Connection
When using Windows 7 or
Windows Server 2008 R2, users can also access RemoteApp and Desktop
Connection using two methods. The first method is to use a RemoteApp and
Desktop Connection URL, which is provided by administrators. For
example, such a URL might be formatted as: https://remotedesk.companyabc.com/RDWeb/Feed/webfeed.aspx. Using this URL, a user can then create a new
connection to RemoteApp and Desktop Connection using the Control Panel,
RemoteApp and Desktop Connection.
The second method to
access RemoteApp and Desktop Connection is to use a configuration file
that is generated by an administrator. These configuration files are
generated using the Remote Desktop Configuration Manager tool. Once the
configuration file is given to a user, the user just has to double-click
the configuration file and the connection to RemoteApp and Desktop
Connection is created.
RemoteApp and Desktop Connection
connections are also created when a user logs on to RD Web Access and
accesses RemoteApp programs, session-based remote desktops, or virtual desktops. To access RemoteApp and Desktop
Connection, users would log on to RD Web Access using the following
URL:
The <name> might
be the FQDN of the RD Web Access server or some other known name that
refers to that server or group of servers, as shown in Figure 15. Additionally, for centralized portal deployments,
an RD Web Access web part can be added to a Windows SharePoint Services
site.

|