After the Remote Desktop Services deployment has been
planned, it is a best practice to then install and configure RDS in a
lab environment. Then after the deployment has been verified, the next
step is to install it into production and have it tested by IT personnel
or a designated pilot group. Lastly, after being tested by these
groups, the deployment can finally be released into full production to
end users. By following this best-practice method, administrators can
reduce many of the inherent risks associated with deploying Remote
Desktop Services while also verifying the infrastructure is ready to
support end users.
The following
subsections contain detailed instructions on how to install and
configure Windows Server 2008 R2–based Remote Desktop Services for a
typical enterprise deployment that only includes several RDS servers.
Enabling Remote Desktop
for Administration
Remote Desktop for
Administration is installed on all Windows Server 2008 R2 servers by
default and only needs to be enabled. To enable this feature, follow
these steps:
1. | Log on to
the desired server with local administrator privileges.
|
2. | Click Start, and then click Run.
|
3. | In the Run dialog box, type in ServerManager.msc
and click OK.
|
4. | After the
Server Manager console is displayed, select the Configure Remote
Desktop task.
|
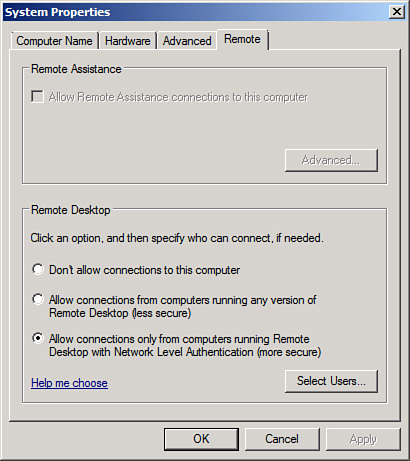
5. | In the
Systems Properties dialog box, on the Remote tab, and in the Remote
Desktop section, select the Allow Connections Only from Computers
Running Remote Desktop with Network Level Authentication (More Secure)
option button, as shown in Figure 1.

|
6. | Click OK
in the Systems Properties dialog box to complete this process.
|
Note
In the Remote Desktop
section on the Remote tab of the System Properties dialog box, there are
two different settings for enabling Remote Desktop. The first option,
Allow Connections from Computers Running Any Version of Remote Desktop
(Less Secure), allows a client using any version of the Remote Desktop
Connection client to connect to Remote Desktop Services. The second
option, Allow Connections Only from Computers Running Remote Desktop
with Network Level Authentication (More Secure), only allows a client
that is using a version of the Remote Desktop Connection client that
supports Network Level Authentication (NLA) to connect to Remote Desktop
Services.
Alternatively, Remote Desktop
for Administration can also be enabled via GPO using the following
policy options:
Computer
Configuration\Policies\Administrative Templates\Windows
Components\Remote Desktop Services\Remote Desktop Session
Host\Connections\Allow allows users to
connect remotely using Remote Desktop Services.
Computer
Configuration\Policies\Administrative Templates\Windows
Components\Remote Desktop Services\Remote Desktop Session
Host\Security\Require requires
user authentication for remote connections by using Network Level
Authentication.
Or, administrators
can also use PowerShell and the following commands to enable Remote
Desktop for Administration:
(Get-WmiObject -Class "Win32_TerminalServiceSetting" -Namespace
root\cimv2\terminalservices).SetAllowTsConnections(1)
(Get-WmiObject -class "Win32_TSGeneralSetting" -Namespace root\cimv2\
terminalservices -Filter "TerminalName='RDP-
tcp'").SetUserAuthenticationRequired(1)
Note
Although the Server
Manager method described previously will also configure the required
host firewall rules for Remote Desktop, the other two methods leave it
to the administrator to configure the necessary firewall rules.
Enabling Remote
Assistance
To configure remote
assistance, follow these steps:
1. | Log on to
the desired machine with local administrator privileges.
|
2. | Click Start, right-click the Computer shortcut, and
then click Properties.
|
3. | Next, select the Remote Settings task and in the Remote
Assistance Settings section, select the Allow Remote Assistance
Connections to This Computer option.
|
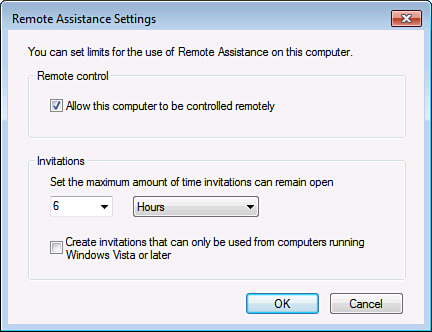
4. | Click the Advanced button to configure whether remote
control will be allowed, the maximum amount of time an invitation can
remain open, and if invitations can only be used from computers running
Windows Vista or later, as shown in Figure 2.

Note
The previous steps assume that
a Windows 7/Vista client is being used. For Windows XP clients, the
steps will be slightly different.
|
5. | Click OK
in the Advanced window, and click OK on the System Properties page to
complete this process.
|
Remote assistance for clients
that are members of a domain can be configured using Group Policy. All
of the remote assistance settings are located in Computer
Configuration\Policies\Administrative Templates\System\Remote Assistance,
as shown in Figure 3.
