Deploying IAS as a RADIUS Server
For basic RADIUS
scenarios in which no RADIUS proxy is implemented, deploying IAS as a
RADIUS server requires configuration both at the client running Routing
And Remote Access and at the server running IAS.
Configuring a RADIUS Client
To configure a
computer running Routing And Remote Access as a RADIUS client, first
open the server properties dialog box in the Routing And Remote Access
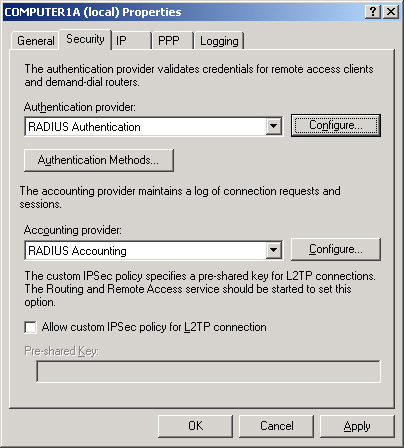
console, and then select the Security tab. This tab allows you to select
a RADIUS server for authentication, logging, or both. By default, both
functions are handled by the local computer. To configure these
functions to instead be passed to a RADIUS server, from the
Authentication Provider drop-down list box, select RADIUS
Authentication. From the Accounting Provider drop-down list box, select
RADIUS Accounting. Figure 5 shows these options.

Specifying a RADIUS Server
After
you select the options for RADIUS authentication and accounting in the
Routing And Remote Access console, you need to specify the particular
RADIUS server or servers you want to use. You must specify the RADIUS
servers for authentication and accounting separately, but the
configuration steps are identical for each. First, click the Configure
button next to the Authentication Provider or the Accounting Provider
drop-down list box. The RADIUS Authentication or RADIUS Accounting
dialog box opens, which, when multiple RADIUS servers have been
configured for fault tolerance, lists the query order of these servers.
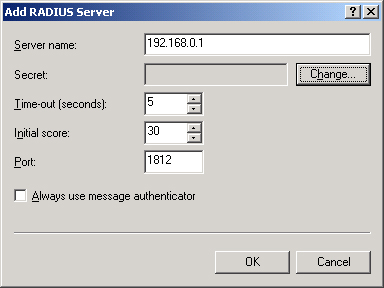
Then click the Add button to open the Add RADIUS Server dialog box. Figure 6 shows the dialog box that opens when you add a RADIUS authentication server.

This
dialog box allows you to specify a RADIUS server by resolvable name or
IP address. In this box, you can also configure the following
parameters:
Secret
This field allows you to define a shared secret, which is a plaintext
password used between a RADIUS client and server. You can also use
shared secrets to encrypt certain message attributes, such as the user
password. When defining a shared secret, be sure to use the same
case-sensitive secret on the RADIUS client and RADIUS server; however,
you should use a different shared secret for each RADIUS server-RADIUS
client pair. For each shared secret, it is recommended that you use a
random sequence of letters, numbers, and symbols at least 22 characters
long.
Time-Out (Seconds)
This parameter determines how many seconds a RADIUS client waits for a
response from a RADIUS server before determining that the connection
attempt is unsuccessful.
Initial Score
When more than one RADIUS server is specified for a particular client,
this value determines the querying order assigned to a particular RADIUS
server.
Port
This value allows you to specify the UDP port used for the RADIUS
protocol. Standard ports used for RADIUS include UDP port 1812 for
authentication and UDP port 1813 for accounting. However, many access
servers use ports 1645 for authentication requests and 1646 for
accounting requests by default. Whatever port numbers you decide to use,
make sure IAS and your access server are configured to use the same
ones.
Always Use Message Authenticator
This option appears only when adding a RADIUS authentication server.
The RADIUS Message Authenticator attribute is an MD5 hash of the entire
RADIUS message. The shared secret is used as the key. If the Message
Authenticator attribute is present, the hash is verified. If it fails
verification, the RADIUS message is discarded. If the client settings
require the Message Authenticator attribute and it is not present, the
RADIUS message is discarded.
Send RADIUS Accounting On And Accounting Off Messages This
message appears only when adding a RADIUS accounting server. This
option causes Routing And Remote Access to send Accounting-On and
Accounting-Off messages to the RADIUS server when Routing And Remote
Access starts and stop.
Configuring a RADIUS Server
To configure a RADIUS
server, you first need to install the Internet Authentication Service
Windows subcomponent of the Networking Services Windows component. After
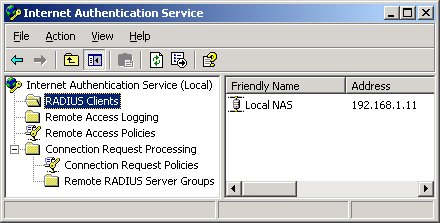
you install IAS, you can configure its features through the Internet
Authentication Service console (Figure 7), available on the Administrative Tools menu.

Registering the IAS Server
The first step in
deploying the IAS server is to register it in Active Directory. Through
registration, the IAS computer joins the RAS And IAS Servers domain
local security group in the domain of which the IAS server computer is a
member. Members of the RAS And IAS Servers group are able to read
remote access attributes of user accounts.
Specifying the RADIUS Clients
In the IAS console,
you must specify each RADIUS client forwarding access requests to the
local IAS server. To specify a new RADIUS client, right-click the RADIUS
Clients folder in the console tree and then click New RADIUS Client. A
wizard opens in which you must configure a friendly name for the
connection, a resolvable name or IP address, the shared secret defined
for the client/server pair, and (optionally) the Message Authenticator
attribute.
Tip
You
can back up, restore, or migrate a RADIUS server by using the Netsh
command-line utility and the AAAA context. First, use the Netsh aaaa
show config >filename.txt
command to dump the complete IAS server configuration into a script
file. Then you can install the configuration included in this script
file onto a particular IAS server by running the Netsh exec [path]\filename.txt command on the target server computer. |