One of the biggest causes of Windows instability in
the past was the tendency of some newly installed programs simply to not
get along with Windows. The problem could be an executable file that
didn’t mesh with the Windows system or a Registry change that caused
havoc on other programs or on Windows. Similarly, hardware installs
often caused problems by adding faulty device drivers to the system or
by corrupting the Registry.
To help guard
against software or hardware installations that bring down the system,
Windows Vista offers the System Restore feature. Its job is
straightforward, yet clever: to take periodic snapshots—called restore points or protection points—of
your system, each of which includes the currently installed program
files, Registry settings, and other crucial system data. The idea is
that if a program or device installation causes problems on your system,
you use System Restore to revert your system to the most recent restore
point before the installation.
System Restore automatically creates restore points under the following conditions:
Every 24 hours— This is called a system checkpoint
and it’s set once a day as long as your computer is running. If your
computer isn’t running, the system checkpoint is created the next time
you start your computer, assuming that it has been at least 24 hours
since that previous system checkpoint was set.
Note
The system checkpoint
interval is governed by a task in the Task Scheduler (select Start, All
Programs, Accessories, System Tools, Task Scheduler). Open the Task
Scheduler Library, Microsoft, Windows branch, and then click the
SystemRestore task. To make changes to the task, click Properties in the
Action pane to display the SR Properties dialog box. To change the
schedule that Vista uses to create system checkpoints, display the
Triggers tab, click the trigger you want to change (Daily or At
Startup), and then click Edit.
Before installing certain applications—
Some newer applications—notably Office 2000 and later—are aware of
System Restore and will ask it to create a restore point prior to
installation.
Before installing a Windows Update patch—
System Restore creates a restore point before you install a patch
either by hand via the Windows Update site or via the Automatic Updates
feature.
Before installing an unsigned device driver—
Windows Vista warns you about installing unsigned drivers. If you
choose to go ahead, the system creates a restore point before installing
the driver.
Before restoring backed-up files—
When you use the Windows Vista Backup program to restore one or more
backed-up files, System Restore creates a restore point just in case the
restore causes problems with system files.
Before reverting to a previous configuration using System Restore—
Sometimes reverting to an earlier configuration doesn’t fix the current
problem or it creates its own set of problems. In these cases, System
Restore creates a restore point before reverting so that you can undo
the restoration.
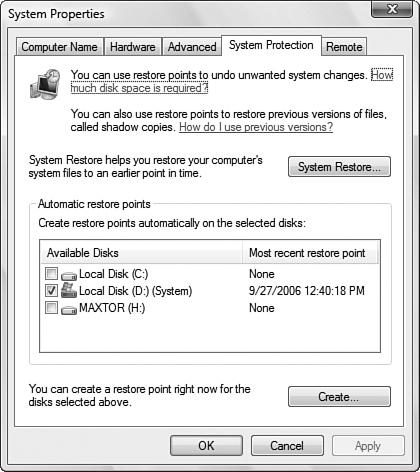
It’s also possible to create a restore point manually using the System Protection feature. Here are the steps to follow:
1. | Select Start, right-click Computer, and then click Properties to open the System Window.
|
2. | Click
System Protection and then enter your UAC credentials to open the
System Properties dialog box with the System Protection tab displayed,
as shown in Figure 1.

|
3. | By
default, Vista creates automatic restore points for just the system
drive. If you have other drives on your system and you want to create
automatic restore points for them, as well, use the Automatic Restore
Points list to activate the check box beside each drive you want to
protect.
|
4. | Click Create to display the Create a Restore Point dialog box.
|
5. | Type
a description for the new restore point and then click Create. System
Restore creates the restore point and displays a dialog box to let you
know.
|
6. | Click OK.
|
Note
In Windows XP you could
adjust the amount of disk space System Restore used, but you can’t do
that in Windows Vista. Instead, Vista always reserves a minimum of about
300MB (on the system drive) to hold restore point data, but it might
use more disk space if your system has lots of restore points and if the
system drive has enough free space. If the drive runs out of free
space, System Restore deletes the oldest restore points to free up some
room. Note, however, that there doesn’t seem to be a limit on the number
of restore points, so on a massive hard disk with lots of free space
you could easily end up with tens of gigabytes worth of restore points.
If you want to free up that disk space, run Disk Cleanup as described
earlier, select the More Options tab, and then click Clean Up in the
System Restore group. This will delete all but the most recent restore
point.