If you find that a hard disk partition is getting low
on free space, you should delete any unneeded files and programs.
Windows Vista comes with a Disk Cleanup utility that enables you to
remove certain types of files quickly and easily. Before discussing this
utility, let’s look at a few methods you can use to perform a spring
cleaning on your hard disk by hand:
Uninstall programs you don’t use—
If you have an Internet connection, you know it’s easier than ever to
download new software for a trial run. Unfortunately, that also means
it’s easier than ever to have unused programs cluttering your hard disk.
Use the Control Panel’s Add or Remove Programs icon to uninstall these
and other rejected applications. Delete downloaded program archives—
Speaking of program downloads, your hard disk is also probably littered
with ZIP files or other downloaded archives. For those programs you
use, you should consider moving the archive files to a removable medium
for storage. For programs you don’t use, you should delete the archive
files. Archive documents you don’t need very often—
Our hard drives are stuffed with ancient documents that we use only
rarely, if at all: old projects, business records from days gone by,
photos and videos from occasions held long ago, and so on. You probably
don’t want to delete any of this, but you can free up hard disk space by
archiving those old documents to removable media such as recordable CD
or DVD disks, or a flash drive. Remove Windows Vista components that you don’t use—
If you don’t use some Windows Vista components, remove them from your
system. To do this, select Start, Control Panel, Programs, Turn Windows
Features On or Off. Enter your UAC credentials to see the Windows
Features dialog box. Deactivate the check box for each feature you don’t
use, and then click OK. Delete application backup files— Applications often create backup copies of existing files and name the backups using either the bak or .old extension. Use Windows Explorer’s Search utility to locate these files and delete them.
After you’ve performed
these tasks, you should next run the Disk Cleanup utility, which can
automatically remove some of the preceding file categories, as well as
several other types of files, including downloaded programs, Internet
Explorer cache files, the hibernation files, Recycle Bin deletions,
temporary files, file system thumbnails, and offline files. Here’s how
it works:
1. | Select Start, All Programs, Accessories, System Tools, Disk Cleanup. The Disk Cleanup Options dialog box appears.
| 2. | Click one of the following options and then enter your UAC credentials when prompted:
My Files Only— Click this option to delete only those disposable files that you have generated yourself.
Files from All Users on This Computer— Click this option to delete disposable files generated by every user on your computer
| 3. | In
the Drive Selection dialog box that appears, select the disk drive you
want to work with and then click OK. Disk Cleanup scans the drive to see
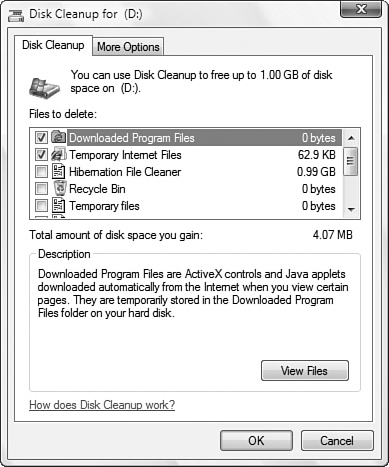
which files can be deleted, and then displays a window similar to the
one in Figure 1.
Tip
Windows Vista enables
you to bypass the Drive Selection dialog box. Press Windows Logo+R (or
select Start, All Programs, Accessories, Run) to open the Run dialog
box. Type cleanmgr /ddrive, where drive is the letter of the drive you want to work with (for example, cleanmgr /dc), and then click OK.
| 4. | In
the Files to Delete list, activate the check box beside each category
of file you want to remove. If you’re not sure what an item represents,
select it and read the text in the Description box. Note, too, that for
most of these items you can click View Files to see what you’ll be
deleting.
| 5. | Click OK. Disk Cleanup asks whether you’re sure that you want to delete the files.
| 6. | Click Yes. Disk Cleanup deletes the selected files.
|
Saving Disk Cleanup Settings
It’s possible to save
your Disk Cleanup settings and run them again at any time. This is handy
if, for example, you want to delete all your downloaded program files
and temporary Internet files at shutdown. Launch the command prompt and
then enter the following command:
Note that the number 1 in the command is arbitrary: you can enter any number between 0 and 65535.
This launches Disk Cleanup with an expanded set of file types to
delete. Make your choices and click OK. What this does is save your
settings to the Registry; it doesn’t delete the files. To delete the
files, open the command prompt and enter the following command:
You can also create a shortcut for this command, add it to a batch file, or schedule it with the Task Scheduler.
|
