Using Windows Calendar
Computers are useful
for tracking all kinds of personal information, and keeping track of
appointments and events is no exception. Windows Vista includes Windows
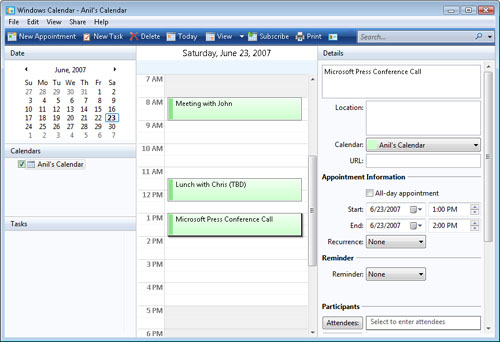
Calendar, which uses a simple, intuitive user interface for recording
information about upcoming meetings, tasks, and related details. Windows
Calendar also provides a feature that makes it easy to share calendar
appointments with other people. Figure 22 shows an example of a daily view in the application. In this section, you’ll learn how to work with Windows Calendar.
Managing Calendars and Groups
In
its simplest configuration, you can use a single Windows Calendar file
for all of your appointments. This is useful if, for example, you just
want to keep track of a single type of event. More commonly, users want
to keep different types of events separate for organizational purposes.
For example, a small-business user might have separate calendars for
personal and social events, another for business appointments and
meetings, and a third for keeping track of details such as tax filings.
The process of creating a
new calendar is simple: just click the New Calendar item on the File
menu. A new calendar appears in the Calendars section. Windows Calendar
gives each calendar a separate color to help keep events visually
separate.
Another useful feature
for organizing calendars is the ability to create groups. This enables
you to manage similar types of calendars together for administrative
purposes (you’ll see examples later in this lesson). To create a new
group for calendars, click New Group on the File menu. After you have
created a new group, you can drag and drop the calendars into and out of
them.
Creating Tasks and Appointments
Appointments are
events that occur at a specific date and time. To create a new
appointment, place the cursor on the date or time of the event in the
calendar view. Then, click the New Appointment button in the toolbar, or
choose New Appointment on the File menu. You can type the text of the
appointment either directly in the calendar (if the current view is
large enough) or in the details pane. This section enables you to
specify additional information, including the following:
A description of the appointment.
Location.
On which calendar the item should appear.
A URL for reference to a Web site or other online location.
Details
about the start and end time for the appointment. (Optionally, you can
choose for it to be an all-day appointment and configure the appointment
to recur.)
An amount of time before the event that a reminder should be displayed.
A
list of participants that you would like to invite to the meeting. You
can enter e-mail addresses manually, or you can click Attendees to
choose them from the list stored in Windows Contacts.
Windows Calendar also
enables you to create and track tasks. The primary difference between a
task and an appointment is that tasks generally have a start date and
due date (rather than specific beginning and end times), and they are
not necessarily placed at a certain time of the day. Tasks also don’t
have attendees. To create a new task, click New Task on the toolbar or
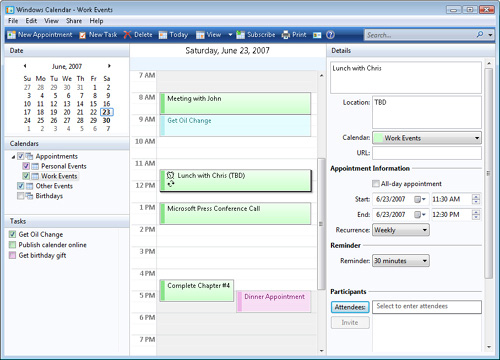
select New Task on the File menu. The list of tasks appears in the
bottom left section of the user interface. Users can place a check mark
next to a task to signify that it is complete. Figure 23 shows an example of Windows Calendar in which there are multiple appointments and task items.
Viewing Calendar Information
You
can view calendar events by using several different view options. The
first option is to choose the time span shown in the calendar portion of
the user interface. The options are as follows:
To change the view,
click the drop-down arrow next to the View button on the toolbar or
select the appropriate item from the View menu. Note that there are
convenient keyboard shortcuts that can make it easier to switch between
views. If you choose to show information for many days on the display,
then summary text is shown for each event. You can always click Today to
return to the current date.
In addition to
controlling the date range that is shown, you can manage which events
and tasks are shown in the calendar view by selecting the check box for
the associated calendar or calendar group. This enables you to view
information from multiple calendars in a single view or to view just one
type of information. For example, when at work, you might be most
interested in details about meetings. At other times, you might want to
view all of the types of upcoming events.
Sending Calendar Information
Although calendars
are certainly helpful when used on an individual basis, they can be even
more useful when shared with other people. A common example in a
home-based environment is for parents to be able to keep track of their
children’s after-school activities. You can share calendar information
in several different ways. The simplest method is to send appointments
through e-mail. The iCalendar format enables users to send
appointment-related data in a standard format. These files usually have
an .ics extension and can easily be attached to an e-mail message (see Figure 24).
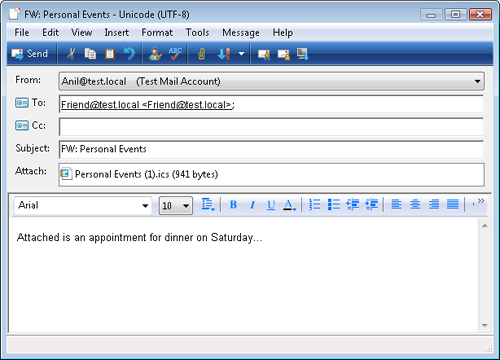
Note that the message
is being sent using Windows Mail. If you are using a different e-mail
program, Windows Calendar uses your default program. The message has an
attachment that includes the .ics file for a group of appointments. To
send a new appointment or group of appointments, select the specific
item, and then click Send Via E-mail on the Share menu. A new e-mail
message is generated. The recipient can open the attachment to have the
event added to his or her calendar. Because the iCalendar format is a
standard, programs other than Windows Calendar can use it.
Publishing a Calendar
Although
sending individual appointments through e-mail can be useful, it can
quickly become difficult to manage when there are many different users
who need to stay up to date with their friends, family members, and
coworkers. An easier way to do this is to use the Windows Calendar
publishing feature. Publishing calendar information also relies on the
iCalendar format, but the data can be stored in a central location that
is accessible to many people. The options include local file folders and
shared network folders. In addition, you can publish calendar data to a compatible Web server on the Internet.
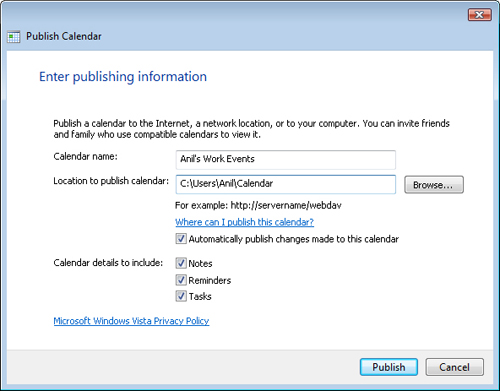
To enable publishing, on the Share menu, select Publish. Figure 25
shows the options that are available. The first option is the Calendar
Name text box. It is usually helpful to include the name of the
individual and the types of events that are included. The Location To
Publish Calendar text box specifies where the calendar data is
published. This can be a local folder path, a network folder path, or
the URL of a compatible Web host. The link opens a Web site that
provides more details for available services. A very useful option is
the Automatically Publish Changes Made To This Calendar check box. When
selected, this setting ensures that the published information is updated
whenever you add or change appointments. Finally, you can determine
whether you want to publish notes, reminders, or tasks.
The publishing
process also enables you to generate an e-mail message to inform others
of the location of your shared calendar. When other users connect to and
download the .ics file, they can add the events and other details to
their own calendars (see Figure 26).
You can choose to stop publishing calendar information from the Share menu by choosing Stop Publishing.
Subscribing to Calendars
Although manually
connecting to and downloading iCalendar files is an option, it does take
time and effort for people to obtain that data. To make this process
easier, Windows Calendar includes a Subscribe command on the Share menu.
The only configuration option is to specify the path to the shared
calendar files. This might be in a local folder, but it is more commonly
stored on a shared network folder or on a compatible Internet server.
Windows Calendar
provides a great deal of functionality for tracking tasks and
appointments in a simple and easy-to-learn user interface.
