Optimizing Disk Performance
Just about every
application (and the Windows Vista operating system itself) relies on
the computer’s hard disk system. Hard disk storage is used for storing
files and for performing temporary operations. The operating system also
uses disk space to supplement the amount of available memory. As a
Consumer Support Technician, you’ve likely heard the complaint that
users’ systems tend to slow down over time. One potential reason is
that information is not organized as efficiently on the hard disk. In
this section, you’ll look at ways in which you can optimize disk
performance.
Disk Cleanup
Over time, it’s likely
that applications will leave unnecessary files on the computer’s hard
disk. Examples include temporary Internet files, application
installation components, and error report files. Finding and safely
deleting these items can be tricky because they’re often scattered in
many regions of the file system. Apart from the obvious loss of usable
disk space, unwanted files can lead to decreased performance due to
fragmentation.
The Disk Cleanup tool
provides a quick way to identify temporary files that the system no
longer needs. You can access it through the Start menu or by clicking
Disk Cleanup in the Properties dialog box for a particular hard disk.
The latter option is helpful if you want to restrict the cleanup
operation to a single logical hard disk partition.
When you launch the
program directly, it performs an automatic scan of the hard disk. The
resulting display shows an overview of the types of files that it finds,
along with estimates related to the potential amount of disk space that
can be recovered (see Figure 10).
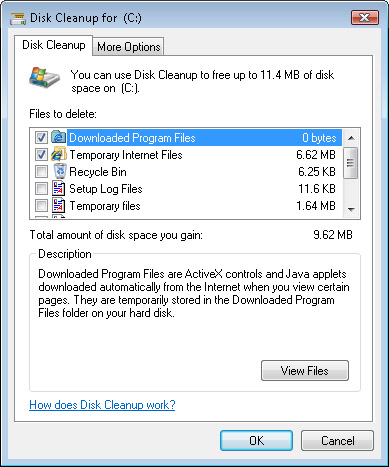
The list of types of files that might no longer be needed includes the following:
Downloaded Program Files
Temporary Internet Files
Debug Dump Files
Microsoft Office Temporary Files
Office Setup Files
Recycle Bin
Setup Log Files
System Error Memory Dump Files
System Error Minidump Files
Temporary Files
Thumbnails
Windows Error Report Information
It’s important to note
that some of these types of files can be useful in improving the user
experience. For example, thumbnail files help Windows Explorer show
previews of files such as photos and videos more quickly. The contents
of the Recycle Bin are useful for recovering files that have been
deleted accidentally.
The process of
performing a disk cleanup simply requires you to select the check boxes
for the relevant types of files and then click OK. The files are
automatically removed from the system. In addition, the More Options tab
in the Disk Cleanup dialog box provides a way to access utilities
quickly for managing Programs And Features and for configuring System
Restore And Shadow Copies features.
Disk Defragmentation
Most modern computers
include very large hard disks that allow for the storage of many
gigabytes of data. This places a heavy burden on the file system because
Windows is often responsible for moving, copying, and deleting many
files. The ideal arrangement for files is for them to be stored
contiguously. This means that the entire contents of the file are
physically stored together on the hard disk.
Due to usage patterns,
however, this might not always be possible. For example, on a hard disk
that is nearly full, it might be necessary to spread the contents of a
2.0 GB video file across different sections of the disk. Each of these
sections is referred to as a fragment of the file. Disk fragmentation
can lead to a decrease in overall performance because, whenever the file
must be read, the physical hard disk must perform more work to load
data that is scattered in different locations.
Fortunately, there is an
easy way to counteract this problem: the Windows Vista Disk
Defragmenter. You can launch this utility from the Start menu or by
clicking Defragment Now on the Tools tab of the Properties dialog box
for a particular hard disk. When the program launches, it shows the
options that are available, as shown in Figure 11.
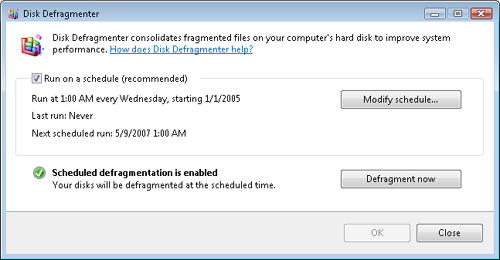
The Disk Defragmenter
program offers two options. The first is to start a disk defragmentation
pass manually by clicking Defragment Now. This starts the
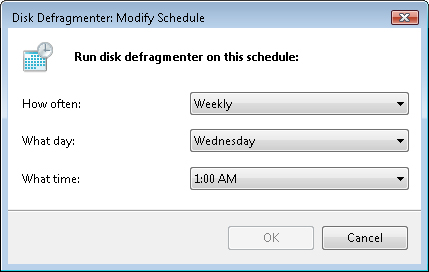
defragmentation process immediately. The other option is to configure
the process to run automatically based on a schedule (see Figure 12).
It is a good idea to schedule defragmentation operations regularly to
maintain overall disk performance over time. The defragmentation process
places a significant load on the disk system, and users are likely to
notice the impact if it is run while they are actively using their
systems. Therefore, it’s a good idea to run the process during periods
of no user activity on the computer.
Other Performance Optimization Options
So far, you have
examined many different ways in which you can optimize the performance
of Windows Vista. In addition to these methods, there are a few services
and features that can be configured to improve system responsiveness.
Although there might be a trade-off in relation to functionality,
computers that are low on system resources can often benefit from these
features.
Adjusting Visual Effects
You can configure systems to choose the
best balance of options to optimize responsiveness. The Performance
Information And Tools window in Control Panel includes a link entitled
Adjust Visual Effects. This link opens the Performance Options dialog
box that allows for changing settings related to visual effects used by
the Windows desktop (see Figure 13).
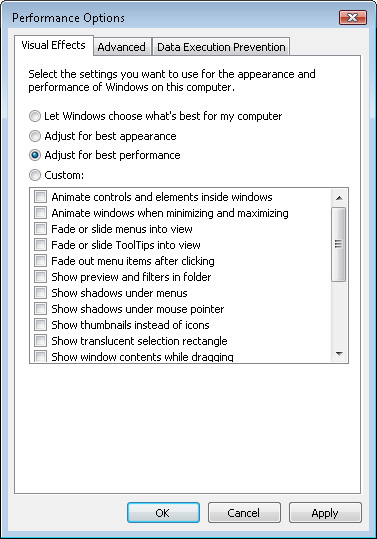
The Visual Effects
tab provides several options that control which user interface features
are enabled. The default setting is to let Windows automatically
determine which options should be enabled. When this option is selected,
Windows Vista determines whether there is a potential performance
problem and makes changes accordingly. The next two options are to
adjust for best appearance or for best performance. The best-performance
option disables all of the visual effects, whereas the best-appearance
option enables them all. Finally, you can choose the Custom option to
select which specific features to enable.
Users might complain to
you that it takes too long to launch programs or that the system does
not seem responsive enough (especially when numerous applications are
running at the same time). For these users, disabling some of the Visual
Effects tab settings can improve the usability of the system.
Managing Indexing Options
One of the most useful
productivity features of Windows Vista is the ability to perform a
search from the Start menu or directly from within applications such as
Windows Explorer.
The Windows Search
indexing process can place a significant load on systems, however. It is
responsible for analyzing many different file types and for storing the
results to make searches faster.
You can launch
the Indexing Options configuration utility directly from the Start menu
or by clicking Adjust Indexing Options in the Performance Information
And Tools Control Panel window. As shown in Figure 14, the tool provides an overview of which file system locations and applications will be indexed.
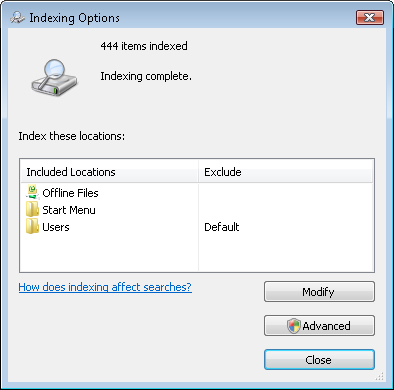
If some locations are not
frequently searched, users can click Modify to remove those paths.
Clicking Advanced presents additional options, including the location of
the index files. Users can also specify whether certain file types
should not be indexed. Overall, by configuring Indexing options based on
users’ needs, you can help reduce hard disk and CPU use.
Practice: Improving System Performance
These
practice exercises walk you through some steps to improve overall
system performance. To complete Practice 2, you need an external memory
device that is compatible with Windows ReadyBoost. The most common
options include USB flash drives and memory cards.
▸ Practice 1: Configure Startup Items
In this practice exercise,
you obtain a list of startup options by using the MSConfig utility as
well as Windows Defender. Because software configurations will vary, you
can optionally choose to disable a startup item and reboot the computer
to ensure that it does not load during the startup process.
1. | Launch the System Configuration (MSConfig) utility from the Start menu.
|
2. | On the General tab, note the various startup options that are available.
The default setting is Normal Startup, but you can also choose to
perform a Diagnostic Startup or a Selective Startup. Leave the Normal
Startup option selected.
|
3. | Click the Startup tab.
The tab shows a listing of all of the programs that are configured
to load during the startup process. Note that the information includes
the name of the program, the manufacturer (if available), the command,
and the location in which the startup commands are stored.
|
4. | Clear the check box for one of the startup items, and then click Apply.
Note that the Date Disabled column shows the current date and
time. This program will not run automatically during the next system
restart.
|
5. | To re-enable the startup item, select its check box and click Apply. This returns the configuration to its original settings.
|
6. | Click Cancel to close the System Configuration utility.
|
7. | Open the Windows Defender program by using the Start menu.
|
8. | From
the Windows Defender home page, click Tools, and then select Software
Explorer. The default view shows a list of all of the current startup
programs.
|
9. | Right-click any startup item on the list and choose to sort the list by Startup Type.
Note that some programs are configured to run during system
startup, whereas others automatically run whenever a user logs on to the
system.
|
10. | Click any startup item to view additional details about the program.
Note the various details that are provided, including the command
and path to the program. Note that you can also disable or permanently
remove a startup item from the list.
|
11. | When finished, close Windows Defender.
|
▸ Practice 2: Configure Windows ReadyBoost
In this exercise, you walk through the steps required to configure a removable media device to support Windows ReadyBoost.
1. | Install a compatible removable media device (such as a media card or a USB flash device) into the computer.
|
2. | Windows
Vista might automatically run a performance test on the device and
prompt you to enable Windows ReadyBoost. For the purpose of this
exercise, choose not to enable Windows ReadyBoost if prompted.
|
3. | From
the Start menu, open the Computer item and locate the new removable
memory device. Right-click the device and select Properties.
|
4. | Click the ReadyBoost tab. By default, the Do Not Use This Device option is selected.
|
5. | To
enable Windows ReadyBoost, select the Use This Device option. The
slider bar can be used to determine how much space should be allocated
for Windows ReadyBoost. Note that any space you allocated to Windows
ReadyBoost will be unusable for other storage on the device.
|
6. | Select
the recommended amount of memory and click OK to enable Windows
ReadyBoost. This initializes the ReadyBoost file on the memory device.
|
7. | Windows
ReadyBoost runs automatically in the background and works to optimize
memory and disk-related performance. If your memory device has a light
or other indicator of activity, you will see it blinking actively.
Otherwise, you can always return to the Windows ReadyBoost Properties
dialog box to view the settings for this feature. |
