Configuring Malware Protection
Some
of the most common threats to standard desktop operating systems are
collectively known as malware. These types of software can perform a
wide array of unwanted operations on a computer. One example is a type
of software that is installed on a computer with little or no
notification to the end user. The program might automatically download
and display advertisements from the Internet or collect and transmit
information to another computer.
Viruses are programs
that are generally designed to do damage. They might be installed
through a security vulnerability or by tricking users into downloading
and installing them. When run, they can cause serious system-related
problems, including data corruption. Regardless of the details, these
programs should clearly be avoided.
Antimalware products are
available from Microsoft and a number of different vendors. These
programs have been designed to protect systems against the installation
and operation of malware by providing several layers of protection. For
example, they might examine all downloaded programs and verify that
users want to install them when they are launched. Another method is to
scan the computer’s file system periodically, looking for signatures of
known malware programs. These features often integrate with other
products such as firewall configurations.
Microsoft
designed Windows Security Center to show basic details related to the
configuration of malware protection. There are two items that you can
find in the details of this section:
The default
configuration of Windows Vista includes Windows Defender, which is
designed to provide numerous security-related functions, including
scanning for malware. It also relies on the Windows Update feature to
download and install new malware definition updates regularly. You’ll
learn about configuring Windows Defender in more detail later in this
lesson.
As with the other sections in Windows Security Center, there are three main indications for the malware protection item:
Green Indicates that malware protection is installed, is up to date, and is configured properly.
Yellow
Specifies that an antimalware configure setting is different from the
recommended value, or that the antimalware software is outdated. The
indicator also appears yellow if Windows Vista is unable to find
compatible antimalware programs on the system.
Red
This indicator specifies that an antivirus or antimalware program is
not currently installed or is turned off. This leaves the computer
potentially vulnerable to security-related problems.
Changing Antivirus Options
Windows
Vista does not include an antivirus application. Therefore, unless a
third-party hardware or software vendor has included a specific product
that is able to detect and remove viruses, the default setting appears
as Not Found. Third-party antivirus developers can add certain features
that automatically assist users in ensuring that the features are
properly configured.
For example, if an
antivirus product is installed but its virus definitions are out of
date, Windows Security Center can provide a direct link that launches
the application and shows options for resolving the problem. Although
the user can accomplish this task manually, it requires the user to find
the relevant program and change the settings.
Note: Evaluating antivirus products
Numerous
Windows-based antivirus products are available on the market. When
evaluating features, users generally have the best experience with
products that are certified for Windows Vista. These products are most likely to
integrate properly with Windows Security Center. In addition to virus
detection and removal capabilities, it’s helpful to keep in mind the
performance effects of particular antivirus solutions. Some of these
products can use significant amounts of memory, CPU, and disk resources,
which can cause systems to slow down noticeably.
For Windows Security
Center to be able to monitor the installation and configuration of an
antivirus product, it must be designed with Windows Vista in mind. In
some cases, you might have installed an antivirus product that is not
automatically detected by Windows Security Center. In this case, you can
click Show Me My Available Options in the details of the Malware
Protection section. Figure 11 shows the two available options.
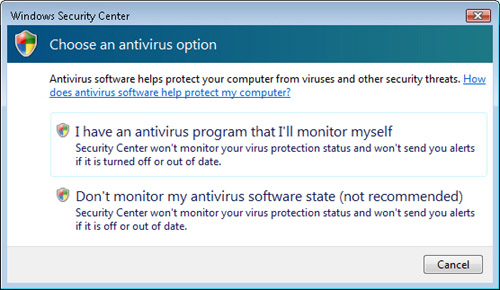
The
first option tells Windows Security Center that you have installed or
will install an antivirus program and that you do not want to see any
further prompts related to this configuration setting. The other option
is not to monitor the status of antivirus software at all. Clicking this
setting still makes the malware protection configuration appear in
yellow, but you will not receive further alerts or details related to
antivirus programs.
Configuring Windows Defender
In addition to
monitoring antivirus programs, the malware protection section in Windows
Security Center can detect the presence of antispyware or antimalware
products. By default, Windows Defender is configured to provide this
functionality. If users continue to use the default settings, they see
that Windows Defender is listed in the details under Malware Protection.
In some cases, users
might want to change the configuration settings of Windows Defender.
Available options include details related to how frequently and when
automatic spyware scans are performed. To change these settings, open
Windows Defender from the Start menu. Click Tools, and then click
Options to open the Options dialog box (see Figure 12).
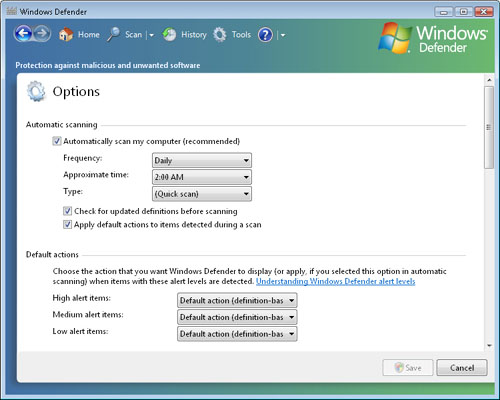
The Options
dialog box includes numerous settings that you can use to define how and
when Windows Defender runs. The major sections and options include the
following:
Automatic Scanning
The settings in this section determine whether Windows Defender
automatically scans the system based on a schedule. If automatic
scanning is enabled, users
can specify the days and times at which the scans will be performed.
Additionally, there is an option to check for updated definition files
automatically before performing the scan. Finally, if users want to
remove or disable any spyware automatically that has been detected, they
can choose to apply the default actions automatically.
Default Actions
When Windows Defender detects malware, it automatically categorizes the
item into an alert level. The possible levels are High, Medium, and
Low. By default, the action that Windows Defender takes is based on
settings defined in the definition files. You can override these default
actions by selecting either Remove or Ignore as the default action for
each alert level. The settings affect options that are displayed when
Windows Defender finds malware as well as the automatic actions it takes
during a scheduled scan.
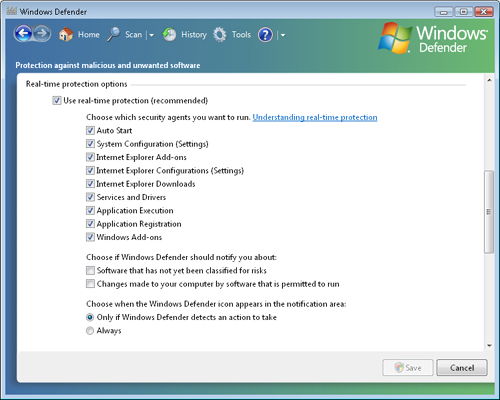
Real-Time Protection Actions
One of the most powerful features of Windows Defender is its ability to
monitor for system modifications automatically that might be
unauthorized. This feature, known as real-time protection, is enabled by
default. Figure 13
shows the many different options that are available. In some cases,
users might want to disable one or more of the security agents while
still allowing real-time protection to be enabled. Other options include
customizing how and when Windows Defender notifies the user when
potential security issues occur.
Advanced Options
This section enables you to specify which types of files Windows
Defender scans and to provide a list of exceptions. Exceptions might be
useful if you have large files that contain only data or known
information, and you want to reduce the usage
of system resources during the scan process. Options are also available
for creating a restore point before any detected malware is removed
from the system.
Administrator Options
These options are “master switches” for the functionality of Windows
Defender. They allow you to specify whether Windows Defender is enabled
and which users will be able to change its configuration.
For most users, the
default settings of Windows Defender provide the ideal balance of
security and usability. In some cases, particular applications or
services might require settings to be temporarily modified.
Alternatively, users might want to change options such as the default
scan frequency to reduce potential performance impacts.
Instead of using
Windows Defender, users also have the option of installing their own
third-party antimalware products. If the program has been designed for
compatibility with the Windows Security Center, its status and details
should appear in this section. It is important to note that customers
should generally use only one type of antimalware product at a time.
Having more than one enabled can cause various compatibility issues.
Finally, if you have chosen
not to install a particular antimalware solution (or if you are running
a product that is not detected by Windows Security Center, you can
click Show Me My Available Options under Malware Protection in Windows
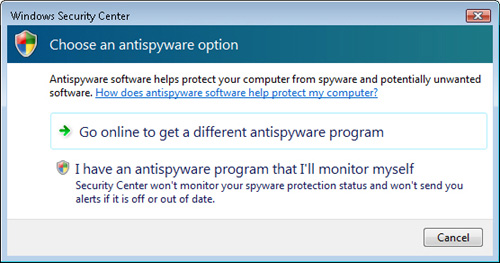
Security Center. As shown in Figure 14, there are two main options that are available:
Go Online To Get A Different Antispyware Program This option launches a Web browser and navigates to Microsoft’s third-party antispyware product page.
I Have An Antispyware Program That I’ll Monitor Myself
Selecting this option effectively disables the Windows Security Center
automatic spyware check. The user does not receive notifications if
malware definitions are out of date or if there are other configuration
issues.
Configuring Other Security Settings
The
final section of the Windows Security Center console is titled Other
Security Settings. The two main features that you manage here include
Internet Security Settings and User Account Control (UAC). Internet
Security Settings is based primarily on the configuration of Microsoft
Internet Explorer, such as Internet zones, the phishing filter, and
other options.
It is important to
note that the overall status of the Other Security Settings section is
based on the least secure option in the details. For example, if UAC is
turned off, but Internet security settings are properly configured, the
Other Security Settings item still appears red. You need to check into
the details to determine which items are raising the warning.
Overall, Windows
Security Center is a useful application for centrally monitoring and
managing security settings. By including important details related to
Windows Firewall, automatic updating, malware protection, and other
security settings, it brings together important system information from
numerous different security tools.
