Using Windows Fax and
Scan
Before the rise in
popularity of the Internet and the availability of e-mail, a common
method of transferring documents was by fax machine. These machines used
an analog phone line to transfer data. Although the transmission speed
and quality of faxed documents are not ideal, they do offer advantages
over alternatives (such as physically printing and mailing a document).
The functionality of a fax
machine is similar to the combined functionality of both a printer and a
scanner. You use the scanner component to convert a paper document to a
digital format for storage or transmission. You use the printer
component to do the opposite: based on a digital source, you output the
file to paper. Additionally, an analog modem device is necessary to
connect to a phone line. Many different types of devices that perform
these functions are available today. A stand-alone fax machine is able
to perform scanning, printing, and transmission functions without the
need for a computer. These are still found commonly in business
environments.
Working with
Windows Fax and Scan
Many Windows Vista users
occasionally need to send and receive faxes. They might not want to
invest in a dedicated device for this purpose because of the cost and
space requirements. Windows Vista includes faxing capability. The
Windows Fax and Scan program allows users to perform the most common
operations through an analog modem that is connected to a phone line.
Additionally, if a user has installed a scanner device, he or she can
use it to scan paper documents and then use a printer to create a hard
copy of a received fax.
You can launch Windows
Fax and Scan from the Start menu or in Control Panel by clicking
Hardware And Sound and then clicking the Scan A Document Or Picture link
in the Scanners And Cameras section. Figure 9 shows the default user interface of the program.
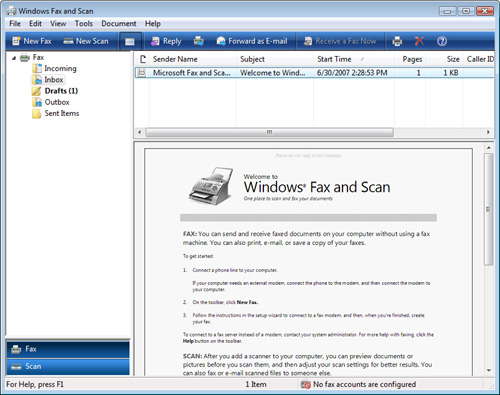
The
primary window layout of Windows Fax and Scan is similar to that of the
Windows Mail application. The left side of the interface includes several
folders:
Incoming The location of new fax items when they are
received
Inbox The location of Windows Fax and Scan items that
have been imported
Drafts A
folder for temporarily storing documents that have not yet been sent
Outbox The location of documents that are pending delivery (such as
an outbound fax that is currently being transmitted)
Sent Items The location in which a copy of all sent items is
stored
The bottom of the
left panel also enables you to select whether you want to work with Fax
documents or Scan documents. The latter option enables importing
documents into the computer, as described earlier in this lesson.
Setting Up a Fax
Account
Before you can send a fax
by using Windows Fax and Scan, you must configure a fax modem. The
process is known as setting up a fax account because it contains all of
the settings that enable a user to send and receive faxes. The first
step is to verify that the computer has an analog modem with fax
capabilities installed and configured. You can do this by using Device
Manager, as described earlier in this lesson. In addition, the fax modem
should be connected to an analog phone line.
More Info: Digital phone lines
Some small-business
environments might use digital phone systems rather than standard
analog lines. Although the plug connector might look identical to that
of an analog phone line, it is possible to damage a modem by incorrectly
plugging it into a digital wall socket. Be sure to verify the type of
connection before you attempt to connect a modem.
To begin the process of
setting up a fax modem, click New Fax. If a device has not yet been
configured, you have the option of doing it at this point (see Figure 10).
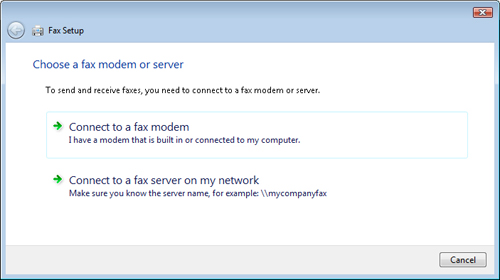
The first option is to
connect to a fax modem that is installed locally on the computer. The
second option involves connecting to a fax server that is located on the
network. This process is similar to connecting to a network printer (a
topic covered later in this lesson). When you choose to use a local
modem, you’ll be able to provide a logical name for it. This option is
useful if there are multiple fax-capable devices installed on the
computer.
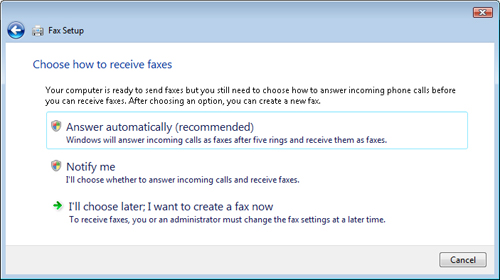
The next step enables
you to configure settings for the receipt of faxes when using a local
modem (see Figure 11). The options are as follows:
Answer
Automatically (Recommended) This
option automatically answers incoming phone calls after five rings and
starts the fax receipt process. If the phone is answered before five
rings, Windows Fax and Scan does not attempt to receive the fax.
Notify Me This option enables the receipt of faxes, but the
user must manually select the option to start receiving. If the phone
line is used for both voice and fax communications, this option can be
helpful. The typical process is for the user first to answer the phone.
If a fax beep is heard, he or she can then start the receive process.
Note that if a user is not present, faxes are not received
automatically.
I’ll Choose Later; I Want To Create A Fax Now
This option effectively
disables the receipt of faxes until the settings are changed at a later
time.
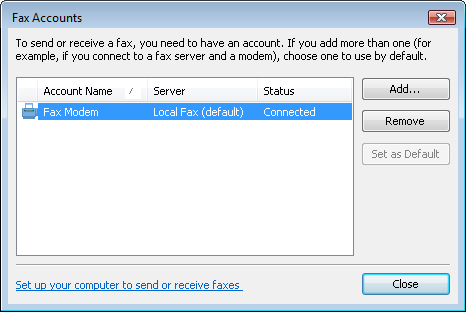
You can add or remove
fax accounts by clicking Fax Accounts from the Tools menu (see Figure 12). You’ll learn how you can configure other
settings later in this section.
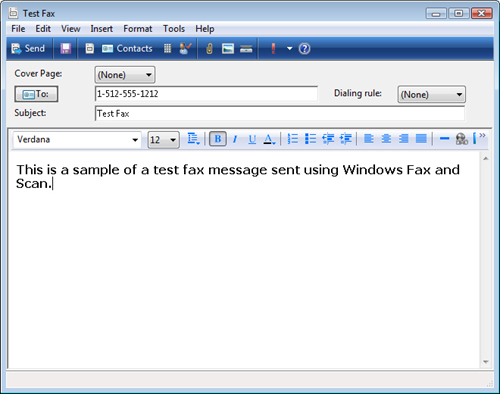
Creating a New Fax
The screen for
creating a new fax appears similar to that of an e-mail message (see Figure 13). You use the To field to specify the recipient of the fax.
You can provide this either by using an item from the Windows Contacts
list (assuming that the contact has a fax number) or by typing the
number manually.
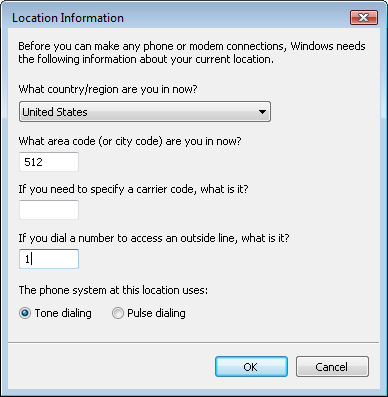
When sending a fax,
the exact dialing rules can vary. Sometimes, you must enter a number to
access a line that can dial out. In other cases, you might need a
country code or area code for long-distance calls but not for local
ones. You can enter the exact number to use, including prefixes and
options, manually. Alternatively, you can choose to create a new dialing
rule (see Figure 14). The specific options might also
vary based on the regional version of Windows Vista being used.
The text entered in the
body of the fax is included on the cover page. You often want to use the
Insert menu to attach a file or document to send. The options include
the following:
File Attachment
Picture
Text From File
Pages From Scanner
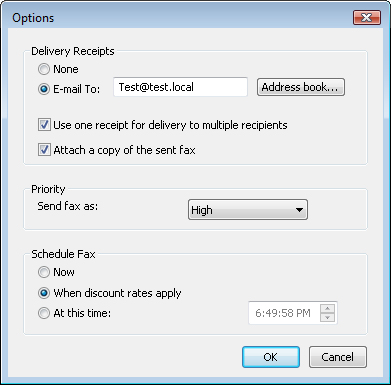
You can also change the
options for when a fax is sent from the Tools menu by clicking Options. Figure 15 shows the available settings. To send the fax,
click Send. Windows Fax and Scan automatically attempts to dial the
number and transmit the fax. During this time, the item appears in the
Outbox folder. After it has been sent successfully, it is moved to the
Sent Items folder.
Configuring Fax
Settings
Windows
Fax and Scan provides several different options that you can use to
configure how and when faxes are sent. To access the options, from the
Tools menu, click Fax Settings. Figure 16 shows an example of the options. The available tabs are as
follows:
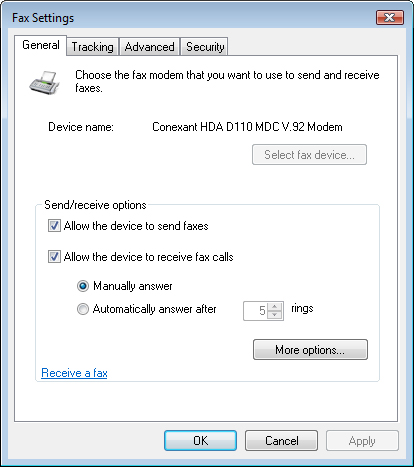
General This tab includes settings for whether faxes
can be sent through a device and whether faxes should be received
automatically. The More Options button enables you to specify station
identifiers (which are included in the fax header data) and to choose
whether faxes should be printed or saved automatically.
Tracking This tab includes various settings for
viewing progress and notifications related to sending and receiving
faxes.
Advanced This tab shows configuration options for the
file system location in which faxes are stored. There are also settings
for redial options and for defining times during which the phone line
has discount rates.
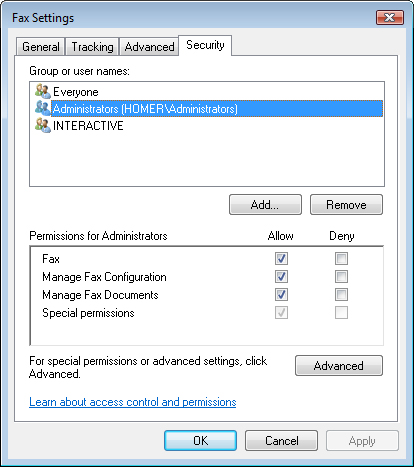
Security This
tab enables administrators of the computer to configure which actions
are available to which users. The security permissions include Fax,
Manage Fax Configuration, Manage Fax Documents, and Special permissions
(see Figure 17).