Performing a Complete PC Restore
In the event of hard disk
corruption or significant data loss due to hardware failure, the best
method of getting up and running might be to restore the complete
operating system as well as all user programs and data files. Consider
this approach when other resolution methods have failed.
Assuming that a valid backup is available, the Complete PC restore
process enables users to perform a relatively pain-free recovery of the
operating system. At the end of the process, applications, settings,
data files, and all other contents of the system hard disk should be
recovered to the point in time of the backup. Users also have the option
of including nonsystem volumes in the backup.
Unlike the restore
process for standard file-based backups, performing a Complete PC
restore requires you to reboot the computer into the special recovery
environment. This is necessary because operating system files,
application settings, and other data cannot be restored while the
operating system is running. It is also helpful because the actual
reason for performing the restore might be that Windows Vista is unable
to boot properly.
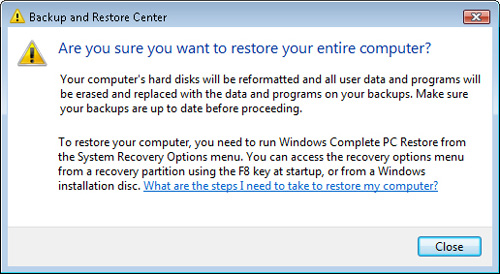
Starting the Restore Process
When you click Restore
Computer in the Backup and Restore Center, you see a message box that
provides details about how to proceed (see Figure 4).
It is important to note that the entire system is effectively rolled
back to the point in time of the backup, and there are no options for
choosing which files are restored. If the system is still accessible and
you have files that were created or modified since the last Complete PC
backup, it is a good idea to create a new backup of those files before
proceeding.
Note: Combining Complete PC backups and file backups
File-based backups
provide several advantages for protecting data: they’re quicker to
perform, and they use less disk space. This means that users can back up
files fairly often. Complete PC backups take a large amount of disk
space and are designed to be run less frequently. Fortunately, you can
use both methods together. A complete recovery process might begin with
restoring from a Complete PC backup and then performing a file-level
restore to recover any files that were added or modified since the
complete backup.
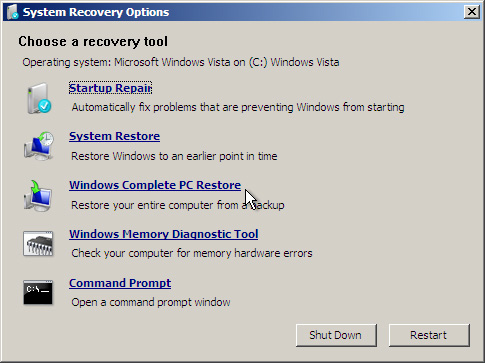
You can launch the
Complete PC Restore process in two different ways. The first is to boot
the computer, using the Windows Vista installation disc. The Windows
Complete PC Restore option displays in the list of available options
when you choose the Repair option (see Figure 5). The other method is to press the F8 key during the boot process to access the Advanced Boot Options
menu. Of course, this option is available only if the computer is able
to boot to this point. Clicking Repair Your Computer allows you to start
the restore process.
Selecting Restore Options
When you click Windows Complete PC Restore,
the recovery environment automatically attempts to locate an available
backup. If the backup is available on another hard disk connected to the
computer, Windows Vista should be able to find it automatically. It
then populates the display with the relevant information (see Figure 6).
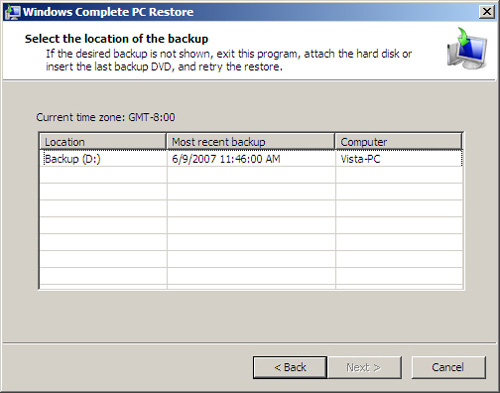
If multiple backups are available, you have the option to choose a specific backup by selecting Restore A Different Backup. Figure 7 shows the information that is available for the Complete PC backups.
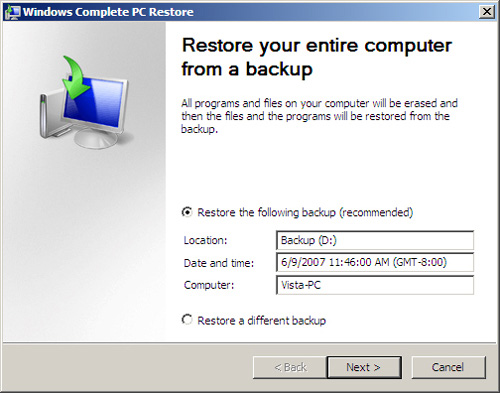
After you have chosen
the appropriate backup set, you see details and options related to what
you want the restore process to do. Figure 8 shows an example of the screen. The available information includes the following:
Location The source location for the Complete PC backup files.
Date And Time
The date and time at which the backup was created. It’s important to
note that the time is displayed in Greenwich Mean Time (GMT), so
adjustments might be required if the computer is in a different time
zone.
Computer The name of the computer running Windows Vista.
Disks To Restore
This is a listing of which hard disks were included in the backup. If
multiple logical or physical volumes were selected, they appear here.

The Format And
Repartition Disks check box enables you to specify whether you want the
restore process to repartition local hard disks automatically to match
the configuration of the backup. This is a useful option when you are
attempting to restore to a completely new hard disk on the computer. If
you leave the check box cleared, the recovery process keeps the existing
partitions intact.
Completing the Restore Process
To begin the restore
process, click Finish. You receive one final confirmation warning. When
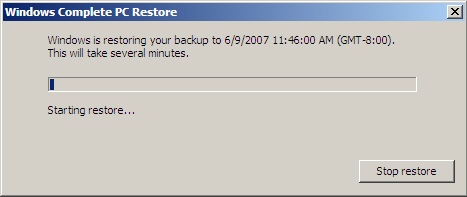
you click OK, the restore operation begins (see Figure 9). Depending on the size of the hard disk and the data you restore, the process might take a long time to complete.
After
the restore operation completes, the computer automatically reboots,
and Windows Vista should appear just as it did at the time when the
Complete PC backup was created.
Note: Restoring system settings
The System Restore
feature in Windows Vista enables you to restore system settings without
affecting data or requiring a reinstallation of the entire operating
system. This is often useful when troubleshooting startup problems,
device driver issues, or the installation of unwanted software.
