Using the Backup and
Restore Center
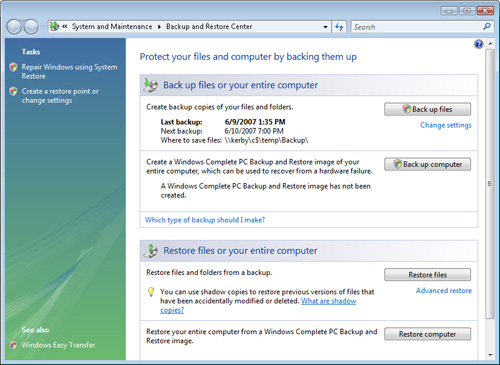
The
primary data protection tool in Windows Vista is the Backup and Restore
Center. You can launch it from the Start menu by searching for the name
of the program, or you can click the Backup And Restore Center link
from within the System And Maintenance section in Control Panel. Figure 1 shows an example of the main screen of the Backup
and Restore Center utility.
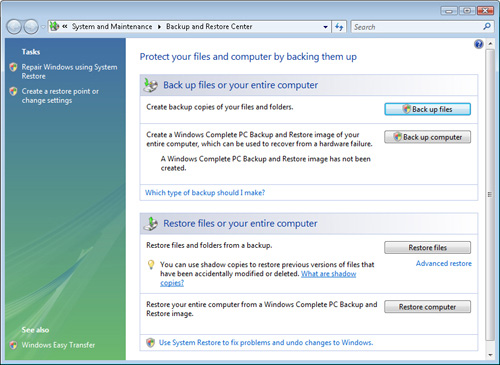
The two main sections
of the program divide the functionality into backup and restore
operations. Windows Vista automatically keeps track of which backups
have been performed and reports on the details. The main approaches to
performing are either to back up specific files or to perform a Complete
PC backup. In the following sections,
you’ll learn how to create file-based backups.
Performing File
Backups
The process of
backing up files and folders involves making a copy of users’ data and
other types of information. This information is stored in a backup
location and can later be used to recover information, if necessary. The
primary goal of this approach is to enable users to identify easily
which information is important. A file backup does not, however, include
operating system files.
Defining and
Scheduling a New Backup
To start the creation
of a new backup process, in the Backup and Restore Center window, click
Back Up Files. The first step asks you to specify the destination
location for the backup (see Figure 2).
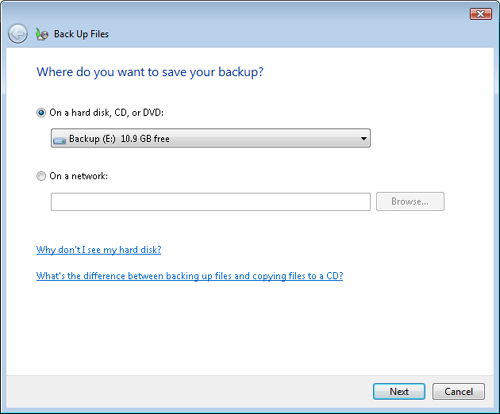
The first option displays a
drop-down list that includes all of the available local backup
destinations. This includes local hard disk volumes, removable memory
devices, external hard disks, and writable CD- and DVD-based devices.
The Windows Vista operating system hard disk does not appear in the
list, because it is not possible to back up system-related information
to this disk. The list also shows how much space is available on each of
these devices.
The second option allows
you to specify a network location to which the backups will be stored.
You can enter the information by typing a Universal Naming Convention
(UNC) path name to the destination folder or by using the Browse button.
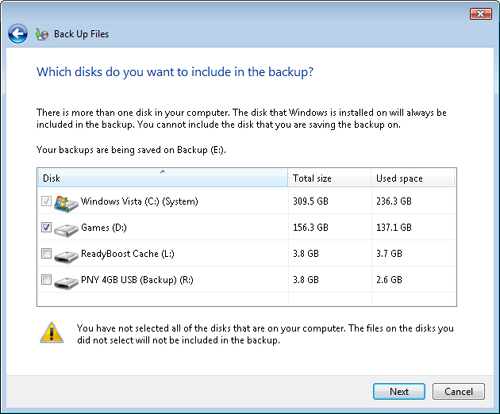
The second step of the
backup process involves selecting which disks should be backed up (see Figure 3). By default, all of the disks that are available
for backup purposes are listed. If you selected a specific volume or
disk in the previous step, it does not appear here because Windows Vista
does not enable performing a backup to the same disk. The operating
system disk is automatically added to the backup set, and you cannot
remove it. You can specify which additional storage devices should be
backed up by selecting or clearing the check boxes for each item.
The next step
involves specifying which types of files should be backed up (see Figure 4).
Table 1 lists the available options and the associated
category details as listed in the Backup and Restore Center.

Table 1. Backup
File Categories and Their Descriptions
| Category | Category
Details |
|---|
| Pictures | Digital photographs, clip art, drawings, scanned
pictures, faxes, and other image files, including .jpeg and .png files. |
| Music | Music, play lists, CD tracks, and other audio
files, including Windows Media Audio and MP3 files. |
| Videos | Videos and movies, including Windows Media Video,
.mpeg, and .avi files. |
| E-mail | E-mail messages and contact lists, including .pst
and .eml files. E-mail that is stored online only will not be backed up. |
| Documents | Documents, such as work processing files,
spreadsheets, and presentations, including .pdf and .xps files. |
| TV Shows | TV shows recorded from Windows Media Center. |
| Compressed
Files | Compressed, image, and archive
format files that contain other files, such as .zip, .cab, .iso, .wim,
and .vhd. This category also includes compressed folders. |
| Additional Files | Any files that do not fit in the other categories.
System files, program files, and temporary files are never backed up. |
Assuming that the
backup destination has sufficient space, it is ideal to select the
check boxes for all of these types of files. In many cases, however, the
backup destination might not have enough space to store all of the file
types. In that case, users can choose to exclude some file types. For
example, TV shows recorded by Windows Media Center can be large and
might not be considered critical from a backup and restore standpoint.
The next step is to specify
the schedule for the backup process (see Figure 5). The main option is the frequency of the backup
operation. The settings include Daily, Weekly, and Monthly. Based on
this selection, the other options specify the details for when the
backup process begins.
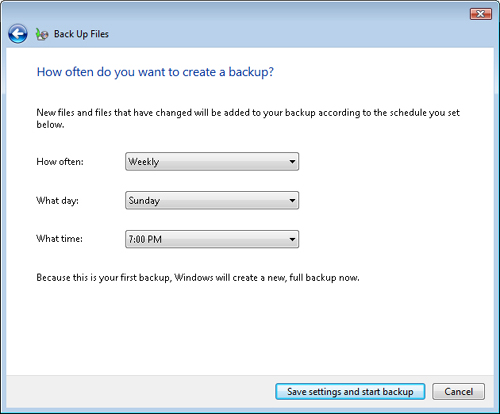
If you have not yet
created a backup of the system, you see a notice at the bottom of the
screen specifying that a new full backup will be created immediately.
Click Save Settings And Start Backup to begin the operation. Figure 6 shows the progress information display for a
backup.
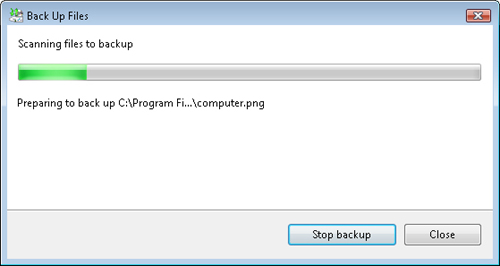
While the backup is
running, users can continue to access the computer and can even make
changes to files. Windows Vista uses a file system feature known as shadow
copy to access files while they are
in use. Files that are modified during the backup process are copied
during the next backup operation. The backup job is also scheduled to
run based on the settings that were chosen.
Performing Manual
Backups
After you create a
scheduled backup process, you can view details about it in the Backup
and Restore Center. As shown in Figure 7,
the details include the date and time of the last backup and the
scheduled time for the next backup operation.
The Change Settings
link enables you to launch the Backup Status And Configuration window
(see Figure 8). You use this window to verify
settings and locations for backup operations and to perform several
different operations.
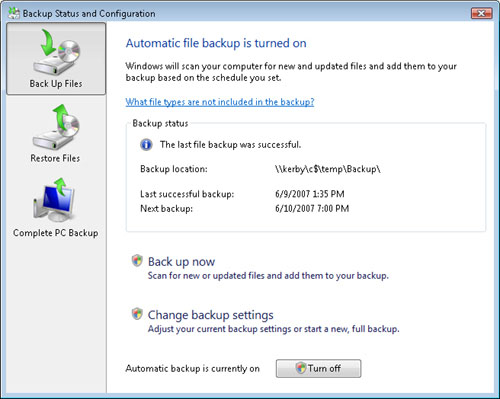
You can click
Change Backup Settings to make modifications to the current backup job.
This is useful if you want to change the backup destination, which files
are copied, or the backup schedule. You also have the ability to turn
off automatic backups altogether.
In general, users
should create and schedule a regular backup process. In some situations,
however, it is useful to perform a manual backup. This might be
important, for example, when a large number of files has been created or
modified on the system, and the user does not want to wait until the
next scheduled backup operation to protect those files. Clicking Back Up
Files in the Backup and Restore Center launches this process. Files are
automatically copied to the destination location. You can view the
progress of the backup by clicking the backup system tray icon.
One approach to
performing a new backup would be to copy all of the selected data files.
The drawback, however, is that this would require a lot of time and a
significant amount of disk space. Usually, only a few files will have
changed since the last backup operation. Windows Vista automatically
tracks which files have been backed up and can detect which files have
been created or modified since the last backup operation. When
performing subsequent backup operations, only changed and added files
are copied to the destination location. This makes the process
significantly faster than performing a full backup and uses a much
smaller amount of backup space.
Managing Backup
Files
The Backup and
Restore features in Windows Vista are designed to create backup-related
files and folders automatically as needed. Over time, however, you might
want to delete older backups or move backups to a different storage
location. You might want to move a set of backups to another computer to
restore the data there.
The standard folder
structure that is used in the backup location begins with a folder name
based on the name of the computer that is backed up. Within this folder,
there is a backup set subfolder that is named based on the date and
time at which the backup was run (for example, Backup Set 2007-06-09
132923). Each Backup Set folder also includes one or more folders that
start with the name Backup Files. Figure 9 shows an example.
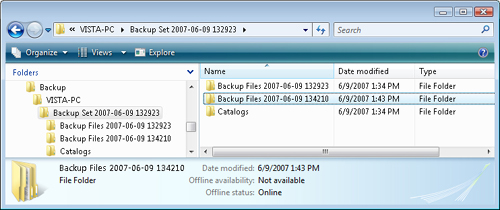
Subsequent
backup operations include new folders within the Backup Set folder. The
backed up data itself is stored within a compressed (zipped) folder.
Its contents can be accessed manually to restore specific files. In
addition, there is a Catalogs folder that includes an index of all of
the files that have been backed up. This information is used by the
Windows Vista restore utilities to find files quickly without searching
through all of the data.
