Application support involves not only supporting
applications, but also supporting the underlying operating system.
Application availability in a Microsoft environment depends on a
functioning operating system. This makes understanding system recovery a
requirement if you are supporting desktops in an enterprise.
System recovery is always a
juicy topic on certification exams. You simply must know how to recover
from a catastrophic event. The first thing to do when you discover that
the computer is failing is to define what was happening just before the
failure occurred. This usually provides you with the insight required to
troubleshoot the problem. The exam describes recent events of a system,
just prior to its failing. Based on this information, you are required
to define what corrective action should be taken to recover the system.
A system failure can be a failed
startup in which Windows Vista begins to boot up but then hangs at
either a black screen or perhaps even a blue screen stop error. Such
failures might be due to startup errors and could be caused by newly
installed applications or device drivers, corrupted boot or system
files, or improper edits of configuration or Registry files.
Failures can occur after the
system has booted and while the console is idle, where the computer
hangs or “blue screens.” This failure could be caused by a device
failure or by corrupted system files.
Failures can also occur
during the operation of an application, again where the computer hangs
or “blue screens.” Such failures might be caused by incomplete
application installation, application incompatibility with Windows
Vista, or corrupted application or system files.
These are just some examples illustrating where you can begin your troubleshooting and repair procedures.
Last Known Good Configuration (LKGC)
The Last Known Good Configuration (LKGC)
has been around since the NT days. This tool can be and is effective in
restoring a system to a functional state under certain circumstances.
The LKGC is an archived copy of the computer’s Registry the last time a
successful bootup and user logon occurred. The LKGC is declared “good”
and is archived each time a user successfully logs on.
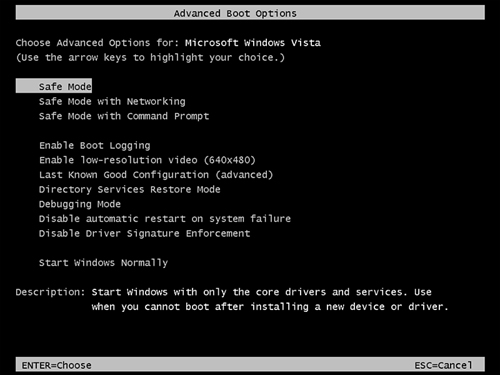
You access and implement the LKGC during the initial bootup process by pressing the F8
function key while the gray-on-black Startup menu is being displayed on
the computer. You then enter into the Advanced Boot Options, where
several recovery options are presented, including LKGC, as shown in Figure 1.

Simply select LKGC from the Advanced Boot Options menu and press Enter.
This deletes the current copy of the system’s Registry, reinstalls the
previous copy of the Registry, and proceeds to boot up the replaced
Registry files.
There may be other
combinations in which LKGC does or does not work, but these examples
cover the vast majority of the situations that steer you toward or away
from LKGC as a repair mechanism.
Safe Mode
If LKGC is not the appropriate repair mechanism, no worries; you have options. The next repair option to consider is Safe Mode.
Safe Mode starts Windows with only the core drivers and services. This
capability can be useful when the system fails to boot up after
installing new device drivers. Because you are loading only a basic set
of drivers during bootup in Safe Mode, if a driver is the cause of the
failure, it is likely that you will be able to boot the system into a
(semi) functional operating system. Now you can access the system and
begin to perform your repairs by uninstalling drivers or whatever caused
the problem.
Alert
LKGC is useful in repairing a failed computer in the following situations:
A
user changes Registry settings using a script or by using the RegEdit
or RegEdt32 utilities. (These two command-line executables launch the
same Registry Editor tool in Windows Vista. In earlier versions of
Windows, they were two different tools.) Upon reboot, the computer
fails.
A user installs a new application that makes Registry changes, causing the computer to fail.
A user installs new drivers for a new
device that makes Registry changes, causing the computer to fail. You
probably need to remove the new device in addition to invoking the LKGC.
A
user upgrades an existing application, causing the computer to fail.
The upgrade installs files with different names or to different paths
than the original version. Because the old copy of the Registry points
to original files that still exist and have not been overwritten, the
old Registry “rolls back” the computer to its prior state.
A
user upgrades drivers for an existing device, causing the computer to
fail. The upgrade installs files with different names to different paths
than the original version. Because the old copy of the Registry points
to original files that still exist and have not been overwritten, the
old Registry “rolls back” the computer to its prior state.
LKGC is not useful in repairing a failed computer in the following situations:
A
user upgrades an existing application, causing the computer to fail.
The upgrade installs files with the same names to the same paths as the
original version. Because the old copy of the Registry still points to
filenames that have been overwritten and are now the failing files, the
old Registry does not return the computer to a functional state.
A
user upgrades drivers for an existing device, causing the computer to
fail. The upgrade installs driver files with the same names to the same
paths as the original version. Because the old copy of the Registry
still points to driver filenames that have been overwritten and are now
the failing files, the old Registry does not return the computer to a
functional state.
And
as always, LKGC can no longer help recover a computer after a user
successfully logs on because the Registry configurations are
synchronized to the current logon.
Caution
Safe Mode and Mass Storage
Safe Mode does install all mass storage device drivers. If the new
driver that caused the failure was for a CD-ROM drive, DVD drive, tape
drive, controller card, or other mass storage device, Safe Mode does not
solve your problem.
You can access Safe Mode on the Advanced Boot Options by pressing the F8 function key while the gray-on-black Startup menu is being displayed. You have three different boot options:
Safe Mode— Core drivers and mass storage device drivers only
Safe Mode with Networking— Adds NIC drivers to provide network connectivity
Safe Mode with Command Prompt— Launches the command prompt
Alert
Safe Mode is useful in repairing a failed computer in the following situations:
A
user installs or upgrades device drivers (other than mass storage
device drivers) that cause the computer to fail during bootup.
A user configures an incompatible video refresh rate or display setting.
A
user installs an application causing a stop error, and the application
inserts some or of all of its services at bootup of the operating system
or a user’s logon.
Boot Configuration Data
MS-DOS used the files IO.SYS, MSDOS.SYS, CONFIG.SYS, COMMAND.COM, and AUTOEXEC.BAT to boot the operating system.
Windows NT, 2000, 2003, and XP used NTLDR, Boot.ini, and NTDetect.com to boot the system.
Vista (and eventually Server 2008) uses the Boot Configuration Data (BCD)
architecture to boot the system. This is to accommodate the new
replacement for the PC/AT BIOS that you have come to know and love. The
new boot process replacement for the PC/AT BIOS is called the Extensible
Firmware Interface (EFI). BCD supports booting from the current PC/AT
BIOS firmware, as well as the upcoming EFI firmware-based computers.
Occasionally, the boot
instructions for a computer get corrupted or, for other reasons, fail to
boot the operating system properly. When this happens, you must repair
these boot instructions. In the case of Windows Vista, these
instructions reside within the BCD data.
BCD data is not stored
in textual format and is therefore not directly human readable. It is
stored in a protected region of the Registry, but should not be accessed
through the Registry Editor application. Microsoft has provided a nifty
new tool called BCDedit ( BCDedit.exe) to manipulate the contents of the BCD.
To access this tool, get to a command prompt in Vista and type Bcdedit /?. This provides a top-tier list of switches to be used with BCDedit. After you have reviewed the output, type Bcdedit /? Topics. This command displays an alphabetical listing of the switches.
Alert
You should know the following BCDedit switches:
Bcdedit /export <filename>— Backs up the BCD data to a file
Bcdedit /import <filename>— Restores the BCD data from a file
Bcdedit /copy— Copies boot entries from the store
Bcdedit /create— Adds boot entries to the store
Bcdedit /delete— Removes boot entries from the store
Bcdedit /default— Sets the default OS in the Startup menu
Bcdedit /timeout <secs>— Sets the time-out timer value
Bcdedit /debug— Enables the kernel debugger
You should also know the comparable tool used in XP and earlier operating systems:
Bootcfg.exe— Enables you to edit the Boot.ini file
Bootcfg is not used on Windows Vista boot data.
Boot from Installation Media
If LKGC, Safe Mode, and
BCDedit aren’t the correct solutions for a failed bootup, you may
perform repairs by booting up the computer on the installation media.
The Windows Vista installation DVD is bootable. Insert the source DVD
for Windows Vista in the DVD drive and reboot the computer. You should
be prompted with the following message:
Press any key to boot from CD or DVD . . . .
Note
A Word About Booting and BIOS
The hardware must support booting from the CD/DVD drive. In addition,
the BIOS of the computer must be configured to boot from CD/DVD before
booting from the hard drive.
Strike a key to boot
up using the installation media. Doing this boots the system from only
files found on the installation media, with no third-party drivers,
applications, or modified or corrupted files or configuration parameters
from your hard drive. As the computer boots on the installation media,
you are prompted for confirmation of the language, time, currency
format, and keyboard format. Confirm these by clicking the Next button.
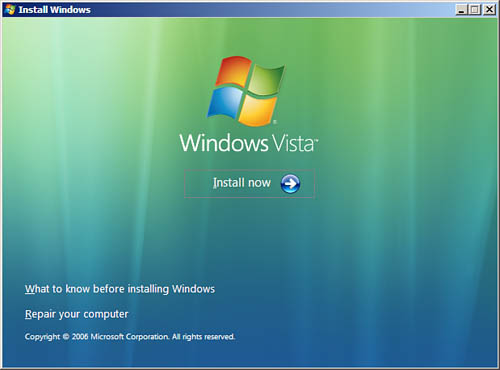
In
the next screen, you have the options Install Now (for a new
installation of Windows Vista), What to Know Before Installing Windows,
or Repair Your Computer, as shown in Figure 2.

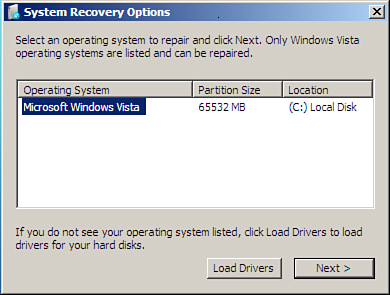
Select the Repair Your Computer
option. When you select this option, the system searches all drives to
identify all instances of operating systems. You are then presented with
a dialog box to select which instance of the OS to repair. If you must
provide additional drivers (called non-HCL drivers,
meaning that the drivers are not on the Microsoft Hardware
Compatibility List) to mount drives that contain the OS, you can select
to load those additional mass storage device drivers by using the Load Drivers button. This dialog box is shown in Figure 3.

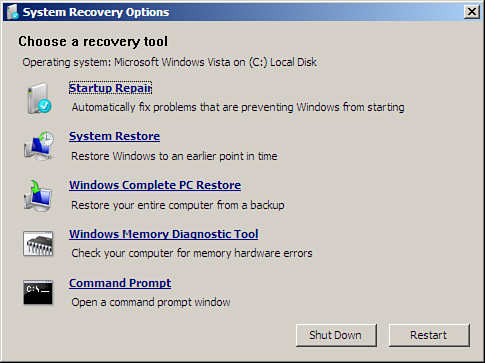
Select Next. This opens the System Recovery Options dialog box that has a worthy collection of recovery options for you (see Figure 4).

To resolve startup problems, click Startup Repair. You might be prompted to make choices, and
your computer may be restarted as Startup Repair tries to fix problems.
Startup Repair scans your
computer for these files and tries to repair missing or corrupted boot
and system files that prevent Windows Vista from starting correctly.
Note
No More Recovery Console
The Repair Your Computer option from the installation media replaces
the earlier Recovery Console used on Windows 2000, 2003, and XP.
Recovery Console does not exist in Windows Vista.