If you access the Internet using a broadband—cable
modem or DSL—service, chances are, you have an always-on connection,
which means there’s a much greater chance that a malicious hacker could
find your computer and have his way with it. You might think that with
millions of people connected to the Internet at any given moment, there
would be little chance of a “script kiddy” finding you in the herd.
Unfortunately, one of the most common weapons in a black-hat hacker’s
arsenal is a program that runs through millions of IP addresses
automatically, looking for live connections. The fact that many cable
systems and some DSL systems use IP addresses in a narrow range
compounds the problem by making it easier to find always-on connections.
When a cracker finds your
address, he has many avenues from which to access your computer.
Specifically, your connection uses many different ports for sending and
receiving data. For example, the File Transfer Protocol (FTP) uses ports
20 and 21, web data and commands typically use port 80, email uses
ports 25 and 110, the domain name system (DNS) uses port 53, and so on.
In all, there are dozens of these ports, and every one is an opening
through which a clever cracker can gain access to your computer.
As if that weren’t enough,
attackers can check your system for the installation of some kind of
Trojan horse or virus. (Malicious email attachments sometimes install
these programs on your machine.) If the hacker finds one, he can
effectively take control of your machine (turning it into a zombie computer) and
either wreak havoc on its contents or use your computer to attack other
systems.
Again, if you think
your computer is too obscure or worthless for someone else to bother
with, think again. Hackers probe a typical computer connected to the
Internet all day long for vulnerable ports or installed Trojan horses at
least a few times every day. If you want to see just how vulnerable
your computer is, several good sites on the Web will test your security:
The good news is that Windows Vista includes an updated version of the
Windows Firewall tool that debuted in Windows XP. This program is a
personal firewall that can lock down your ports and prevent unauthorized
access to your machine. In effect, your computer becomes invisible to the
Internet (although you can still surf the Web and work with email
normally).
The main change in
Vista’s version of Windows Firewall is that the program is now bidirectional.
This means that it blocks not only unauthorized incoming traffic, but
also unauthorized outgoing traffic. If your computer has a Trojan horse installed (it might
have been there before you installed Vista, or someone with physical
access to your computer might have installed it), it might attempt to
send data out to the Web. For example, it might attempt to contact a
controlling program on another site to get instructions, or it might
attempt to send sensitive data from your computer to the Trojan’s owner.
A bidirectional firewall can put a stop to that.
The Windows Firewall in
Vista also supports the following new features:
The IP Security (IPSec) protocol
Environments that use
only Internet Protocol version 6 (IPv6)
Both incoming and outgoing firewall
exceptions
Exceptions applied to specific
computers and users
Exceptions
applied to many different protocols (not just TCP and UDP)
Exceptions applied to both
local and remote ports
Exceptions applied to specific interface types: location
area network, remote access, or wireless
Exceptions applied to specific Vista services
Command-line support for controlling the firewall
From this list, you can see that Vista’s firewall is a
far more sophisticated tool than any of the versions that shipped with
XP or its service packs. A powerful new interface for working with
Windows Firewall settings, exceptions, and monitoring reflects that
sophistication. It’s Windows Firewall with Advanced Security (WFAS), and it’s a
Microsoft Management Console snap-in. To load it, press Windows Logo+R,
type wf.msc, click OK, and then enter your User Account Control
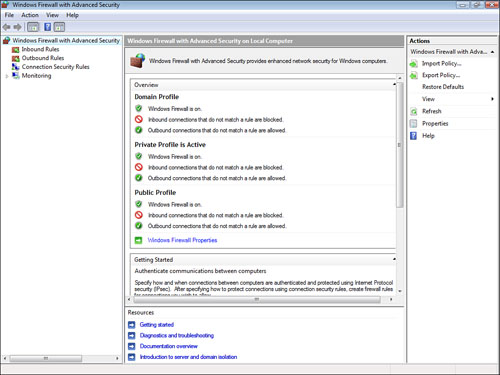
credentials. Figure 1 shows the WFAS snap-in.

The home page of the
snap-in presents an overview of the current firewall settings, as well
as a number of links to configure and learn about WFAS. This snap-in
configures the firewall by setting policies and storing them in three
profiles. The domain profile is used when your computer is connected to a
network domain; the private profile is used when your computer is
connected to a private network; and the public profile is used when your
computer is connected to a public network. To change the settings for
the profiles, click the Windows Firewall Properties link, and then use
the Domain Profile, Private Profile, and Public Profile tabs to modify
the settings (although the defaults should be fine for most people).
The scope pane contains
four main sub-branches:
Inbound Rules— This branch presents a list of defined rules
for inbound connections. In most cases, the rules aren’t enabled. To
enable a rule, you right-click it and then click Enable Rule (or you can
click the rule and then click Enable Rule in the Action pane). You can create your own rule by
right-clicking Inbound Rules and then clicking New Rule (or clicking New
Rule in the Action pane). This launches the New Inbound Rule Wizard.
Outbound Rules— This branch presents a list of defined rules for
outbound connections. As with inbound connections, you can enable the
rules you want to use and create your own rules. Note, too, that you can
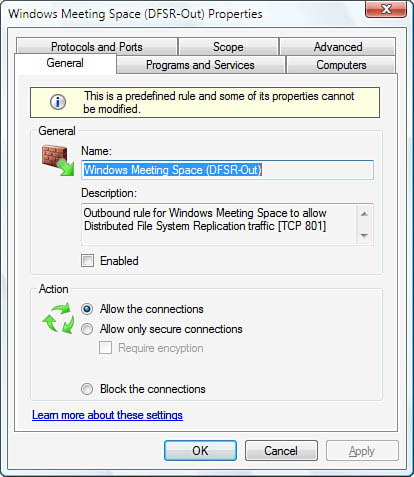
customize any rule by double-clicking it to display its properties
sheet (see Figure
2). With this properties sheet, you can
change the program executable to which the exception is applied, allow
or block a connection, set the computer and user authorization, change
the ports and protocols, and specify the interface types and services.

Connection Security Rules— This branch is where you create and manage authentication rules, which determine the restrictions and requirements that apply
to connections with remote computers. Right-click Computer Connection
Security and then click New Rule (or click New Rule in the Action pane)
to launch the New Connection Security Rule Wizard.
Monitoring— This branch shows the enabled firewall
settings. For example, the Firewall sub-branch shows the enabled inbound
and outbound firewall rules, and the Connection Security, Rules
sub-branch shows the enabled authentication rules.