Using Previous Versions
of Files
Generally, the
process of creating backups is useful for ensuring that your data
remains protected. It provides an easy way to restore large numbers of
files in the case of a large amount of data loss. What about simpler
situations? For example, suppose you’ve made some changes to a Microsoft
Word document on your computer, and you want to undo those changes. In
this case, it can be a time-consuming process to access the Backup and
Restore Center, find the relevant backup set, and then choose the files
you want to restore. Fortunately, there’s a much better way.
Using Windows Explorer,
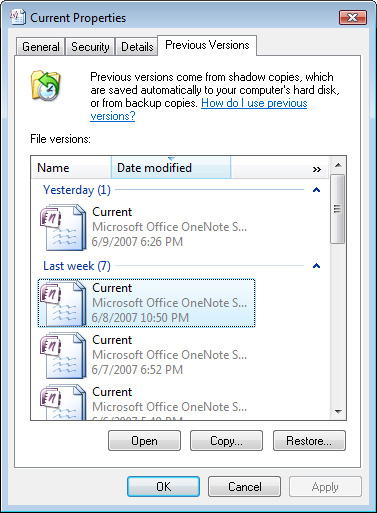
you can right-click any file or folder on your computer and click the Previous
Versions tab of the item’s
Properties dialog box (see Figure 17).
You can also right-click a file or folder item and select Restore
Previous Version. The list might include numerous previous versions of
the file. The total number of versions depends on various settings,
including how often you modified the file. In this section, you’ll learn
about how the Previous Versions feature works.

Sources of
Previous Versions
There are two main
methods by which Windows Vista stores previous versions of files on the
computer. The first is based on backups that you create using the Backup
and Restore Center. For example, if you configure a backup job that
runs nightly on your computer, a previous version of the file is
available based on the time of that backup. New versions of the files
apply only if the contents of the file have changed. In this example, if
you modify the file daily (and perform backups every night), you should
see a previous version for each of the backups. Alternatively, if you
don’t modify the file, the backup process does not create another copy
of it, and a previous version will not be available for that time
period.
The second source of
previous versions of a file or folder is through the System Restore
feature.
Whenever a new restore
point is created on the computer,
changes to data files are also recorded. Although you do not directly
configure the dates and times of the creation of restore points, you can
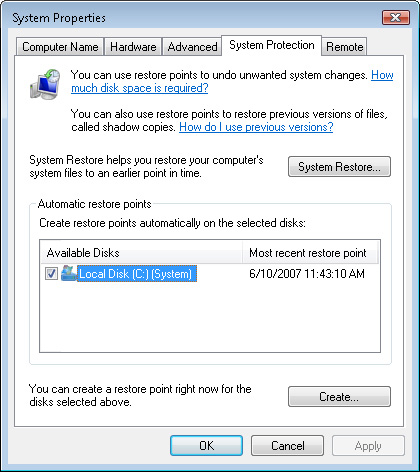
create one manually from the Start menu by right-clicking Computer,
selecting Properties, and then clicking the System Protection tab (see Figure 18). The Create button enables you to generate a new
restore point. By default, Windows Vista automatically creates new
restore points daily. Restore points are also created when system
changes (such as the installation of new software or device drivers) are
performed.

Over time, as backups and
restore points are deleted to save disk space, previous version
information might also be removed. Therefore, it is a good idea to keep
multiple previous versions of backups for historical reasons. Overall,
the Previous Versions feature and System Restore are not replacements
for standard backup procedures.
Restoring Previous
Versions of Files and Folders
The primary
benefit of using the Previous Versions feature is that it enables you to
access earlier versions of data easily simply by using standard file
properties. From the Previous Versions tab of a file or folder, you can
sort the list of versions based on name, modification date, or location
of the file. You have three main options for choosing how to work with
earlier copies of the files.
The first is to click
Open on the Previous Versions tab of the file or folder’s Properties
dialog box. This opens an earlier version of the file or folder and
enables you to view it as it existed at a previous point in time. For
example, if you open a version of a Microsoft PowerPoint document that
was created the previous week, you’ll see only the slides and content
that were in the file at that time. Similarly, when you open a previous
version of a folder, you’ll see all of the files that existed within
that folder at the time the previous version was created.
The second option is to
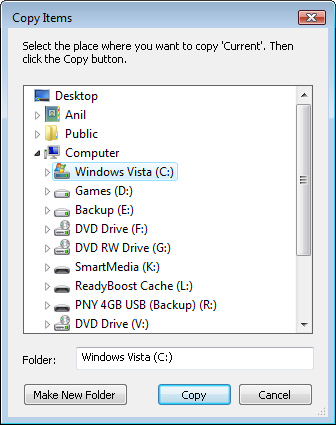
click Copy to copy a previous version of a file or folder to another
location. When you click this button, you are prompted to provide the
destination file system location for the item. The older version of the
file or folder is then copied to that location (see Figure 19).
The copy feature is useful when you want to compare an older copy of a
file with a newer one or if you’re not sure which version you want to
restore.

In some cases, you want to
replace the current version of the file with an earlier version. You
can do that by clicking Restore on the Previous Versions tab of the file
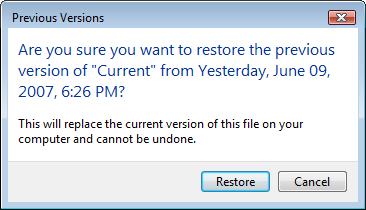
or folder’s Properties dialog box. A dialog box prompts you for
confirmation of this operation (see Figure 20).
It is important to note that when you choose to restore a file or
folder, you are no longer able to change it to a later version.
Therefore, if you are unsure of whether you want to roll back
permanently to a previous version of the item, it’s best to copy it to
another location and then overwrite it later.

Restoring Deleted
or Renamed Files
So far, the focus has been
on ways in which you can restore to previous versions of files or
folders. The process involves clicking the appropriate file and
accessing the Previous Versions tab of its Properties dialog box. What
about files that have been deleted or renamed? In those cases, the original
file is no longer present, so you cannot select it and display its
properties to access the Previous Versions tab.
Fortunately, there’s a way
to restore these files as well. You need to know the location of the
item that you are trying to recover. To restore the file or folder,
access its parent folder, and then choose to open a previous version.
You should then be able to see the file or folder you want to restore.
After you have located the item, you can again copy it back to its
earlier location. The Previous Versions feature in Windows Vista makes
the process of restoring files and folders quick and easy.