Installing and Managing
Printers
Most computer
users are very familiar with printers. Although increased computer use
has generally decreased the need for paper, it is hard to eliminate it
completely. For example, it’s common to print a hard copy of a map or
directions when traveling to a new location. In addition to being able
to output standard black-and-white documents, many printers can output
color documents and photographs. There are several different types of
printers available on the market:
Wired
printers These printer devices are
designed to connect directly to a computer. Older printers commonly use
a parallel port (also called an LPT port) connection. Most new wired
printers connect using a USB port on the computer.
Network printers A standard wired printer requires a
computer to be able to output documents. In some cases, many users want
to share a printer without placing a dependency on one of the computers.
Network-enabled printers are able to connect directly to a wired
network. They include functionality for enabling users to connect
directly to the device over the network.
Wireless printers Some stand-alone printers include a built-in wireless
network interface or support for standards such as infrared and
Bluetooth connections. Bluetooth is a low-range wireless network
connection method that requires the computer to have a Bluetooth
receiver. Infrared connections are often included on portable computers
such as notebooks and personal digital assistants (PDAs). Wireless
printer options are helpful in homes and small-business
environments when users might need to connect to many different output
devices quickly or when portable print devices are used.
Multifunction devices Some
printer-related devices provide a wide range of different functionality
in a single physical device. For example, they might include a scanner,
internal memory, a printer, and an analog fax-capable modem. They can be
wired or wireless devices and can be shared directly on the network.
Installing Local
Printers
Windows Vista
includes a large database of available printer drivers. In most cases,
the process of plugging in a wired printer results in the automatic
installation of the appropriate drivers. When installing multifunction
devices or wireless printers, users should refer to the documentation
that came with the device. Often, specific settings must be configured
on the device itself. For example, network printers require you to
configure Transmission Control Protocol/Internet Protocol (TCP/IP)
address information.
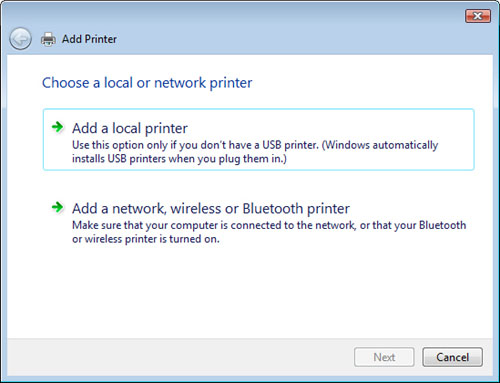
It is also possible to add a
printer device manually. This is necessary when Windows Vista does not
detect a connected printer device automatically. It is also the process
by which users can connect to a printer that is located on another
computer or that is directly accessible on the network. To start the
process, open Control Panel, click Hardware And Sound, and then click
the Add A Printer link. Figure 18 shows the main
options.
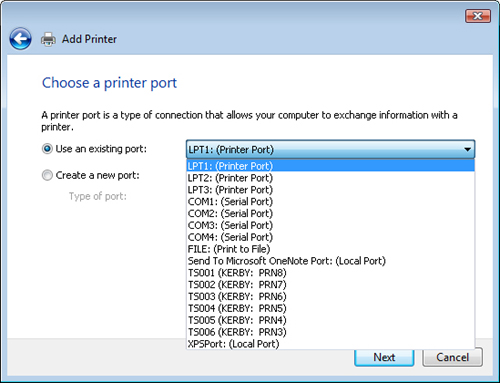
When adding a local
printer, you have the option of specifying the port to which the printer
is attached (see Figure 19). Options include printer (LPT) ports, serial (COM) ports,
USB ports, and any other virtual device ports that might be configured.
Known TCP/IP network printer ports are also included. Some types of
software applications are able to install virtual printer devices that
users can use to output documents to files or to other types of
programs. For example, users can use virtual print devices to generate
XML Paper Specification (XPS) or Adobe Portable Document Format (PDF)
files from any program that is capable of sending output to a printer.
After you
choose the printer connection type, you have the option of choosing a
printer from the list of known manufacturers and models. You can also
click Have Disk to provide drivers manually. Finally, the Windows Update
command enables you to look for driver updates online automatically.
Adding a Network,
Wireless, or Bluetooth Printer
Some printer devices are designed to be shared
using a standard network connection, a wireless connection, or a
Bluetooth connection. Because these devices are not connected to a
computer port directly, you generally must configure them manually. When
you choose the Add A Network, Wireless, Or Bluetooth Printer option in
the Add Printer Wizard, Windows Vista automatically attempts to locate
available shared or wireless printer devices on the network (see Figure 20) by using network discovery features. It is
important to understand that you add printers that are connected
directly to a network by using a TCP/IP connection, using the Add A
Local Printer option.
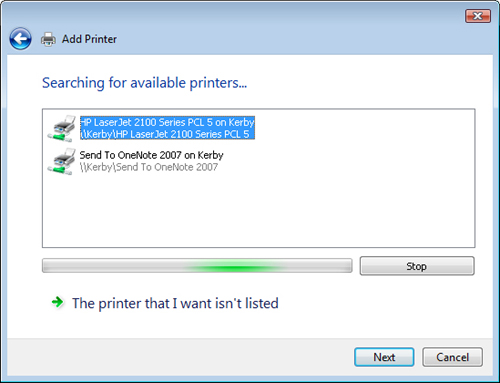
If Windows Vista does
not detect the printer automatically, click The Printer That I Want
Isn’t Listed.
Managing Printer
Settings
Most printers have
options that you can use to manage how they output print jobs. For
example, some printers have multiple paper size options and the ability
to print on both sides of a page (a feature known as duplexing). To
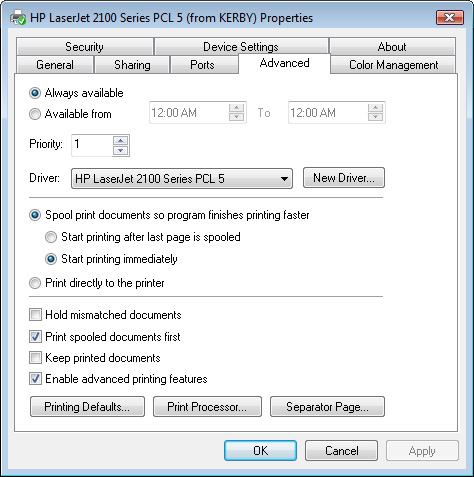
access the properties of a printer, click the Printers link in the
Hardware And Sound section of Control Panel. Then, right-click the
printer and choose Properties to open the printer’s Properties dialog
box. The specific available tabs differ based on the capabilities of the
printer (see Figure 21).
In addition, users can choose one of the printers to
be the system default. This is the printer to which Windows Vista sends
documents unless another device is chosen, using the Printer Options
dialog box.
Sharing Printers
To be able to send data
for output to a printer, the computer must have information about its
settings, options, and data format requirements. The printer driver
provides these details. For locally attached printer devices, the
drivers are typically loaded automatically on the computer. They are
either included with Windows Vista or are provided by the hardware
manufacturer. In the case of connecting a network printer, Windows Vista
automatically attempts to download the available drivers from the
network printer.
Users of Windows Vista
can also share their printers on the network to enable others to use
them. To enable printer sharing, users must first enable it by using the
Network and Sharing Center. To share a printer, right-click
the printer object and select Sharing. Figure 22 shows an example of the available settings. The Share Name
specifies the specific name that users use to access the printer. The
full network path has the \\ComputerName\PrinterShareName format. It is a
good practice to include details about the owner or location of the
printer in the share name. One potential disadvantage of sharing a
printer is that the computer to which the printer is connected can be
bogged down by preparing printed documents to be sent to the printer
device (a process that is referred to as rendering). When selected, the
Render Print Jobs On Client Computers check box requires print
processing to occur on the client computer, thereby offloading some of
the overhead on the computer that is sharing the printer.
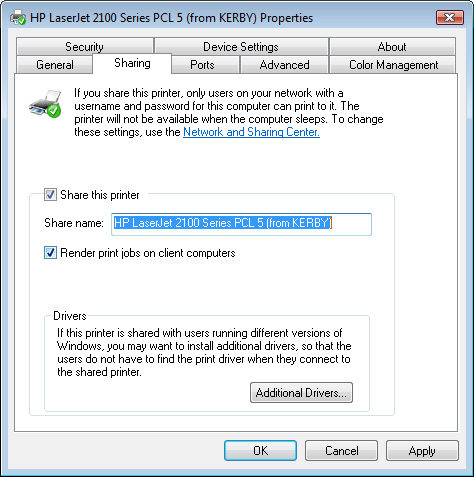
Because users can
connect to a network printer by using a variety of different operating
systems, it is also possible to add additional drivers to the
configuration by clicking Additional Drivers and selecting which
platforms the printer should support. The specific list of operating
system options is based on the capabilities of drivers that are provided
by device manufacturers or that are included with Windows Vista. If
drivers are not available over the network, users need to use the
Windows Vista built-in driver for the device (if one is available) or
manually provide the driver during the printer installation process.