Removing Malware by Using Windows Defender
It’s
no secret that malware installations can cause significant frustration
for end users and technical professionals alike. Computer users should
certainly use some form of defense against the installation of unwanted
programs. Windows Defender is the primary method of combating malware in
Windows Vista. It is included with every edition of the operating
system, and Microsoft designed it to prevent, detect, and remove
malicious software programs.
Windows Defender
includes a combination of different technologies that are designed to
work together to keep users’ systems free of unwanted software. For
example, it has the ability to detect malware based on various
“signatures” that are stored within its definitions database. It uses
this information to monitor for system modifications, downloading of new
files, and running of applications. It also periodically scans the file
system for known malware programs. Because new types of malware are
constantly being developed, it also integrates with the Windows Update
feature to download new definitions regularly.
Windows Defender is
enabled by default and includes basic configuration settings that should
meet the needs of most users. In this section, you’ll learn how you can
use this program to identify and remove malware.
Working with Windows Defender
During general
operations, Windows Defender is designed to run without any specific
input from users. It runs constantly in the background on computers and
attempts to detect any unwanted software installations or activities. It
also monitors for potentially risky modifications to system settings or
the presence of known malware files.
Windows Defender also
offers several features and settings that you can modify based on users’
specific requirements. You can launch Windows Defender from the Start
menu or by double-clicking the Windows Defender icon in the system tray
(if it is present). Figure 1 shows the default display of the program.
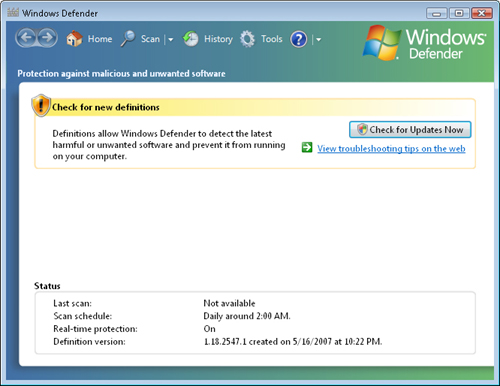
The screen provides
details related to the last time a scan was run as well as an overview
of current Windows Defender settings. It can also provide information
that might require the user to perform a task. For example, if the
Windows Defender definitions file is outdated, the user is prompted to
download and install updates.
Note: Keeping systems protected
Although
users can choose not to use Windows Defender, it is highly recommended
that they enable some type of antivirus and antimalware program on the
computer. Numerous third-party products are available. When making
recommendations as a Consumer Support Technician, verify that these
programs are designed with Windows Vista in mind.
Scanning for Malware
One of the most
common operations that users perform with Windows Defender is scanning
for malware. Although the program is initially configured to perform a
regular scan, as a Consumer Support Technician, you might want to run a
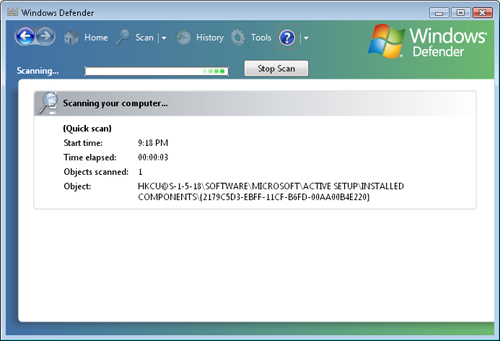
new scan to detect recently installed malware. You can start the process
of performing a standard Quick Scan by simply clicking the Scan button
in the toolbar. This instructs Windows Defender to start scanning the
most common locations in which malware might be located (see Figure 2).
These locations include the Windows Registry (including locations in
which startup programs are defined) and commonly used file system
locations (such as user-specific folders). It also performs a scan of
the Windows operating system folder.
In addition to the Quick
Scan, there are two other options. You can access both by clicking the
arrow next to the Scan button. The Full Scan option performs all of the
operations of the Quick Scan, but it also inspects all areas of the
computer’s file system. The process can take a significant amount of
time (especially on computers with many files), but it is the most
reliable way to detect any potential malware on the computer.
Another
option is to perform a Custom Scan. This option enables users to
specify a particular hard disk volume or folder to search for malware,
which can be useful when you suspect that recently downloaded files
stored in a specific location might be malware. Any results that are
found are immediately displayed on a results screen.
Responding to Malware Alerts
When Windows
Defender encounters potentially malicious software on the computer, it
might need to notify the user to determine what to do. In most cases,
users should disable or remove the software. Sometimes, the software
might be legitimately required and should be given permission to perform
its tasks. For this reason, Windows Defender can notify users of the
issue by using the system tray icon. If there is an issue that requires
attention, the icon changes to include either a yellow exclamation mark
or a red stop sign. Additionally, Windows Defender can display system
tray notification messages or pop-up windows (see Figure 3).
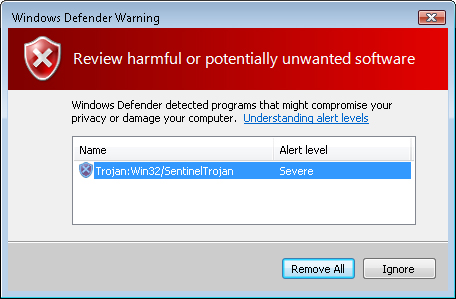
The potential danger of
certain pieces of malware can range significantly, based on type and
design. Using information stored in its definition files, Windows
Defender can determine the importance of a particular piece of suspected
malware and can present details to users. The potential alert levels
are as follows, in order:
Severe
High
Medium
Low
Not yet classified
Typically, items that are marked with Severe or High alert levels should be removed immediately from the computer. Figure 4 shows the action options that are available when malware has been detected.
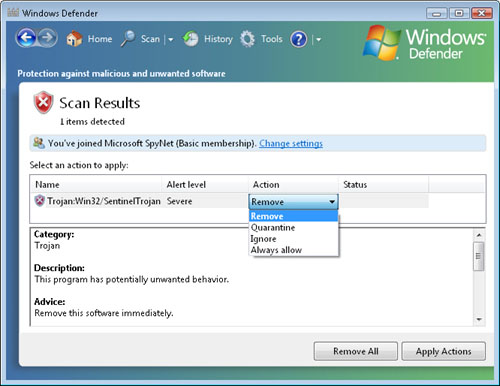
The user is given several different options to determine how the problem should be resolved, as follows:
Remove
This option automatically removes the malware. Often, this includes
deleting any files that were detected and changing any system settings
that might have been modified. For example, this might involve removing
the program from the list of startup items.
Quarantine
In some cases, users might not know whether to allow the program and,
therefore, will not want to delete it. The purpose of the quarantine
feature is to move the software to a safe location on the computer. It
will no longer be able to run automatically, but it will not be
permanently deleted. If users find that they do indeed want to run the
program, they can choose to remove it from quarantine.
Ignore
This option does not perform any actions based on the detection of
malware. If a program has been configured to run automatically, it will
continue to run. Users will continue to be notified of the detection of
the program on future scans.
Always Allow
This option is designed to allow certain programs to continue running
on the computer without generating any future warnings. In general,
users should select this option only if they are completely sure that
they trust the program and are aware of its capabilities.
Additional details
are often available by selecting a specific item from the list. To make
decisions easier for users, each alert level can have a corresponding
default action. You’ll look at those details later in this section.
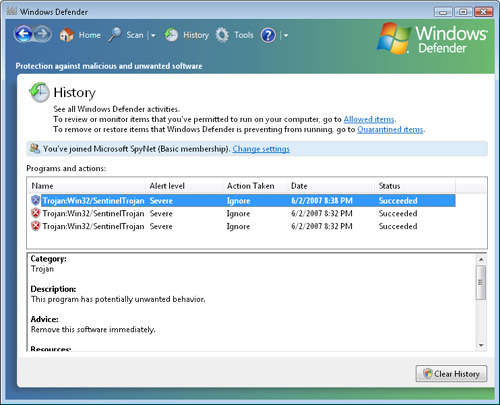
Viewing the Windows Defender History
Over time, it is
likely that Windows Defender will detect multiple pieces of malware. As a
Consumer Support Technician, you might want to review this list. For
example, if a user reports that he or she is missing several important
data files, it is possible that malware might have moved or deleted them
from the computer. To access these details, click the History button on
the Windows Defender toolbar. Figure 5 shows an example of the types of information that might be available.
Viewing Quarantined and Allowed Items
Earlier in this lesson,
you learned about the option to place malware items in a quarantine
location. This is a useful option when you are unsure whether you should
allow a specific program, but you don’t want to enable it immediately.
Later, you might want to review the items
in this location to make a determination about whether you should
enable or remove them from the system. You can view the quarantine
location by clicking the Tools button in Windows Defender and then
selecting Quarantined Items. When you select an item, you can decide
what should be done with it.
Similarly, Windows
Defender keeps track of which items the user allows to run on the
computer. As a Consumer Support Technician, you might want to verify
that a user did not unknowingly enable a malicious program to run on the
computer. You can access this list by clicking Allowed Items on the
Tools page in Windows Defender.
Joining Microsoft SpyNet
One of the most
challenging technical issues in the battle against spyware is detecting
new malicious programs. Malware authors are constantly making changes to
existing programs and creating new ones to circumvent definitions used
by programs like Windows Defender. To react more quickly to new malware,
Microsoft has created a system that enables users to report these
programs automatically. The resulting online community is known as
Microsoft SpyNet. You can configure membership options by using the
Microsoft SpyNet link in the Tools window in Windows Defender (see Figure 6).
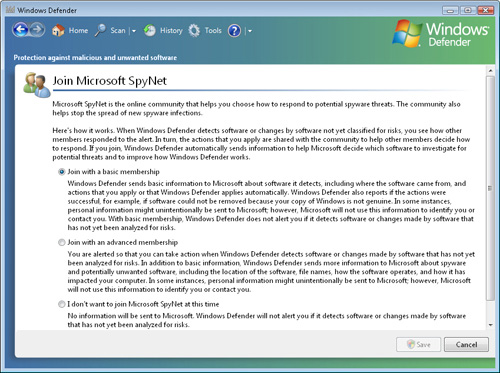
There are three options
for these settings. The first option is Join With A Basic Membership.
This is the default setting, and it allows Windows Defender to send
information about detected
malware to Microsoft. As the text notes, there is a possibility that
the report might contain personal information. However, Microsoft states
that it will not use this information in any way. The primary
limitation of this setting is that it does not protect users from items
that are defined as not yet classified.
The second option is
Join With An Advanced Membership. This option enables Windows Defender
to collect and transmit information about unclassified potential
spyware. Windows Defender can collect numerous technical details to help
analyze whether the program is indeed malicious. Apart from helping
detect malware more quickly, this setting also configures Windows
Defender to present alerts for unclassified malware that it detects.
The final option is I
Don’t Want To Join Microsoft SpyNet At This Time. In most cases, the
basic and advanced memberships will be most useful for customers. No
special registration process is required, and Microsoft guarantees that
user-specific information will remain confidential if it is included
with a malware report.
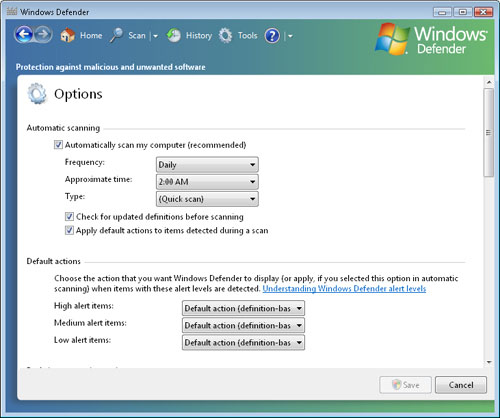
Configuring Windows Defender Options
Windows Defender
includes numerous basic and advanced options that you can configure
based on users’ specific needs. You access these settings in Windows
Defender by clicking Tools and then clicking Options (see Figure 12-35). The main sets of options that are available include the following:
Automatic Scanning
These settings specify whether automatic scanning is enabled. If it is,
the user can choose the frequency and time at which Windows Defender
performs the scans. Additionally, there is an option to download updated
definitions automatically before performing the scan.
Default Actions
This section allows users to specify actions that Windows Defender
automatically takes when it detects malware. The default settings
specify that the recommendations that are included in the definition
files should be used. This is often the most appropriate setting for
users. Other options include specifying whether items of a certain alert
level should be automatically removed or ignored.
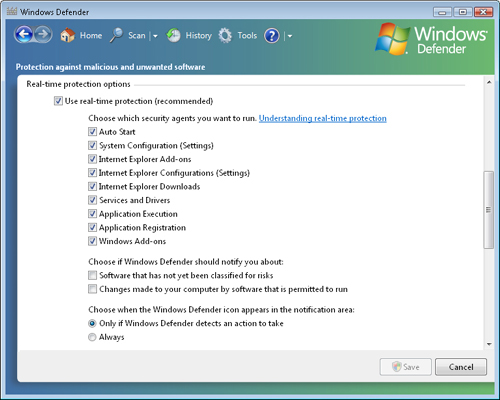
Real-Time Protection Options
Windows Defender includes numerous features that are useful for
automatically preventing against common malware installation methods.
This section, shown in Figure 7,
enables users to specify which types of actions Windows Defender should
monitor. The most secure setting is to leave all of the check boxes
selected. For performance or testing reasons, however, you might want to
disable one or more of the items.
Advanced Options
This section includes several settings related to which files Windows
Defender scans, along with specific behaviors such as automatically
creating restore points. You can click the Add button to specify files
or locations that Windows Defender should not scan (see Figure 8).
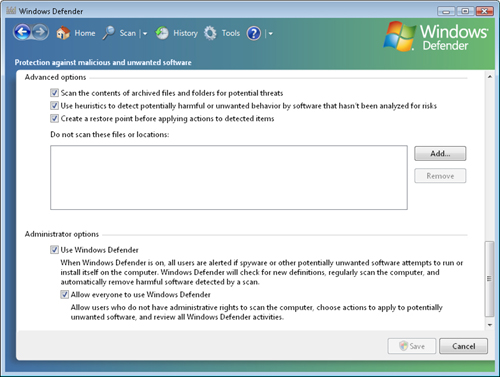
Administrator Options
This section enables you to specify whether Windows Defender is enabled
and whether other users on the computer can make changes to its
configuration.
Overall, Windows Defender includes a large number of options for customizing the behavior for malware detection and removal.
