Defining Web Restrictions
Web
restrictions settings enable parents to define which types of content
are accessible to children who are using the computer. To access these
settings, first enable Parental Controls for the child’s user account.
Then, click the Windows Vista Web Filter link in the User Controls dialog box for the child’s account to access the available options. Figure 4 shows the default settings for Web restrictions.
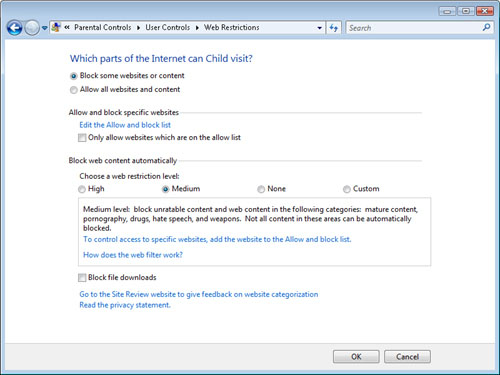
The
first option, Block Some Websites Or Content, is the master setting
that determines whether Web filtering is active. When it is active,
parents can specify a wide array of options to manage which content is
accessible.
Allowing and Blocking Web Sites
In some cases, parents
might want to determine actively which Web sites are available to their
children. These settings can be managed by clicking the Edit The Allow
And Block List link in the Web Restrictions dialog box (see Figure 5).
The Allow Or Block
Webpages dialog box contains two columns: one for a list of allowed Web
sites, and another for a list of blocked Web sites. The Website Address
text box enables users to specify a complete Uniform Resource Locator
(URL) to a particular site. One easy way to obtain the URL if it is not
known is for a parent to open Internet Explorer, navigate to the site,
and then copy and paste the URL. The Allow and Block buttons determine
how the Web site is managed.
There are two main
approaches to managing which sites are accessible. The first is to
define a list of allowed Web sites and to prevent children from
accessing any other sites. The other approach is to block access
specifically to a list of Web sites. In general, blocking access to
specific Web sites might be easier to configure (especially when
considering the other options that
you’ll learn about in this lesson). Defining a list of allowed Web
sites can be tedious and time-consuming, but it can offer the best
protection against access to unwanted content.
The Only Allow Websites
Which Are On The Allow List check box specifies which approach is used.
When the check box is selected, the list of blocked Web sites is
effectively unused because all sites are blocked unless they appear on
the Allowed Websites list. Parents can remove an entry from either list
by selecting it and clicking Remove.
Managing lists of Web sites
can be a time-consuming process. When parents need to configure these
settings on multiple computers, it is often difficult to type in each
site address manually on every computer. The Import and Export buttons
enable parents to save the current collection of settings to a file that
they can import to other computers or allow other accounts to use on
the same computer.
Blocking Sites Based on Content
When configuring Web
restrictions, it is practically impossible to define specific Web site
exceptions for every site on the Internet. The primary goal for parents
is to ensure that inappropriate content is not available to children.
Because site contents often change, it is important to be able to filter
the content dynamically. Many Web site operators are just as concerned
as parents about the suitability of their content. Because they often do
not want children to visit their sites, they can choose to rate their
own content voluntarily. This information is sent to the Web browser
automatically with each page request. Although the system does not
prevent potentially malicious Web site operators from misstating these
details purposely, it does provide a reasonable level of protection.
To ease the task of
filtering Web content, the Web Restrictions dialog box contains a
section titled Block Web Content Automatically (see Figure 6).
This feature works by analyzing the content of a particular Web page or
Web site automatically and then testing it based on a variety of
built-in algorithms. There are four main settings for the Web
restriction level, as follows:
High
This setting blocks all sites except those that specifically include
information that they are approved for children. Therefore, this is the
most secure option, but it is also the most restrictive.
Medium
This setting automatically blocks content that does not contain rating
details and analyzes the page for a variety of unsuitable content.
None This setting effectively disables automatic filtering. Settings on the Allow and Block lists are still respected, however.
Custom This setting enables parents to specify which types of material should be blocked.
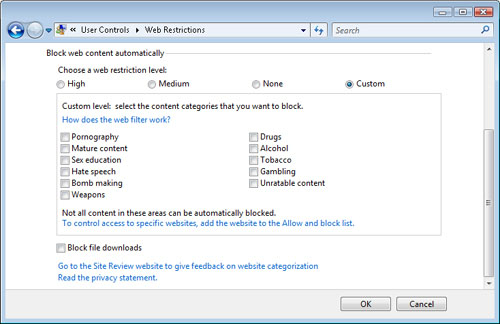
Regardless
of the option chosen, it is important to note that the Web filtering
algorithms are not perfect and cannot always block all of a certain type
of content. The Web Restrictions dialog box also enables parents to
block file downloads for their children. This is often appropriate for
security and privacy reasons because it prevents them from installing
potential malware or unwanted programs.
Providing Site Reviews
Categorizing,
rating, and filtering Web site content is a particularly difficult
process. Because the definition of appropriate content is a subjective
measure, site administrators, parents, and third parties (such as
Microsoft and content rating companies) can disagree on whether certain
content should be filtered. If parents or site administrators believe
that content has been improperly classified, they can click the Go To
The Site Review Website To Give Feedback On Website Categorization link.
Figure 7 shows the Web site.
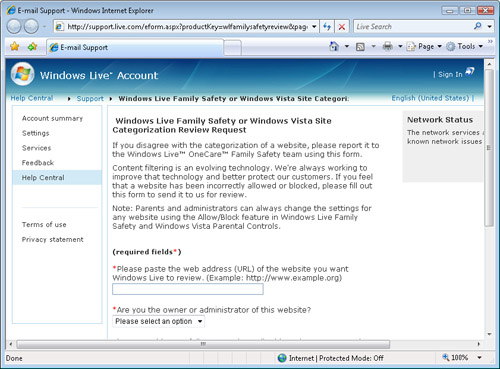
The site enables users
to provide information about a particular URL and to specify why they
feel that the content was improperly categorized. Microsoft staff
members can then review reports and decide whether the content should be
reclassified. Although the process is not immediate, it is a good way
for concerned parents to help filter unwanted content for their
children.
Attempting to Access Blocked Web Sites
When
Web restrictions are enabled for a user account, all Web content that
is accessed through a Web browser is automatically analyzed. When the
content of a Web site is found to be inappropriate based on the Allow
and Block lists or based on automatic filtering settings, children see
the notice shown in Figure 8.
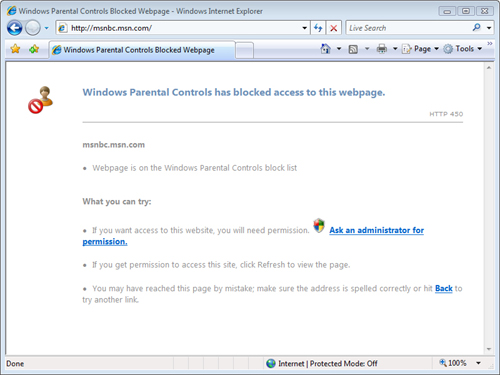
Parents can
instruct their children to notify them to review blocked content. If the
site is appropriate, then parents can use an Administrator account and
make the appropriate changes to the settings. Although it is likely that
adjustments will be needed periodically, the Web restrictions feature
can help ensure the safety of children’s online experience.
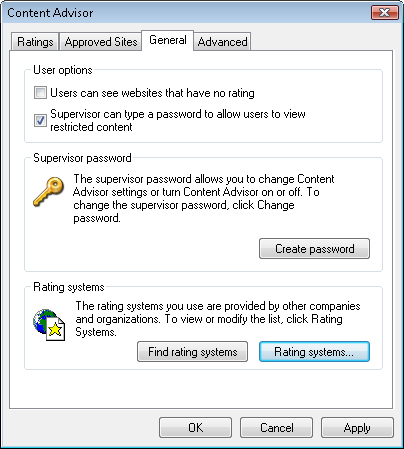
Using Internet Explorer Content Advisor
In
addition to the standard Web restrictions settings that are available
in Parental Controls, Internet Explorer includes a feature for advising
users based on the type of content that is being accessed. Figure 9 shows an example of the available settings.
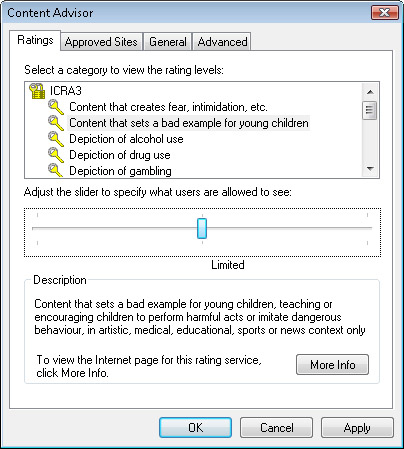
Each setting pertains to
various types of content that can be detected through details reported
by Web sites. It is important to keep in mind that the rating levels are
often voluntary and might not agree with parents’ filtering
requirements. Internet Explorer also includes options for determining
whether sites that do not include rating information can be viewed (see Figure 10). Further, it is possible to include additional ratings systems for use by Internet Explorer.