You will need to build an
environment for customizing Windows PE images before deployment. Having
everything in the appropriate location will simplify the task of
creating builds and will help you establish repeatable methods for
creating and updating builds.
Create this environment on a technician, or lab
computer. If you’re using BDD 2007 to deploy Windows Vista, configure
the Windows PE customization environment on the build server. In fact,
installing and configuring BDD 2007 installs all of the requirements for
building custom Windows PE images.
Installing the Windows AIK
Windows PE ships with the Windows AIK, which is available from the Microsoft Download Center at http://www.microsoft.com/downloads.
Install the Windows AIK on your Windows PE build system from the
installation DVD. (Microsoft provides the Windows AIK as a downloadable
DVD image.) Installing the Windows AIK is a requirement for installing
and using BDD 2007. Therefore, a build server containing BDD 2007
already has the files necessary to build and customize Windows PE
images.
Before installing Windows AIK, you need to
prepare your build system for the Windows AIK installation. In addition
to certain system requirements, installing the Windows AIK also has software prerequisites. These requirements are similar to the requirements for installing and using BDD 2007:
MSXML Parser 6.0
.NET Framework 2.0
An
x86 or x64 computer running Windows XP Professional Service Pack 2,
Windows Server 2003 Service Pack 1, Windows Vista, or Windows Server
Code Name “Longhorn”
Approximately 1.1 gigabytes of free disk space, plus additional space for images and Windows PE builds
To install the Windows AIK
1. | From the Windows AIK media or a folder containing the Windows AIK, run waikplatform.msi, where platform is either x86 or amd64.
|
2. | Accept
the EULA and choose the default location for the installation files.
You must use the default installation location if you’re using BDD 2007.
|
3. | Complete the installation wizard to install Windows AIK.
|
Note
The Windows Installer file waikplatform.msi
includes the Windows AIK tools. The file winpe.cab actually includes
the Windows PE source files. To install Windows PE, winpe.cab must be in
the same folder as the .msi file. |
Configuring the Build Environment
Windows AIK will install the Windows PE build and imaging tools to the following folders:
C:\Program Files\Windows AIK\Tools\ Contains Windows AIK program files
C:\Program Files\Windows AIK\Tools\platform\ Contains ImageX program files for different processor architectures
C:\Program Files\Windows AIK\Tools\PETools\ Contains Window PE source files
C:\Program Files\Windows AIK\Tools\Servicing\ Contains supporting sources files
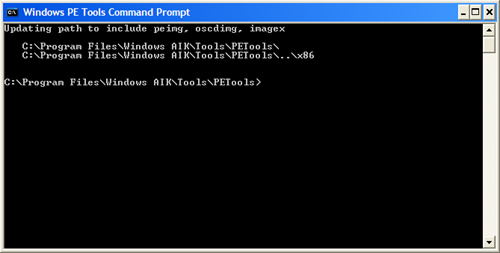
Windows AIK also provides a command prompt that opens on the Windows AIK tools folders (Figure 1).
You can use commands within this command prompt interface to create
your Windows PE build environment. The build environment is a copy of
the build scripts and Windows PE source files that you customize and
then use to create a new Windows PE image file. The Copype.cmd script is
designed to create the build environment. Use the following syntax to
create the Windows PE environment, where platform is either x86 or amd64 and destination is the folder to which you want to copy the files:
copype.cmd platform destination
Removing the Build Environment
When the Peimg utility installs components, it
modifies the access control lists (ACLs) of the Windows PE build files
and folders, making it difficult to remove them in the future. You can
work around this by using the Windows Server 2003 tool Takeown.exe to
take ownership of the affected resources.
To remove the Windows PE build environment
1. | Take ownership of the folder structure using the Takeown command:
takedown /F c:\winpe_x86\* /R
|
2. | Use the Change ACLs (cacls) command to give yourself permission to remove the folders (user is your user account):
cacls c:\winpe_x86\* /T /G user:F
|
3. | Remove the folder:
rd /s /q c:\winpe_x86\
|
