5.2 Working with Public Key Infrastructures
Public Key Infrastructures are quickly becoming a
must in most computing environments today. PKI systems generate
certificates that use a third party to prove who you are to others. This
is because each time a PKI certificate is generated, it has had to
undergo a validation process to identify who you are. For this reason,
PKI certificates provide non-repudiation; that is, they absolutely prove
who you are, no one can impersonate you because they need access to
both the private and the public keys included with the certificate.
Normally, you are the only one to have access to the private key.
PKI systems in Vista can support several uses, including the following:
Encrypting File System
Smart Card Deployments
Secure Sockets Tunneling Protocol (SSTP) VPN connections
Secure Online Transactions
Secure Web Site Connections
Digital Rights Management
Digital Signatures for e-mails and documents
Any document, even an e-mail, that includes a
certificate will ensure that the document cannot be modified when
delivered to others. In addition, certificates allow you to rapidly
identify a computer or a user in a manner that a simple user name and
password cannot. Windows Server makes it very easy to automate the
entire certificate management and deployment process. You should
integrate them to your infrastructure to enhance the security level of
your network.
However, keep in mind that for certificates to
work seamlessly, they have to be trusted by the recipient. Windows Vista
includes an embedded series of trusted root certificate authorities
that is updated regularly by Microsoft through Windows Update. If you
purchase certificates from one of these authorities—for example, Thawte,
VeriSign, GoDaddy, or others—then, your certificate will be trusted by
any computer, both those you control and those you do not control. If
you issue your own certificates, then they will not be trusted by any
computer until you import the root certificate into the target PC. You
can do this through Group Policy on computers you control. But when you
are working with user's home computers or computers in public locations,
you will not be able to rely on your own certificates. Ideally, each
certificate you rely on will originate from a trusted authority so that
it can be used either internally or externally with no worries.
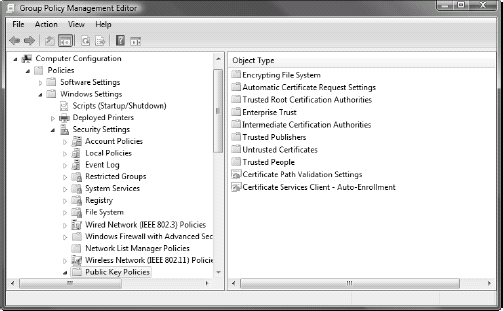
Remember that internal certificate settings are managed through Group Policy (Computer Configuration => Policies => Windows Settings => Security Settings => Public Key Policies), as shown in Figure 14.
Take the time to learn what each policy setting does before applying
it. Also, work with your server team to coordinate certificate
implementation and deployment strategies.
5.3 Working with Virtual Private Network connections
Another aspect of working with external access
is allowing remote users to access your internal network from the
Internet. These remote connections can originate from users of mobile
computers while they are on the road or users working from their home on
either a corporate or a personal computer. While these connections
relied on telephone lines in the past through modem connections, today,
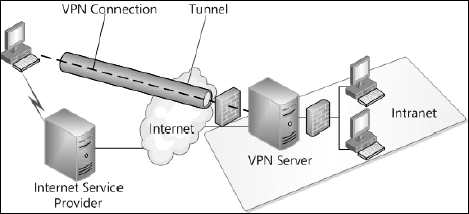
they rely on high-speed Internet connections. Because of this, the ideal
way to support these connections is through a virtual private network
(VPN) or a connection that creates an encrypted tunnel from the external
computer to the internal network protecting all data that transfers
between the two. Encryption is critical because you use a public network
to connect from the remote point to your internal network and you want
to ensure the content of the communications are protected at all times
as shown in Figure 15.
When the client makes a VPN connection, the following activities occur:
The
user initiates an Internet connection. This connection can be a wired
connection, a wireless connection or even a modem connection, though the
latter are very rarely used today.
Once
the Internet connection is active, the user launches the Connect to a
network tool in Vista to make the connection (through Control Panel,
Network and Internet, Connect to a network, or through a right-click on
the network connection icon in the Tray area, then selecting Connect to a
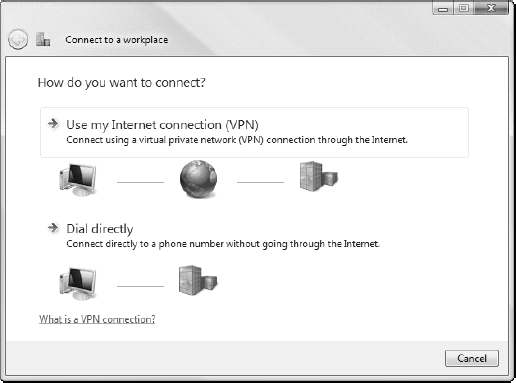
network). If this is the first time this connection is made, then the
use must use the Connect to a workplace wizard which prompts for either a
VPN or a direct dial connection as shown in Figure 16.
The user then walks through the wizard pages to identify the address of
the connection, its connection method and the credentials required for
the connection. If the connection is already established, then the user
only needs to select it and click the Connect button.
As the connection is launched, the client system contacts the hosting server and initiates the authentication process.
The hosting server authenticates the user and security information is exchanged between the client and the server.
The
VPN server will then provide the client with a new IP address. The
client system will then use this new address to communicate with the
internal network through the VPN server. All communications are
encrypted through a tunnel that only the server and the client are party
to.
Virtual private networks can also be used for
site to site connections, linking remote sites to central locations
through inexpensive Internet connections rather than through expensive
dial-up connections.
Windows Vista with Service Pack 1 and Windows Server 2008 support VPN connections using three different protocols:
Point-to-Point Tunneling Protocol (PPTP)
Layer Two Tunneling Protocol (L2TP) with Internet Protocol Security (IPSec)
Secure Socket Tunneling Protocol (SSTP)
These protocols are used to encapsulate
communications from point to point to ensure they are fully encrypted.
PPTP is the oldest protocol Microsoft supports for VPN connections; this
protocol was introduced by Microsoft as early as with Windows 95. It
supports user authentication, access controls, and the ability to apply a
connection profile that may limit the access the end user will have to
the internal network. By providing an IP address that is part of the
internal IP address pool to the end point, PPTP lets the external
computer behave as if it was directly connected to the network. In
addition, PPTP can compress data through the VPN tunnel to improve
communication speeds.
L2TP is a standard protocol that unlike PPTP,
relies on the User Datagram Protocol (UDP) portion of TCP/IP. This means
that it can work over more network platforms than PPTP. However, L2TP
does not provide all of the features of PPTP. For example, PPTP can
stand on its own because it can provide negotiation between the two
systems, encryption of the communications and authentication for the
user. L2TP only provides authentication on its own. This is why
organizations marry L2TP with IPSec; IPSec will then provide the
negotiation and encryption services while L2TP will authenticate the
user. In addition, IPSec provides for mutual machine authentication,
making sure you are linking to the right machine when you set up the
connection.
Since L2TP is more modern, many organizations
prefer to rely on this protocol along with IPSec for traditional VPNs.
However, with the release of Windows Server 2008, Microsoft is
introducing the Secure Socket Tunneling Protocol. SSTP relies on the
Secure Sockets Layer (SSL) to create a simpler but as efficient Internet
tunnel. This protocol uses the same strategy you would use when
interacting with a commercial Web site such as a bank to encrypt all
communications. The advantage of SSTP is that it relies on standard
HyperText Transfer Protocol (HTTP) sessions to provide the VPN link.
Working with HTTP is much simpler than working with IPSec or L2TP. In
addition, SSTP is secure because user credentials are not sent until an
encryption tunnel has been created, keeping them secure.
Each of the three VPN protocols relies on mutual
identification and the creation of a tunnel before secure
communications can begin. Several different authentication mechanisms
can be used for the creation of this secure tunnel, but the simplest
relies on the use of a trusted PKI certificate. In this case, client
computers will automatically trust the certificate and connections will
be implemented without the need to interact with the client system. If
you use any other authentication mechanism, you will need to perform an
activity on the client computer. For example, if you use a shared
password, then you must enter the password on the server and also enter
it on the client PC. This might work well on one or two PCs, but when
you need to create VPNs for hundreds of systems, this becomes very
impractical very quickly.
In addition, because SSTP relies on HTTP to
operate, it uses port 443 for communications between the client and the
VPN server. Port 443 is part of the standard ports that are usually open
on firewalls. This means that when you rely on an SSTP VPN, you will
most likely not need to do anything at the firewall level to have the
connection work because port 443 is one of the standard ports
organizations allow on their firewall configurations. Using either of
the other two VPN protocols would require you to open additional ports,
something that organizations are loathe to do with reason. The fewer
ports you open on the firewall, the fewer chances you have of letting
someone you don't want into your network.
5.4 Working with Network Access Protection
Vista includes a client for Network Access
Protection (NAP) that works with both Microsoft's NAP implementation in
Windows Server 2008 and/or Cisco's Network Access Control. Basically,
NAP allows you to protect your network from connections to systems that
do not meet a specific health status when they request the connection.
Connections can be through VPNs, DHCP, routers or switches, Terminal
Services, or Web pages. Each time a connection request is forwarded to
your centralized services, the client must provide its health status. If
the health status does not conform to your policies, then the client is
placed into a quarantine network where it will be updated so that it
can meet the health requirements. After the client has been updated and
it can prove so, the client is allowed to connect to the network.
NAP implementations not only allow you to create
secure networks, but can also allow you to configure who has access to
both your wired and wireless connections, making your network even more
secure than ever. And, when you support VPN connections, you can ensure
that your clients can only connect when they conform to a specific set
of rules. For computers you control, you can rely on Group Policy and
tools such as Windows Server Update Services to correct any unhealthy
status. For computers you do not control, you can redirect the user to a
Web page that outlines what the user must do to manually update their
system to meet your health requirements.
NOTE
Any computer that does not include the NAP
client, either through the application of a service pack or through its
integration into the platform, will simply not be able to connect to a
NAP-enabled network. This behavior occurs whether the client is trying
to make an internal or an external network connection.
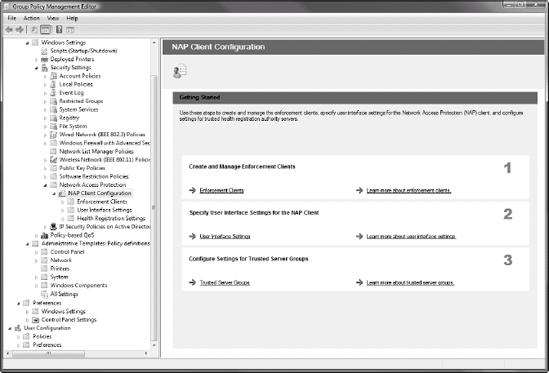
You can configure the behavior of the NAP client through Group Policy (Computer Configuration => Policies => Windows Settings => Security Settings => Network Access Protection), as shown in Figure 17.
Work with your server team to coordinate the settings you must apply to
this section and then deploy these settings to each of your PCs. Doing
this will help you create a secure network.
You'll find that you can control a series of different behaviors with NAP.
NAP relies on the Network Access Policy Service
(NAPS) in Windows Server 2008. NAPS also provides the controls for
remote access and VPN connections. This centralized control center will
work with your firewall configurations, rely on PKI certificates and
control connections to the network that originate internally through
routers, DHCP or Terminal Services or connections that originate
externally through the VPN mechanisms you put in place. NAP brings
together all of the elements of Layer 5 in the Castle Defense System to
help you implement a secure and protected network at all time.
From the client side, you find that you can control the following behaviors through NAP client management:
Enable or disable NAP enforcement
Configure
how you want the NAP client interface to appear on client computers,
controlling items such as the branding text and graphics that appear
Control to which Health Registration Authority (HRA) server or servers your clients will connect to
Control which cryptographic mechanism clients will use when connecting to HRA servers
Most of these activities are performed by the
server administrators that implement and administer the NAP service on
your Windows Server 2008 systems. However, you should familiarize
yourself with the various features and components of NAP in order to
provide assistance during this process.
