To diagnose and correct a startup problem, you need to understand what occurs during startup. Figure 1 provides a high-level overview of the different paths startup can take.
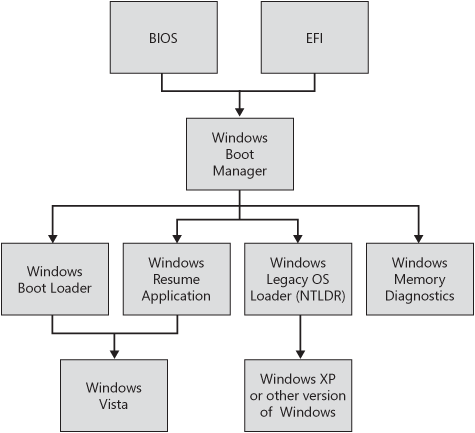
The normal startup sequence for Windows Vista is:
Power-on self test (POST) phase
Windows Boot Manager phase
Windows Boot Loader phase
This sequence will vary if the computer is
resuming from hibernation or if a non-Windows Vista option is selected
during the Windows Boot Manager phase. The following sections describe
the phases of a normal startup process in more detail.
1. Power-on Self Test Phase
As
soon as you turn on a computer, its processor begins to carry out the
programming instructions contained in the basic input/output system
(BIOS) or Extensible Firmware Interface (EFI). The BIOS or EFI, which
are types of firmware, contain the processor-dependent code that starts
the computer regardless of the operating system installed. The first set
of startup instructions is the power-on self test (POST). The POST is
responsible for the following system and diagnostic functions:
Performs initial hardware checks, such as determining the amount of memory present
Verifies that the devices needed to start an operating system, such as a hard disk, are present
Retrieves system configuration settings from non-volatile memory, which is located on the motherboard
The contents of the non-volatile memory remain
even after you shut down the computer. Examples of hardware settings
stored in the non-volatile memory include device boot order and Plug and
Play information.
After the motherboard POST completes, add-on
adapters that have their own firmware (for example, video and hard drive
controllers) carry out internal diagnostic tests.
If startup fails before or during POST, your
computer is experiencing a hardware failure. Generally, the BIOS or EFI
displays an error message that indicates the nature of the problem. If
video is not functioning correctly, the BIOS or EFI usually indicates
the nature of the failure with a series of beeps.
To access and change system and peripheral
firmware settings, consult the system documentation provided by the
manufacturer.
2. Initial Startup Phase
After the POST, computers must find and load the
Windows Boot Manager. Older BIOS computers and newer EFI computers do
this slightly differently, as the following sections describe.
Initial Startup Phase for BIOS computers
After the POST, the settings that are stored in
the non-volatile memory, such as boot order, determine the devices that
the computer can use to start an operating system. In addition to
floppy disks or hard disks attached to ATA, Serial ATA, and SCSI
controllers, computers can typically start an operating system from
other devices, such as:
It is possible to specify a custom boot order,
such as “CDROM, Floppy, Hard Disk.” When you specify “CDROM, Floppy,
Hard Disk” as a boot order, the following events occur at startup:
The
computer searches the CD-ROM for bootable media. If a bootable CD or
DVD is present, the computer uses the media as the startup device.
Otherwise, the computer searches the next device in the boot order. You
cannot use a nonbootable CD or DVD to start your system. The presence of
a nonbootable CD or DVD in the CD-ROM drive can add to the time the
system requires to start. If you do not intend to start the computer
from CD, remove all CDs from the CD-ROM drive before restarting.
The
computer searches the floppy disk for bootable media. If a bootable
floppy is present, the computer uses the floppy disk as the startup
device and loads the first sector (sector 0, the floppy disk boot
sector) into memory. Otherwise, the computer searches the next device in
the boot order or displays an error message.
The
computer uses the hard disk as the startup device. The computer
typically uses the hard disk as the startup device only when the CD-ROM
drive and the floppy disk drive are empty.
There are exceptions in which code on bootable
media transfers control to the hard disk. For example, when you start
your system by using the bootable Windows Vista DVD, Setup checks the
hard disk for Windows installations. If one is found, you have the
option of bypassing DVD startup by not responding to the Press Any Key
To Boot From CD or DVD prompt that appears. This prompt is actually
displayed by the startup program located on the Vista DVD, not by your
computer’s hardware.
If startup fails during the initial startup
phase, you are experiencing a problem with the BIOS configuration, the
disk subsystem, or the file system. The following a error message is
common during this phase. It indicates that none of the configured
bootable media types were available.
Non-system disk or disk error
Replace and press any key when ready
If you have changed the disk configuration
recently, verify that all cables are properly connected and jumpers are
correctly configured. If booting from the hard disk, verify that all
removable media has been removed. If booting from a CD or DVD, verify
that the BIOS is configured to start from the CD or DVD and that the
Windows Vista media is present. If the disk subsystem and BIOS are
configured correctly, the problem may be related to the file system.
If you boot from the hard disk, the computer
reads the boot code instructions located on the master boot record
(MBR). The MBR is the first sector of data on the startup hard disk. The
MBR contains instructions (called boot code) and a table (called a
partition table) that identify primary and extended partitions. The BIOS
reads the MBR into memory and transfers control to the code in the MBR.
The computer then searches the partition table
for the active partition, also known as a bootable partition. The first
sector of the active partition contains boot code that enables the
computer to do the following:
Read the contents of the file system used.
Locate
and start a 16-bit stub program (Bootmgr) in the root directory of the
boot volume. This stub program switches the processor into 32- or 64-bit
protected mode and loads the 32- or 64-bit Windows Boot Manager, which
is stored in the same bootmgr file. Once the Windows Boot Manager loads,
startup is identical for both BIOS and EFI computers.
Note
The stub program is
necessary because 32-bit and 64-bit computers first start in real mode.
In real mode, the processor disables certain features to allow
compatibility with software designed to run on 8-bit and 16-bit
processors. The Windows Boot Manager is 32-bit or 64-bit, however, so
the stub program sets up the BIOS computer to properly run the 32-bit or
64-bit software. |
If an active partition does not exist or if
boot sector information is missing or corrupt, a message similar to any
of the following might appear:
Error loading operating system
If an active partition is successfully located,
the code in the boot sector locates and starts Windows Boot Loader
(WinLoad) and the BIOS transfers execution to it.
Initial Startup Phase for EFI Computers
Startup for EFI computers initially differs
from startup for BIOS computers. EFI computers have a built-in boot
manager that enables the computer’s hardware to choose from multiple
operating systems based on user input. When you install Windows Vista on
an EFI computer, Windows Vista adds a single entry to the EFI boot
manager with the title Windows Boot Manager. This entry points to the
“\Efi\Microsoft\Boot\Bootmgfw.efi” 32-bit or 64-bit EFI executable
program—the Windows Boot Manager. This is the same Windows Boot Manager
that is eventually loaded on BIOS-based
computers. Windows Vista configures the EFI boot manager to display the
EFI startup menu for only two seconds and then load the Windows Boot
Manager by default to minimize complexity and startup time.
If you install a different operating system or
manually change the EFI boot manager settings, EFI might no longer load
the Windows Boot Manager.
