In a peer-to-peer network, each computer can act as
both a client and a server. You’ve seen how to use a Windows XP machine
as a client, so now let’s turn our attention to setting up your system
as a peer server. In Windows XP, that means sharing individual drives,
folders, printers and other resources with the network.
Deactivating Simple File Sharing
The first thing you need
to do is deactivate Windows XP’s Simple File Sharing feature. This
feature is designed for novice users who, understandably, don’t want or
need to learn about technical topics such as maximum users and file
permissions. Windows XP activates Simple File Sharing by default, even
on Windows XP Professional installations. (Note, however, that you can’t
turn off Simple File Sharing in Windows XP Home; yet another reason to
always choose Windows XP Professional.)
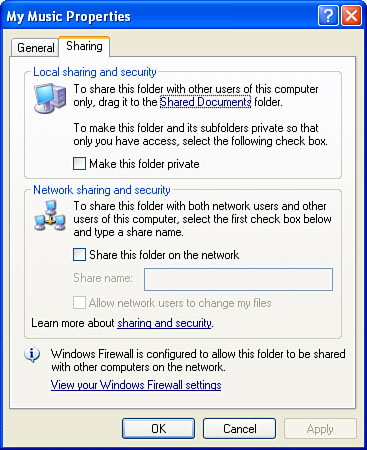
To help you understand the difference between simple and classic file sharing, Figure 1
shows the property sheet for the My Music folder on a system using
Simple File Sharing. Notice the following in the Sharing tab:
In the Local Sharing and Security group, you activate Make This Folder Private to prevent other users from accessing the folder.
In
the Network Sharing and Security group, you activate Share this Folder
on the Network to share the folder, and you type a name in the Share
Name text box. If you want network users to be able to modify the files,
you activate the Allow Network Users to Change My Files check box.
As you can see, what
this approach adds in ease of use it takes away in power and
flexibility. It’s an all-or-nothing, one-size-fits-all-users approach.
To regain the power and flexibility to share your resources properly,
you need to run off Simple File Sharing by following these steps:
1. | Launch Control Panel’s Folder Options icon (or, in Windows Explorer, select Tools, Folder Options).
|
2. | Display the View tab.
|
3. | Deactivate the Use Simple File Sharing check box.
|
4. | Click OK. |
Creating User Accounts
You need to set up an account for each user that you want to access a shared resource. Here are some notes to bear in mind
for creating users who will access your computer over a network:
Windows XP does not
allow users without passwords to access network resources. Therefore,
you must set up your network user accounts with passwords.
The
usernames you create do not have to correspond with the names that
users have on their local machines. You’re free to set up your own
usernames, if you like.
If
you create a user account that has the same name and password as an
account of a user on his or her local machine, that user will be able to
access your shared resource directly. Otherwise, a Connect To dialog
box appears so that the user can enter the username and password that
you established when setting up the account on your computer.
Sharing a Resource
With Simple File Sharing turned off, follow these steps to share a resource:
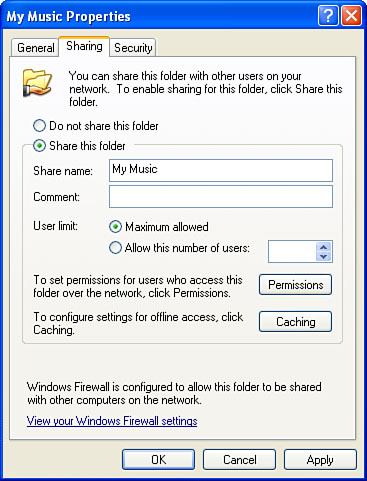
1. | In
Windows Explorer, right-click the drive or folder and then click
Sharing and Security. Windows XP displays the object’s property sheet
with the Sharing tab selected, as shown in Figure 2.
|
2. | Activate the Share This Folder option.
|
3. | Type the share name and a comment (the latter is optional).
|
4. | In
a small network, it’s unlikely you’ll need to restrict the number of
users who can access this resource, so leave the Maximum Allowed option
activated. (The maximum number is 10.) If you’d prefer to restrict the
number of users, activate Allow This Number of Users and then use the
spin box to set the maximum number.
|
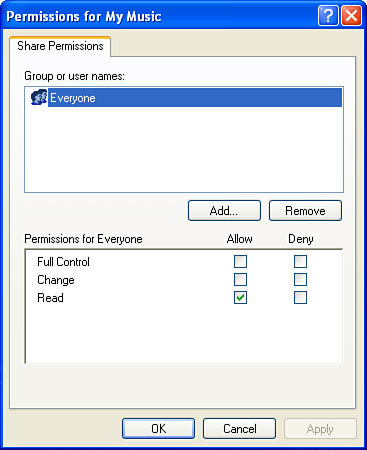
5. | Click Permissions to display the Permissions dialog box (see Figure 3).
|
6. | Select the Everyone group in the Group or User Names list and then click Remove.
|
7. | Click Add to display the Select Users or Groups dialog box.
|
8. | In
the Enter the Object Names to Select text box, type the name of the
user or users you want to give permission to access the shared resource.
(Separate multiple usernames with semicolons.) Click OK when you’re
done.
|
9. | Select a user in the Group or User Names list.
|
10. | Using the Permissions list, you can allow or deny the following permissions:
| Read | Gives
the group or user the ability only to read the contents of a folder or
file. The user can’t modify those contents in any way. | | Change | Gives the group or user Read permission and allows the group or user to modify the contents of the shared resource. | | Full Control | Gives the group or user Change permission and allows the group or user to take ownership of the shared resource. |
|
11. | Repeat steps 7–10 to add and configure other users.
|
12. | Click OK to return to the Sharing tab.
|
13. | Click OK to share the resource with the network.
Tip
If you want even more
control over how your shared resources are used over the network, you
should also set NTFS security permissions on the folder. (Ideally, you
should do this before sharing the resource.) To do this, right-click the
folder, click Sharing and Security, and then display the Security tab.
This tab is similar to the Permissions dialog box shown in Figure 3, except that you get a longer list of permissions for each group or user.
|
Hiding Shared Resources
Hiding your valuables
is a time-honored method of securing them from prying eyes and would-be
thieves. When you share a resource on your network, however, you’re
displaying that resource for all to see. Sure, you can set up
password-protected user accounts and set the appropriate permissions for
the resource, but others will still be able to see that the resource is
shared.
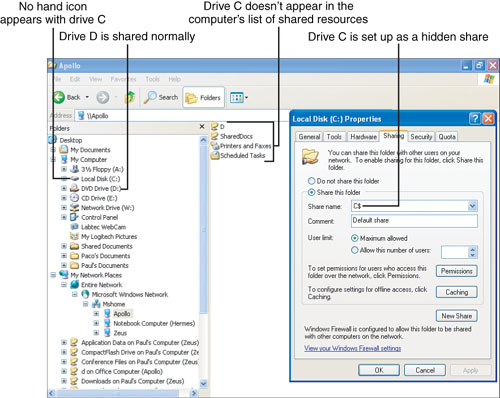
To prevent this situation, it’s possible to share a resource and hide it at the same time. It’s also extremely easy to do: When you set up the shared resource, just add a dollar sign ($) to the end of the share name. For example, if you’re setting up drive D for sharing, you could use D$ as the share name. This prevents the resource from appearing in the browse list of My Network Places.
In Figure 4,
for example, you can see that the current computer (named Apollo) is
sharing drive D (which shows the hand icon to indicate that it is
shared) and drive C, which according to the display property sheet, is
shared with the name C$. Notice two things:
|
Hiding shares will work for the average user, but a savvy snoop will probably know about the $
trick. Therefore, you’ll probably want to set up your hidden shares
with nonobvious names. Note, however, that Windows XP sets up certain
hidden shares for administrative purposes, including one for drive C (C$) and any other hard disk partitions you have on your system. Windows XP also sets up the following hidden shares:
| Share Name | Shared Path | Purpose |
|---|
| ADMIN$ | %SystemRoot% | Remote administration | | IPC$ | N/A | Remote interprocess communication | | print$ | %SystemRoot%\System32\spool\drivers | Access to printer drivers |
You cannot delete or rename these administrative shares.
|
How do you connect to a
hidden share? Well, you need to know the name of the shared resource, of
course. When you know that, you can use any of the following
techniques:
In the Run dialog
box, type the UNC path for the hidden resource. For example, to display
the hidden C$ share on ZEUS, you would enter this:
In
Windows Explorer, make sure that a shared resource isn’t highlighted,
and then select Tools, Map Network Drive. In the Map Network Drive
dialog box, type the UNC path for the hidden share in the Path text box.
For
a hidden shared printer, run the Add Hardware Wizard from Control
Panel, and when you’re prompted, enter the UNC path to the hidden
printer.
