Mousing around the Windows Home Server Console UI is a
nice way to see what's available, but it's time to take a closer look
at each of the core features of Windows Home Server, with an emphasis on
the benefits that each feature offers.
1. PC Backup and Restore
With the advent of Windows
Home Server, Microsoft now offers multiple levels of backup protection
to Windows users. Windows 7 features the Backup and Restore control
panel, for image-based backup of the entire PC as well as more typical
file backup. Windows 7 also includes Previous Versions, a way to
retrieve older versions of documents and other files directly from the
file system, as well as tools such as System Restore.
Windows Home Server
offers another level of backup protection via its PC Backup
functionality. This Windows Home Server feature provides a centralized
backup solution that applies to all of the PCs on your home network (up
to 10 PCs). Sure, you could individually configure a Windows 7 Backup on
each PC, but Windows Home Server is a better solution because the
backups are stored in a more logical place—the headless "back room" Home
Server—and because it reduces the required hard drive space by not
creating duplicate copies of files that haven't changed.
Windows Home Server Backup
provides two basic services: it backs up the entire PC and then
performs incremental backups on a daily basis going forward, enabling
you to restore your computer to a previous state using a Computer
Restore CD that's included with the server. It also provides a way to
access and restore individual files and folders, similar to the way
Previous Versions works on the local system.
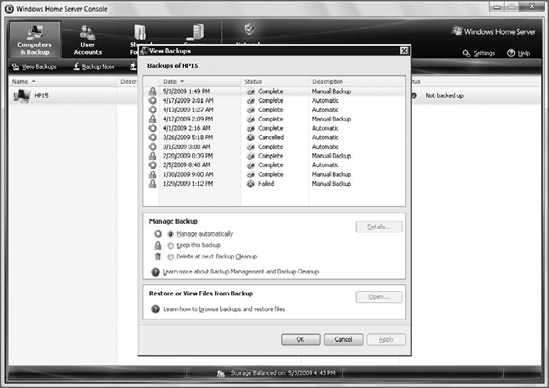
This interface is a bit hard
to find. Open the Windows Home Server Console and navigate to the
Computers & Backup tab. Then, right-click the computer whose backups
you'd like to access and choose View Backups. The dialog shown in Figure 1 will appear.

To access backed-up files
from a specific date, choose the date from the list at the top and then
click Open. If the backup contains files backed up from two or more
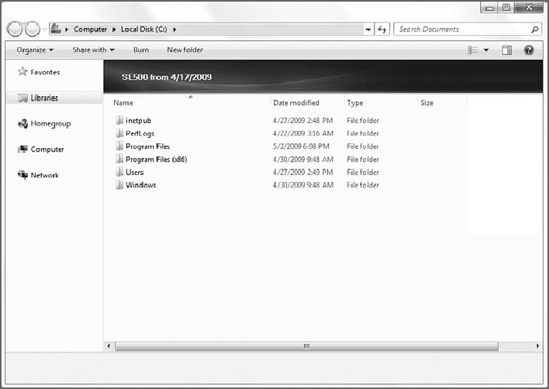
drives or partitions, you'll be prompted to pick one. Then, Windows Home
Server will open the backup—a process that can take a few minutes
depending on the size of the backup—and provide a standard Explorer
window, like that shown in Figure 2.
From here, you can
navigate around the virtual file system of the backup, find the files
you need, and drag and drop them onto your PC as you would any other
files. When you close this special Explorer window, the connection with
the backup is lost.

2. PC and Server Health Monitoring
Windows Home Server includes
health monitoring, both for the server itself and all of the connected
PCs. The overall health of the entire network—the home server and all of
the connected clients—is optionally communicated via the Windows Home
Server Connector icon that appears in the notification area of any
connected PCs. If it's green, all is well; yellow indicates a risk; red
is a critical problem; and blue means that the PC is being backed up.
Windows Home Server
monitors several things to determine overall health. On the server, it
monitors the integrity and free space of the attached hard drives (both
internal and external). On the PC clients, it monitors backups to ensure
they're proceeding without problems, and, on Vista systems in
particular, it integrates with Windows Security Center to ensure that
each PC is up-to-date with anti-virus and other security controls. That
way, you know when a PC elsewhere in the house is behind on updating its
security features and can take proactive steps to correct the
situation.
Notifications, which appear
when there are issues, can be annoying, as anyone who has used Windows
OneCare or similar notification-based security software will know, but
individual users can elect to just turn off tray-based health
notifications, which isn't a bad idea for all the non-administrators in
the house (that is, everyone else in your family).
3. Document and Media Sharing
While it's relatively simple
to share content with HomeGroups or even create a shared folder manually
on a Windows 7 PC, Windows Home Server builds on this basic
functionality in a number of ways. From a general standpoint, a server
is an ideal place to store file archives of any kind, though this may be
a foreign concept to many consumers currently. Though we had both been
using Windows Server–based servers for years at home, we switched over
entirely to Windows Home Server when the product first shipped in late
2007. It's a product we both use and recommend, for its simplicity,
functionality, and extensibility.
From a file-sharing
perspective, Windows Home Server works like any Windows-based machine.
It includes a number of prebuilt shares, such as Music, Photos, Public,
Software, and Videos, and it creates a default share for each user you
create (at \\home-server\users\username
by default). These shares have standard rights associated with them, so
whereas even a guest has read access to the Public folder, only a user
who was explicitly given the correct credentials can access any share
with Full rights. The UI for configuring this is far simpler than what's
available in Windows 7, and you can, of course, add other shared
folders if you wish. To do so, just navigate to the Shared Folders tab
in the Windows Home Server Console and click the Add toolbar button.
Windows Home Server isn't
just about simplicity. In addition to making it very easy to access and
control access to whatever is available on the server, Windows Home
Server also includes a unique and innovative approach to disk storage.
Instead of using the arcane drive letter layout that still hobbles
Windows 7 today, any hard drive you connect to Windows Home Server is
added to the pool of available storage, and you don't need to deal with
any disk management arcana. Just plug in the drive, external or
internal, navigate to Server Storage, right-click it, and choose Add.
In a nice nod to future
expansion, Windows Home Server will work with as much storage as you can
throw at it, and it's basically limited only by the USB 2.0, FireWire,
ATA, and S-ATA connections on your server. Our Home Server setups both
utilize about 4TB of storage, although much of that is used for file
duplication.
Indeed, this file
duplication functionality is another innovative Windows Home Server
feature. Rather than burden users with complicated existing technologies
like RAID, Windows Home Server instead supplies a very simple interface
that ensures that important files are duplicated across at least two
physical drives, so if one drive fails, you won't lose anything
critical. Paul has configured Windows Home Server so that all of his
digital photos and documents are duplicated in this fashion, for
example, while videos are not. File duplication is configured on a
per-share basis and is automatic if you have two or more drives
connected. You can, however, configure this feature as you will.
Finally, Windows Home Server
also makes it easy to remove storage. This way, if you want to disable
older, less voluminous storage devices and plug in newer, bigger drives,
you can do so without interruption. Windows Home Server first copies
whatever data is on the older drives to other drives, and then it
removes that drive from the storage pool so you can disconnect it.
(Obviously, this requires enough free space on other drives.) It's a
brilliant scheme and works as advertised.
NOTE
More important,
perhaps, you can also use the Windows 7 Library feature to monitor
Windows Home Server–based folder locations alongside those that are
available on your local PC. The Windows 7 Documents, Pictures, Music, and Videos libraries
automatically aggregate content from two locations each on your PC.
There's no reason you couldn't also include locations on your Home
Server. After all, that's where your content will typically reside
anyway.
Here's how: using the
Pictures Library as an example, say that you would like this library to
monitor a Windows Home Server–based Photos share as well as whatever
local folders are already being monitored. To do so, open the Pictures
Library and click the locations link under the Pictures Library name in
the folder header. This opens the Pictures Library Locations window.
Click Add to add a new location. Then, browse to your Home Server's
Photos share on the network and click Include folder. Then, click the OK
button to close the Pictures Library locations window.
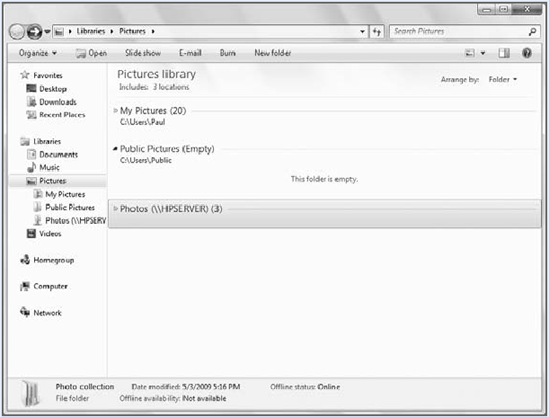
Now, as shown in Figure 3,
you can see that the Pictures Library is monitoring three locations:
the My Pictures and Public Pictures folders on your local PC, and the
Photos share on your Home Server.
