With the main document, fields, and address list all
buttoned up, you can merge everything together. Before taking that final
step, it’s a good idea to preview the results of the merge to see how
the documents are going to look.
Previewing a Mail Merge
After you actually merge the
document and address list, it’s tough to go back and fix mistakes if the
merge creates a lot of copies. To avoid that possibility, you can
preview each document that will result from the mail merge to check for
errors. If the mail merge will create a lot of documents, you can skip
around and check a selected few. Here’s how to preview a mail merge:
1. | With
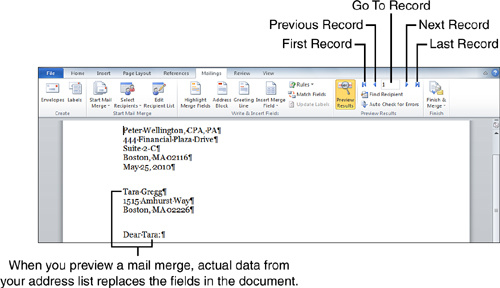
the main document and the Mailings tab open, click Preview Results.
Word replaces the fields with data from the first row of your address
list, as shown in Figure 1.

|
2. | To preview other documents, do any of the following:
- Click Previous Record to view the preceding merged document.
- Click Next Record to view the next merged document.
- Click First Record to jump to the first merged document.
- Click Last Record to jump to the final merged document.
- Click the Go to Record text box and type a number to go to a specific document.
|
3. | Click Preview Results again to exit preview mode. The fields become visible again in the main document.
|
Creating Merge Documents for Printing
When you finally
merge everything together, you can send the finished documents directly
to a printer, open them on the screen to edit them, or send them out as
email messages.
1. | Save the document one more time, just to be safe.
|
2. | On the Mailings tab, click Finish & Merge.
|
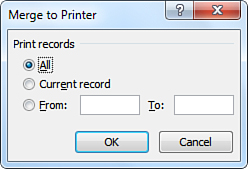
3. | From the drop-down menu, click Print Documents. The Merge to Printer dialog box opens, as shown in Figure 2.

|
4. | Click one of the following options:
- All: Prints all the merged documents.
- Current Record: Prints only the document open on the screen and populated with information from the address book.
- From:
Prints a selected range of contiguous merged documents. After selecting
this option, click the From box and type the number of the first
document you want to print; then click the To box and type the number of
the last document you want to print.
|
5. | Click OK. The Print dialog box opens.
|
6. | Set
any printing options you want; then click OK to send the documents to
your printer.
|
If you click Edit Individual
Documents in the Finish & Merge menu, Word displays the Merge To New
Document dialog box, which looks and functions exactly like the Merge
To Printer dialog box. After you specify which documents to merge, Word
merges them into a single, long document. Within the new document, the
merged documents are separated by section breaks. By merging the
documents this way, you can review and edit each one before printing or
emailing any of them.