Suppose you're responsible for planning your
departmental retreat, appropriately scheduled to coincide with the
circus that's coming to town. It's a great opportunity for team-building
and entertainment. You've entered work resource rates and material
resource costs. You've also diligently assigned resources to their
tasks. Project multiplies task time by resource cost rates, and suddenly
something magical happens—reliable cost information about your tasks
and the project as a whole appears in your Project file.Add any necessary cost resources or miscellaneous fixed costs to tasks that need them—and your cost forecasts are now looking pretty accurate. In
this section, you'll learn about the importance of entering accurate
costs for labor and materials. You'll also learn how to assign cost
resources to tasks and how to specify the costs for those assignments.
Finally, you'll learn how to enter a miscellaneous cost for a task if
needed.
1. Assigning Cost Resources to TasksNow
you're ready to assign your cost resources. Remember those cost items
that contribute to tasks but have no bearing on the schedule? Items like
lodging, rentals, or printing can't make a task finish any faster, and
yet they contribute to the project cost, so you must figure them in. The
departmental retreat project is teeming with cost resources. 1.1. Assigning cost resources with the Assign Resources dialog boxAfter
you create cost resources in the Resource Sheet, it's time to assign
them to the appropriate tasks and enter their cost for that particular
assignment. Here are the steps: Display any task-oriented view. You
may gravitate to the all-purpose Gantt Chart view, but you can assign
resources to tasks in the Network Diagram, Calendar view, Task Usage
view, or any other task-oriented view. Choose Resource→Assignments→Assign Resources. The Assign Resources dialog box opens. In the task list, select the task to which you want to assign a cost resource. Project
aficionados know that the Assign Resources dialog box is one of the few
dialog boxes that can stay open while you do something in the active
view. In the Assign Resources dialog box, select the name of the cost resource, and then click Assign. A
checkmark appears next to the cost resource's name, which scoots up
near the top of the list of resources with other resources already
assigned to the selected task. In the Cost column for the assigned cost resource, type its cost for the task. What
makes cost resources so useful is that they don't have a set cost
value—you can enter a different cost for each task to which you assign a
specific cost resource. But since it's a single cost resource, you can
also see how much you're spending on that one cost resource across all
the tasks to which it's assigned. For
example, suppose you need to assign the "Conference Room Rental" cost
resource to two different tasks: "Conduct day 1 of retreat" and "Conduct
day 2 of retreat." Day 1 is a full 8-hour day, and the cost is $200.
Day 2 is just a 5-hour day, so the conference room rental cost for that
day is only $125. You select
the "Conduct day 1 of retreat" task, assign the "Conference Room Rental"
resource to it, and then, in the Cost column, enter $200.
Then you select the "Conduct day 2 of retreat" task, assign the
"Conference Room Rental" resource to it as well, and then, in the Cost
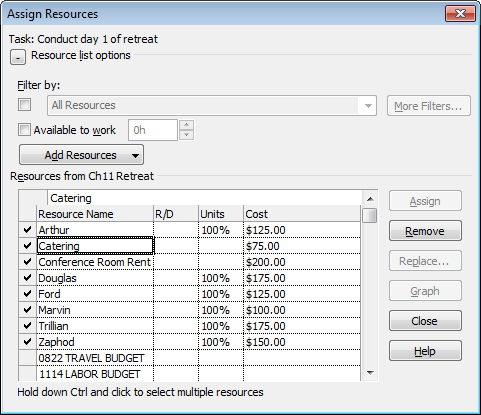
column, enter $125. If the same task uses a second cost resource, select its name, as shown in Figure 1, and then click Assign. For
example, you might have a cost resource called "Catering" that goes
with the "Conduct Day 1 of Retreat" task in addition to the "Conference
Room Rental" cost resource. To assign cost resources to another task, select the task, and then repeat steps 4–6. When you're finished assigning cost resources, click Close to close the Assign Resources dialog box.
You
don't even have to know the cost for a cost resource when you're
assigning it to a task. Go ahead and make the assignment, and then add
the cost later. Even better, enter a ballpark figure in the Assign
Resources dialog box's Cost field, so you have some kind of cost
estimate for the task. Enter a task note indicating that you're waiting
on cost information, as illustrated in Figure 2. That way, you won't lead yourself, or anyone else, astray. (The box on Entering a Task Note describes how to document items you're waiting for using task notes.) 

Tip: The
Assign Resources dialog box isn't the only game in town for entering or
changing cost resource costs. You can also use the Task Information
dialog box. The Resources tab lists all resources assigned to the
selected task. The Cost column is available for your editing pleasure.
Task
notes are the electronic equivalent of a yellow sticky note for tasks.
You may find such notes handy for a quick reminder to yourself that
you're awaiting some cost information. The note can also be as elaborate
as a copy of an email from a supplier providing a full breakdown of
their cost estimate to you. Of course, the note can be about
anything—not just costs. Select
the task for the note, and then choose Task→Properties→Task Notes,
which incidentally looks like a yellow sticky note. Project opens the
Task Information dialog box's Notes tab. Type or paste your note, and
then click OK. In some
views, like the Gantt Chart view with the typical Entry table applied, a
little note icon appears in the indicators column to the left of the
Task Name column. You can just rest your mouse pointer over that icon to
read the note in a pop-up. Otherwise, double-click the task to open the
Task Information dialog box. Select the Notes tab, and then read or
revise the note as you will. |
1.2. Assigning cost resources in a tableYou
can also add cost resource values in a usage view's table area, because
these views show assignments. To enter costs in the Task Usage view or
Resource Usage view, do the following: Display the view you want. Choose
Task Usage if you want to see the assigned resources under each task.
Choose Resource Usage if you want to see the assigned tasks under each
resource. With either usage view, you get to see assignments, that intersection of tasks with resources, and you can get additional assignment information you can't see anywhere else. In
the table area on the left, right-click the column heading next to
where you want to add the Cost column, and then choose Insert Column. In
the "Field name" drop-down list, type cost to quickly scroll to and choose the Cost field. Project
displays the Cost column in the sheet to the left of the selected
column. In the Task Usage view, the Cost field for the task and resource
assignment are both editable. However, in the Resource Usage view, the
Cost field is editable only for the assignment (the task name under the
resource name). Enter or change the cost information for assigned cost resources as necessary. When
you change cost information for an assignment in a usage view, the cost
at the rolled-up summary level (the task cost) changes to reflect the
additional assignment cost. The box on Specifying When Costs Are Incurred explains how you can define exactly when costs are incurred.
Ordinarily, when you enter costs for
cost resources, they're prorated and distributed equally over the task
duration. For example, suppose you assigned a cost resource of "Airfare"
at $200 to a 5-day task. Project automatically distributes the $200
across the 5 days for $40 each day. In the Resource Sheet, you can
change a resource's Accrue At field to Start or End if you want the cost to be incurred on the task's start date or finish date. However,
if you want to change when one instance of a cost resource is incurred,
you can do that in the time-phased portion of the Task Usage or
Resource Usage view. In this example, it makes sense for the full $200
to show up on the task's start date. To do that, follow these steps: Choose View→Task Views→Task Usage or View→Resource Views→Resource Usage. Choose Format→Details and then turn on the Cost checkbox. This adds the Cost row to the time-phased portion of the usage view. Enter or change the time-phased cost information for the cost resource as you wish.
|
2. Entering an Oddball Cost for a TaskEvery
once in a while a miscellaneous cost crops up that may not warrant the
creation of a cost resource. For example, the "Clown workshop
team-building activity" task requires rubber noses and a couple of pairs
of oversized shoes. One option is to set up one catch-all cost
resource, for example called Miscellaneous Costs. However, if you know
this task is the only one that needs this kind of cost, a fixed cost tied to the task is quicker. Here's how you enter a fixed cost: Display any task sheet view. Examples of task
sheet views include the good old Gantt Chart view, the Tracking Gantt,
and the Task Entry view. All you need is a table area for task
information Display the Cost table by choosing View→Data. Click the down arrow next to Tables and then, on the drop-down list, choose Cost. In
the upper-left corner of the table, you can also right-click the Select
All cell, at the intersection between the first row and the first
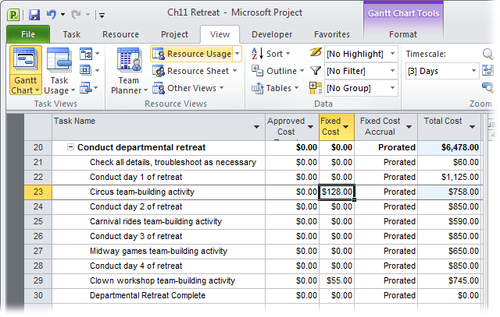
column. In the menu that appears, choose Cost. The Cost table appears,
as shown in Figure 3. 
Select the Fixed Cost cell for the task, and then type the cost. If necessary, select the Fixed
Cost Accrual field for the task, and then select Prorated, Start, or
End to indicate when the cost should be incurred during the task
duration. The typical accrual for
fixed costs is Prorated, which means the fixed cost is divided into
equal portions across the task's duration. For example, if you have a
fixed cost of $100 on a 5-day task, the prorated setting incurs $20 each
day, which you can see if you add the Cost field to the time-phased
portion of the Task Usage or Resource Usage view. Change
the fixed cost accrual to Start if you want the full cost to be
incurred on the day the task begins. Change the accrual to End if you
want the full cost to be incurred on the day the task ends. Which one
you choose can depend on the nature of the cost or your accounting
guidelines. You can change
the typical method for fixed-cost accrual for the current project.
Choose File→Options. In the Project Options dialog box, choose Schedule.
Under "Calculation options for this project", in the "Default fixed
cost accrual" box, select Start, End, or Prorated. This setting takes
effect for all new tasks you create.
Tip: Although
you can enter fixed costs easily enough, there's nothing that makes you
explain what the cost is for. Unless it's stunningly obvious, a
notation about the cost is always a good idea. A task note,
is one way to describe a fixed cost. If you have multiple fixed costs
throughout your project, consider using a custom text field instead.
After you create the custom field , add it to the Cost table next to the Fixed Cost field so the fixed-cost description sits right next to the cost it describes.
Summary
tasks can have fixed costs, too. Entering a fixed cost on a summary
task is helpful when a cost corresponds to a project phase, rather than
just an individual task. Add fixed costs to a summary task in the same
way you add them to regular tasks. You
may wonder how you can add a fixed cost to a summary task. The other
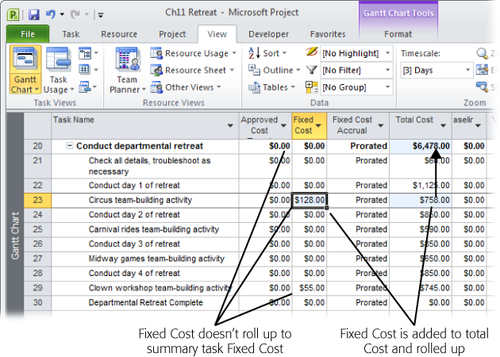
cost fields, like Total Cost, roll up subtasks' values to calculate the
corresponding cost for the summary task. However, as shown in Figure 4, Project doesn't roll up the Fixed Cost field, which can be both convenient and perplexing. 
You can also enter a fixed
cost for the project as a whole. To do this, you must first show the
project summary task. Choose Format→Show/Hide, and then, turn on the
Project Summary Task checkbox. Apply the Cost table as usual, and then,
in the project summary task, enter the fixed cost.
|